How Difficult? Non-skid f’glass crack repair ...

ThorSen

Active Member
Aug 17, 2017
219
Western North Carolina
Boat Info
2018 SPX 190 OUTBOARD 150
Engines
150 4-stroke Mercury outboard
Goooood morning and Happy New Year, CSR all !!!

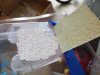
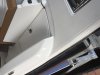
My question is: how difficult would it be for me to “learn on The Admiral’s boat” (her pride and joy) how to repair the crack in the attached photos?

Q-2: Is such an undertaking even advisable , for the first time, in a spot that is so conspicuous? (pretty much the first spot people look when stepping onto the boat :-/

Q-3: What materials, products, tools would one need and where would be the best place to source said specialty items?

Arghhhh! Discovered yet ANOTHER (second) crack or defect in the battery hatch cover ... mere inch(es) away from the one we had repaired a couple years ago (thanks entirely to CSR member Aaronpav, who referred us to a young, local glass guru who made the 1-hour drive up from Lake Norman to repair that first crack with the boat on our dock lift ...)

Alas, and despite the handsome we paid - and are more than willing to pay again - that young craftsman is now fully involved in his post grad thesis and it appears will be unable to help us out, this go round.

The time, expense, hassle and more hassle involved in trying to get the boat to a dealer far, far outweighs such a small defect, at least in my mind*

I have come up empty on finding anyone who is both qualified AND willing to do the repair with the boat up on our dock lift (even though it is under cover with ample lighting and full electric availability, etc.)

*Part of me is wondering if that whole area, if not the entire hatch cover, is somehow defective but, something tells me trying to obtain a factory replacement now that we’ve had the boat 3 years (not to mention the dealer is far, far away) would be like spitting up a rope ...

So, I am left to wondering if it is worth the risk involved (both domestic and financial (I figure boat depreciation will result if I gum the job up :-/ for me to try and tackle this repair myself, for the first time ever .... (very difficult swallow)

Full disclosure: I tend to OCD everything ....
 

Attachments

  • A5229DE3-8FD3-4154-9230-8047B31ACD83.jpeg
    A5229DE3-8FD3-4154-9230-8047B31ACD83.jpeg
    81.3 KB · Views: 179
  • 6D0024F4-6C1A-47E9-B4D0-2E58B424B384.jpeg
    6D0024F4-6C1A-47E9-B4D0-2E58B424B384.jpeg
    93.1 KB · Views: 199
  • 44DA3592-CE70-43AE-8450-814286D1798D.jpeg
    44DA3592-CE70-43AE-8450-814286D1798D.jpeg
    121.9 KB · Views: 182
I'd look into a new hatch. Don't know that you'll ever get that spot "perfect."
 
Looking closely at that third pic- yes I do think that is a defect. It looks like an air void. I see where that previous repair you had done is - was that the same kind of thing? Air voids are covered under warranty - that should be a no cost thing to you. I'd really try and get your dealer involved - although being a small part, you could start by sending those pictures to your dealer and then you can mail the part to them if you don't want to make the drive. Most likely, Sea Ray will have your dealer fix it - but if need be, that part would still be available if the warranty "fix" turned out to be replacement, instead. Get your dealer involved in this - they need to be your first contact, not corporate.

But, yeah, you don't want to learn how to do this kind of repair (in such a visible area) on your own boat. Especially since your warranty will take care of it.
 
If this is your first attempt at repairing non-skid gelcoat, I recommend you save your time and money and get a pro with experience to do it. Non-skid is very difficult to match. Most pros buy a piece of mold pattern PVC (sold in sheets that is made with the female non-skid pattern molded in the surface. You apply the gelcoat then place the mold material over the deck being careful to interlock the male area on the deck with the female pattern on the mold material, then force the air from underneath. Air left under the mold material gives you an air void and a certain do-over. Mis-aligning the mild material with the deck and there is another certain do-over, go OCD on the repair and lift the mold before the gelcoat fully kicks and you get a real mess on your hands. Miss the alignment of the mold and deck by even a few thousandths and it is another do-over. Do-overs on non-skid are horrible to correct because all the gelcoat you put on the repair has to be removed to do the repair over.

Another way with this type of non-skid is to fill the hole with resin and thickener then shoot gelcoat over the repair and saw the non-skid pattern in the repair with something like a fine tooth meat saw blade. Takes a very steady hand and the patience of God.

Either way, you shouldn't just go for it. Go find some scrap fiberglass in a boat yard and take it home and practice about 10 times or until you get the hang of handling the non skid. Even the best fiberglass guys hate repairs where they have to deal with a non-skid match and give you the "It might not match " disclaimer.

My advice is to go find the guy that did the previous repair, take the hatch off and take it to him to save him the drive time then, when he called and tells you to come pick up the hatch, smile that you avoided this process, thank him and write the check.
 
Thanks, men.

I will reach out to the dealer 1st thing Monday am (have roofers here now, chasing a flashing leak :-/

AND, I will likely remove hatch - either to take to dealer or the young man who helped us last time ...

And he knows, we pay him in big fat cash!!!!! :) :) :)

It’ll be awhile before I get down to the boat - is removal of that hatch a matter of backing screws out (swallow) or (bigger swallow) knocking a rod out of a piano type hinge?
 
As other's have said, very difficult to repair non-skid - especially the patterned vs the sand type. Smooth gelcoat absolutely, you could fix that like a pro, but not the non-skid. As new as your boat is, I would definitely get with the dealer - assume it is Marine Max Lake Norman - maybe take the hatch to them.
 
To remove the hatch... First remove the aft storage hatch cover (where a stern drive would normally be) since in that boat, the two are integrated "underneath" and the storage hatch has to be removed first. This will take at least two people as it is awkward. Some of the attaching hardware for this hatch is hidden behind panels, so you'll need to take those panels off, first. They are awkward, as well, since you'll be working upside down. Oh... wait... never mind all that... a half dozen screws, pop the gas strut off and you're done - 5-minute job :)
 
I'd try your hand at the gel coat repair. Pickup some Spectrum Color patch paste and a Gibco non skid mold. I plan on using this to repair a spot in the spring.

https://gibcoflexmold.com/

This is a test I did with the mold... it's a perfect match to my boat.
 

Attachments

  • Resized_20191006_093329(1).jpeg
    Resized_20191006_093329(1).jpeg
    490.1 KB · Views: 89
Last edited:
If that is not a warranty repair I would be very tempted to do a repair myself. Nothing too lose. The gel coat non skid is still in place, just pushed down into the void. I would VERY carefully pry up the pushed in edge and try to stuff white MarineTex epoxy under into the void. Then press the chip into place and use a light acetone wipe to clean up the excess. I think the repair would be virtually invisible.

Not to flare your OCD, but I think I see the place that was previously repaired just to the right of the new void.
 
The key to this repair is to have the mold to match. Then spray the entire area around the repair zone with PVA mold release. The clean out the repair to match with a dremel. Clean just that area out with acetone. Then fill with just enough gel coat to fill the area and apply the mold. Add a weight over it while it cures. After curing you can remove all the excess as it will not adhere to the mold release.

-Kevin
 

Forum statistics

Threads
113,112
Messages
1,426,288
Members
61,027
Latest member
NeilS
Back
Top