260 Sundancer Windlass Installation (2003 Model)

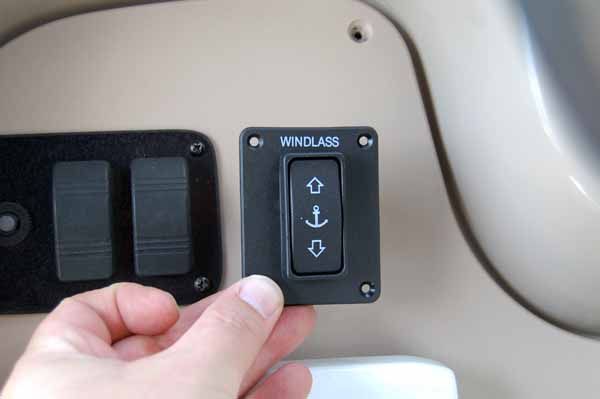
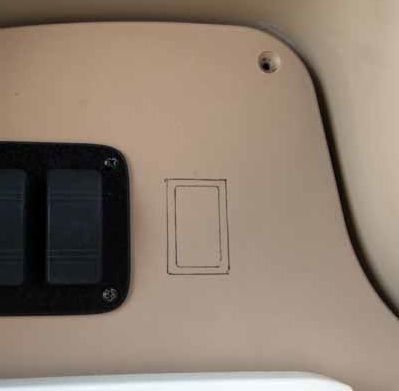
Next I started positioning the rocker switch. I thought it was best next to the trim tab switches.

27_zpsbf9a849e.jpg


I marked the exterior then offset the cut needed

2eea7ecb-b014-40c5-803f-e16ca876829f_zps1eaa5875.jpg


after cutting the hole this is what the switch will look like mounted

f5e92cea-b047-430d-9ed9-3233cba171e6_zpsab4a4239.jpg


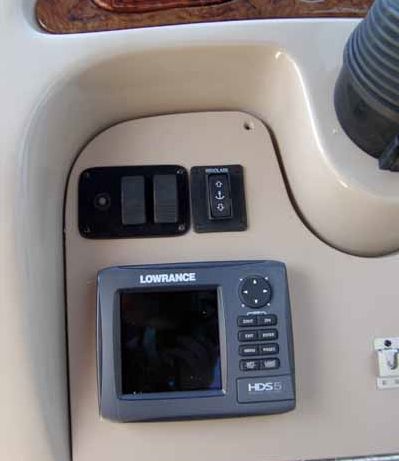
The final mount is completed by drilling some pilot hole and screwing to the console.

This is my HDS-5 installed along with it. If anyone is interested in that install I can post later. It was pretty simple compared to the windlass.
 
My next step was to find a dry location for the contactor. This is basically a solenoid/relay that controls the windlass. The contactor is connected to the battery source and also to the windlass. It works as a relay switch to allow for a basic "guarded" rocker switch to be used and will also allow for the connection to the foot switches.

This is a picture of the contactor:
30_zps55031fed.jpg


and this is the location inside the helm I choose. It is to the starboard side of where the cabin door would slide too. Because some of the cable will be attached at an angle leave a little room to the side of the furthest position of the open door.

31_zps891e997a.jpg


and here it is mounted

32_zps97759e57.jpg


I don't seem to have any picture handy of it wired up.

A this point I went to a clean up period.
I spent some time reinstalling the shelves in the cabin and re installing everything that I removed.

I did take the opportunity to address on thing. While the closet was apart I install a 12V power outlet on the closet wall below the CO detector behind the cushions. The intent here was to be able to have a dual port USB charger to provide power to toys on the starboard side. Since I sleep up on the v berth it made a much more handy connection to charge my cell phone or tablet over night.

I will try to get a picture posted later to give you a better idea.
 
Last edited:
Wow! This was awesome! My anchor windlass needs to be replaced (he's going off to college this year) so I've been thinking of putting one in but it felt daunting. Your step by step is just what I needed to see. It's not nearly as difficult as I imagined. The only thing I was thinking about differently would be to put a stainless steel plate down from the windlass to the tip of the bow as a rashguard before installing the windlass. It would cover the holes and protect the deck too.

Thanks so much for the photos.
 
Great write-up -- thanks! The pictures of disassembly of the cabin and helm are very helpful, too. BTW, were those shelves OEM? They look great!
 
Thanks, more pictures and write up on the way. Just getting busy prepping the boat for this season.
Hopefully more over the weekend.

-Kevin
 
Great write-up -- thanks! The pictures of disassembly of the cabin and helm are very helpful, too. BTW, were those shelves OEM? They look great!

The shelves in the cabin are OEM Sea Ray. IIRC, they were first introduced in 2003 on the the 260 along with the Cherry interior.

-Kevin
 
Thanks so much for the post and pictures. It's given me the confidence to attempt the same project. I'm assembling the supplies per your list, windlass just came today. Couple of quick questions which will show you how inexperienced I am. How did you connect the approximately 16awg windlass wires to the 6awg cables? Also, you indicated that you made a direct connection to the battery switch. Did you do so with the 6awg cable to the switch? And did you use the breaker in the line close to the switch? Looking forward to any more pictures you will post, especially if you had a picture of the contactor/solenoid connections and the breaker positioning in the bilge. Would you be interested in selling/renting the crimping tool to a fellow Long Islander to save a few bucks for both of us? Thanks again!!
 
...How did you connect the approximately 16awg windlass wires to the 6awg cables? Also, you indicated that you made a direct connection to the battery switch. Did you do so with the 6awg cable to the switch? And did you use the breaker in the line close to the switch?...

I pondered the connection for a while and eventually settled on making a crimp connection. What I wound up doing was cutting the top of the 6awg 1/4 post terminal crimp off leaving just the barrel. I then crimped the windlass line to the 6awg line and sealed with marine shrink tubing. I don't think I have pictures of that but you get the idea.

I did not use the panel mounted breaker provided by Lewmar and instead purchased a similar surface mount breaker. For the connection I ran 6awg from the switch and mounted the breaker in the engine compartment just below. From there I extended the 6awg to the helm. I have pictures of that I will be posting. From what I learned, since it is a thermal breaker you would want the breaker as close to the power source as is convenient.
 
Looking good. Thanks for documenting and sharing this.
 
I have a 2001 260DA and would like to see your pics, video or whatever you have. I can't seem to find a way to get from the helm to anchor locker. I don't know where to run the wire. Would appreciate any help you could give.

When I purchased my boat this was on my wish list but I figured I could always add one.
This thread is here to document my installation so that others may find similar inspiration.

Project Inventory:

  • LEWMAR V700G VERTICAL WINDLASS (WINDLASS, ROCKER, BREAKER AND CONTACTOR/SOLENOID)
  • 6 AWG TINNED MARINE BATTERY CABLE (APPROX 50FT RED & 50FT BLACK)
  • 16 AWG TINNED MARINE PRIMARY WIRE (APPROX 25FT EACH GREEN, BLUE & PURPLE)
  • BUSSMAN 187 SERIES 35A (I WANTED A FLUSH MOUNT)
  • 6 AWG TINNED SEAMLESS MARINE LUGS 1/4 POST (APPROX 25)
  • SOME DUAL-WALL ADHESIVE HEAT SHRINK 1/2" RED (3:1 RATIO)
  • VARIOUS SIZES OF OTHER MARINE GRADE SHRINK TUBING
  • VARIOUS OTHER TYPICAL MARINE

Just some notes regarding my work:
  • For all my connections were crimped and sealed with marine grade shrink tubing to seal them.
  • All the 6AWG terminals were tinned seamless connector with for a 1/4" post.
  • The 6AWG cable is thick so I would up purchasing a hydraulic crimper from harbor freight that made great crimps.
  • I think there were two that I had to drill to slightly enlarge.
  • My terminal connections to posts were booted.
  • I used slightly less than 1 million zip ties.
  • Very little of this work required more than one person.

Now this project took a lot of planning and based on last year costs I was able to shop around and complete this for less than $950. The only compromise I think I made was that I did not install a battery solenoid that would have come from the factory. This was mitigated buy using the switched thermal breaker.

Timing wise I would budget a week of part time work daily unless you can work this start to finish.
That will also give you time to work things out that your may encounter. I always find it better to not rush and actually enjoy the project.

I am going to post a bunch of photos along with descriptions.
I pre-wired this install for foot switches at the bow that will not be shown yet as I will be completing them this spring. Take my word, even if you don't think you will need them, you will want to wire for them as you will not want to disassemble the cabin again to run couple of small wires.

I hope you find this interesting. I loved he project and have received many complements. This project diary is my payback for all the great information I have received. If you want a windlass, have the time, enjoy working with tools and want to save a lot of money this is a great project an my notes should help.

Of course, this was done on a 2003 260 Sundancer and your model may vary slightly however the process will be similar.
 
Cod, he has some pictures near the beginning of the thread.
 
Thanks Kevin I must have had threads hidden, I saw your pics and explanation, it was awesome and will help me. I have 2 vinyl boards going across both my sides in cabin, that will be my main challenge getting them off. I'm looking at getting a Lewmar v700, Lewmar said I should get a horizonal for mine for the space, but I like the looks of the vertical and was wondering if you had plenty of room for your motor.
 
deleted. double post.
 
Last edited:
I'm not Kevin, but I installed a V700 (vertical) in my 260DA (the 260DA's were the same from '99-'04). The locker is PLENTY big enough for a vertical.

Vinyl boards? It sounds like a previous owner changed things around a bit. The originals would have been cushioned and wrapped in coordinating material. But, look for fasteners behind it or under it as I assume the screws are not in the face of it since you would have readily seen that. Or do you mean "soft" vinyl boards - with cushioning behind the vinyl? If so, the screws are hidden in the horizontal cleat - it takes about 2 minutes to remove those.

While you're up at the bow checking things out for your windlass install, check the condition of the wood core in the locker's deck area. Removing the hawse pipe and anchor roller will give you access to check the wood out. Although, I think I mentioned this earlier in this thread.
 
Last edited:
Kevin.

Thanks for the detailed post on this. I have the same model and am in the process of ordering parts to do the same job. It's been a little while since this post was made... would you do anything different now that it's been a while since the install?
 
Sorry that I have been neglecting this post. I have been busy and not as much time online. If you have any questions you can still post them here and I will try to respond. I also have more pictures that I may have not included if anyone needs something specific. If you also PM me I will see it when I login. My last big project on this 260 was a total cockpit upholstery outfitting - learned a lot. Last year I completed most of it and this winter finishing some small items (primary the captains chair). I will probably make a post for that sometime in the future.
 
Kevin,
I wanted to thank you for this detailed post. We added the windlass to our 2006 26' Dancer last October and your photos and notes were spot on and a HUGE help. The only thing we did a little different... we cut some starboard to match the shape and outline of the windlass with a 1" border around it to help close up the slight hole underneath it. This helped us cover the hole itty bitty space that was left over as well as ensure that there was enough overlap to be waterproof (we sealed it with marine adhesive to the deck).

The only other word of wisdom I would add for anyone undertaking this project... make sure your deck buttons to raise/lower the windlass from the deck are aligned to allow water to drain out instead of collect in the button wells. We weren't smart enough to do that and they are already starting to rust (less than 6 months later).

I look forward to your cockpit upolstery pics!
 

Forum statistics

Threads
113,164
Messages
1,427,659
Members
61,076
Latest member
DevSpell
Back
Top