340EC project

JAndrewG

Member
Jul 23, 2007
158
Brownsville Washington (Seattle area)
Boat Info
340EC
Engines
330 HP Mercruiser inboards
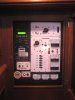
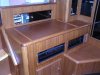
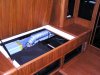
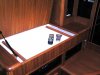
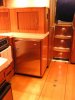
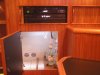
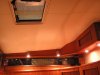
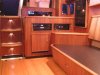
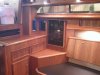
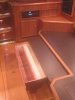
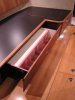
I posted a few photos of this project in a thread about stripes for an early Sea Ray, and thought I'd post a few here of the interior so as not to get too far off topic.

1986 340EC...

John
 
Last edited:
WOW Fantastic work !! Can we see some alrger pictures and also cockpit and boat pictures!!
Thanks for sharing ! :thumbsup: :thumbsup:
 
I'll add my WOW into the pile!!!

I would love to be able to do my floors in the galley area as you did....I'm just short about 99% of the talent required....
 
Hey Guys, thank you. This is the first time I've shared these; actually the first time I've posted photos anywhere.

The boat's been living in it's boathouse. I've collected a planer, table saw, miter saw, etc., and have been cutting all of the teak lumber in the loft of the boathouse. So, the boat gets washed, and a few months later it's buried in sawdust, and washed again.

I've been taking photos during all of the stages it's been through. I spent about six months curled up in the bilge, rewiring, replacing all of the plywood used for mounting the strainers, mufflers, and so on with UHMW plastic, and have several good shots of that process. I'll post more later.

I can't seem to find the photos I have of the boat outside the house after buffing and striping. I'll look some more. If I can't come up with them, it'll be awhile before I'll have some more...

I'm just about done with the salon and will be taking more shots when I've finished some trim that I've installed in the last week. The port side shows unfinished in these pics. It now has a Denon A/V reciever, CD and DVD players, an iPod dock, a Super Sidebar (see their site- they're cool!), and a 15" LCD facing aft on the port side, as well as the 20" facing forward on the stbd side as mentioned. From there I'll move forward to the stateroom, or v-berth, or whatever you want to call it in a 34' boat.

The cockpit is still a mess, and will be started on when the interior is done. I have new guages and guage panels made, and a bunch of other odds and ends are ready to be installed once I've repainted the dash. The windshield will be coming off then to be bead blasted, painted, and have new glass made. Flat glass is not too expensive to have cut and tempered.

I've removed the overhead carpet in the salon as you can see. This was the low point in the project. I bodyworked it as straight as I could (the factory carpet covered a lot of sins), and just as I was going to upholster it I drilled out a hole that needed filling, and about a cup of water ran out. About 3 months later I was done with this set back, and had drilled over 180 1 1/4" holes (took the pilot bit out of a hole saw) and filled them with thickened West System epoxy. The water came from the leaky screws under the windshield, and from the snaps for sun pads that used to be there. Do yourself a favor and pull anything like that off and re-bed it with 5200. What a nightmare, and had I not drilled out that hole, I'd never have found it.

The overhead is now Ultraleather in a very light beige.

Thanks again for the compliments. Guess I've been wanting to do this for awhile. I'll post more in a few weeks.

John
 
John,
You're a true craftsman.

Very nicely done. :thumbsup:
 
osd9 said:
I'll add my WOW into the pile!!!

I would love to be able to do my floors in the galley area as you did....I'm just short about 99% of the talent required....

In the right place ... speak lots of boats ... you could make a nice business out of this skill
 
Again, many thanks for the kind words. I was surprised at how nervous I was to post these and let this cat out of the bag, as it were. Locals at the marina stop by for the "tour" every so often, and for follow-ups as it continues. I laugh and tell them to wait several months between in order to see real progress.

Alex D,

During the different stages of this effort, people ask me if I'd hire out for whatever it is I'm working on at the time. For example, while in the bilge and doing all of the electrical work, I was asked if I would do various electronics installations, such as an inverter (I have installed a 2000 watt Pure Sinewave unit in this old boat). Earlier while sanding and buffing the gel, a fellow with a new 28' Cobalt did some serious dock damage and contacted me to see if I would do the repair. Just this week I had a guy call my office about re-gelcoating an entire 17' boat. During the interior work, several have called about building cabinets for them.

Honestly, I'm not a marine electrician, a fiberglass repairman, or a woodwright. I'm very good with my hands, and am learning as I go. This is much of the enjoyment of the project, learning new skills and techniques. I did a lot of custom paint and bodywork in my teens, twenties, and thirties, and I'm afraid turning what I'm doing here into a business would end up about the same as when I'd paint someone's street rod. In the end, I'd make about 50 cents an hour. My graphics business is all I can handle and then some, and keeps us fed and funded enough to throw cash at a silly project like this one. Who in their right mind would spend the money it would take to buy maybe 3000 hours of labor, plus all of the materials, on an old 340? Sometimes it's all I can do to keep myself stocked with teak lumber...

The kicker in all of this, and the primary reason that it's possible at all to make the time to do it, is that my wife is my best cheerleader. She is the one who talked me into buying it in the first place, and is still upbeat and supportive about it today. It makes all the difference.

So, I'll add photos as I can. When she's up and running I look forward to meeting some of you at a rendezvous or something.

Thanks again,

John
 
Wow... nice project.
Post anything you can as it gives some great ideas and sparks alot of thought on what I might want to do to my '87 340ec...
Thanks for sharing!
Gary
 
Thanks Gary.

I'm going to be taking more photos of the port side of the salon soon. It's not done; there is the salon seat back, the pull out for the bed under it, and a table to build still, but it's starting to take shape and most of the trim is finished.

Ah, I love those late 80's Sea Rays. Your '87 EC has a small bar area and ice maker aft of the seats. The seats are the same as a Sundancer. I like that arrangement too, but my '86 layout is by itself, that is, it's different than yours or an earlier '84 or '85 model. The water tank on mine is tall and just under the 110 panel. The original cabinets created some odd angles that I've changed quite a bit. Your fresh water tank I think is the same as a Sundancer as well- much shorter height wise, and runs under the salon seats. If you ever drill holes to mount something on the sole here, be carefull because the tank is just under it.

If you need anything at all, such as information on where to get trim or whatever, PM me and I'll get back to you. I've collected a lot of resource info and am happy to help.

Thanks again,

John
 
Hey John...
Any more pics of the project?
Also, have you done the cockpit yet?
I need to re-cover the vinyl side panels and rebuild a bit of them, interested in some insight to the removal... looks like most mounting screws are hidden pretty well...LOL
Gary
 
Hey...

Thanks for asking about more photos guys. I hadn't checked in for quite awhile, and haven't posted in a long time either. It tickles me that you revisited this thread and want to see more.

Ah, it's a busy life. I thought I'd get some more photos to post here 'in a few weeks', and it's been a few months. Life can be a terrible distraction from doing the things you enjoy most.

Garjowan- no, no, I'm not even nearly in the cockpit yet. I have made progress in the salon, though, despite the distractions. It is very nearly done, excepting for upholstering the salon seat, which I want to wait to do until more of the dust-creating work is done. I will go forward into the stateroom (vee birth?) next, and will undoubtedly be several months there before (finally!) doing the windshield, dash, and cockpit.

Oh, and yes, the screws are hidden well on your cockpit panels. I helped a buddy with his 1989 340DA (his boathouse is kitty-corner from ours) remove his panels this summer. There are machine screws here and there that stick out of the plywood. Aluminum brackets are attached to the boat, and wing nuts are used so you can easily spin them off once you find them. Not too hard, just stick your head under the upholstery and you'll see them.

I promise, I will take some photos soon and post them. Do you think I should register with one of the online photo sharing sites, or just attach them here?

Thanks again for your interest,

John
 
OK, here are a few more photos of this never ending project.

First, an overview of what you're looking at.

Inside the A/V cabinet is a Denon A/V receiver, DVD, and CD players. The tambour doors close to conceal them, and a simple IR to RF converter allows full remote control function without needing to be line-of-sight. You can use the remote from the cockpit if you like.

The lid lifts and is held up with a gas strut. This area will be used for chart storage, maybe the boat keys, tide charts, etc. The next photo shows that the bottom of this storage compartment pulls out for access to the A/V components and Prosine inverter. Everything top loads from here.

To port of the A/V cabinet is an opening for the iPod dock. There is a 110 panel outlet here, and the wall it's on removes for more access to the entertainment system wiring. A conduit from behind this wall runs up to the helm, and is already wired to run a video signal from the (not yet purchased) Garmin monitor to the LCD TV's in the cabin.

Next to the iPod dock is one of my favorite things, the "Super Sidebar". See their website, this thing is really cool. The first button turns the unit on, and the next five dispense your favorite liquors, 'Whiskey', 'Vodka', 'Rum', 'Scotch', and 'Gin'.

Forward is the 110 panel. The white panels are original to the boat. When I built the new teak wall around it, I made the black formica that they attach to much wider. This allowed the Prosine control panel and Ocean Breeze thermostat to mount to the left. I added analog DC voltmeters for each battery bank below.

The settee has not yet been upholstered; I want to wait until I'm done making so much dust. You can see the seat back has a door that opens. This is where the table will be stored when not in use. The upholstery will cover this, and will be attached with snaps to allow access.

The settee bottom pulls out to make a wider bed. Inside of this 'drawer' is another that is lined with tennessee cedar, to store a blanket and pillow when reading or watching TV.

The sole is European steamed beech with a border in yellowheart. The black accents on the cabinet doors is ebony, and the black kickplate bordering everything is black formica.

The overhead is Ultraleather.

Let's see...all of the appliances in the galley are new. We're really happy with the Isotherm fridge, and the icemaker just makes sense with the booze on tap...:)

There are a ton of other details, but I've talked too much already. Any questions, just ask.

Thanks a lot,

John
 

Attachments

  • 110Panel.jpg
    110Panel.jpg
    37.9 KB · Views: 253
  • AVCabinet.jpg
    AVCabinet.jpg
    51 KB · Views: 253
  • AVCabinetAccess.jpg
    AVCabinetAccess.jpg
    54.5 KB · Views: 246
  • AVCabinetMapStorage.jpg
    AVCabinetMapStorage.jpg
    44.5 KB · Views: 242
  • GalleyAft.jpg
    GalleyAft.jpg
    41.7 KB · Views: 257
Here are a few more...
 

Attachments

  • GalleyFridgeStove.jpg
    GalleyFridgeStove.jpg
    40.5 KB · Views: 229
  • LiquorStorage.jpg
    LiquorStorage.jpg
    35.5 KB · Views: 233
  • Overhead.jpg
    Overhead.jpg
    31.9 KB · Views: 238
  • Salon1.jpg
    Salon1.jpg
    38.6 KB · Views: 246
  • Salon2.jpg
    Salon2.jpg
    37.7 KB · Views: 224

Forum statistics

Threads
113,118
Messages
1,426,558
Members
61,035
Latest member
Lukerney
Back
Top