Cummins Dry Exhaust Service Bulletin

Very timely - Thanks.
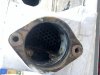
I have my exhaust off see the pics. After indexing the manifold flanges they were out over 0.040 and a lot of pitting so I can see where my leaks were coming from. I set up the mill and trued the flange faces. All going back together with new bolt assemblies as recommended.
View attachment 80121 View attachment 80122 View attachment 80123

Tom:
Noticed you removed the Cooling Plate in this process as well. Did you have a leak or did you feel like you were in that deep and might as well remove/reseal/re-install? My mechanic suggested that cooling plate almost never needs to be removed except in my case where we developed a coolant leak from the plate.

Since I developed this starboard coolant leak it was an easy decision to replace the leaking Manifolds and service the Gear Cooler, Heat Exchanger while we were in there.

Coolant Plate.jpg


Heat Exchanger.png
97716ABA-373D-49D3-94B9-2A6829E7FB80.jpeg
FB16FF57-C6AA-44A0-9789-7CD6727C0383.jpeg
523F4A08-13DC-4BF9-B8E5-CC18FEA1A38E.jpeg
DD1A2DF8-A2AF-43C8-9E15-3C5BDF1D4BED.jpeg
AFF80C50-B819-4F40-9A2D-E477D4995005.jpeg
Coolant Plate.jpg
 

Attachments

  • 9F7999DD-D3A7-4D8A-AD95-C4CCC5E6A66B.jpeg
    9F7999DD-D3A7-4D8A-AD95-C4CCC5E6A66B.jpeg
    116.2 KB · Views: 27
Last edited:
I talked to one of our structural engineers and got the bolting 101 class:
First "torqueing" a bolt is a very inaccurate means to tension a fastener due to variables in friction under the boat head, number of threads engaged, and variations in friction within the thread mating areas. However, due to the complexity and cost of measuring bolt stretch, rotational torqueing is the standard. Rotational Torqueing can vary up to 30% in actual tension (stretch) values. Most important is to chase and clean the threads and use the recommended lubricant.
Structures that use fasteners rely on the fastener clamping force for integrity. That clamping force is created by stretching the bolt within it's elastic material property range. As materials are put in tension they undergo four states: normal unstressed, elastic, plastic (yield), then fracture. In the elastic range the bolt length will return to it's normal unstressed state when loosened (consider it a spring). In the yield or "plastic" range the bolt will permanently deform its dimensional characteristics. Also, once a fastener is taken into it's yield range the tensile strength rapidly degrades. So, you can see that the fastener assembly needs to be in the elastic range to properly function and create that clamping force. Also notable is the higher strength the bolt is the more narrow the elastic range is. This goes to also say the longer the bolt grip (the unthreaded area between the head and threads) the greater the elastic range in length the fastener can go through.
The last part of bolting 101 is temperature - As a bolted assembly is heated each of the elements of that assembly expands and grows in size. The bolts will get longer consequently a reduction in clamping force can be realized should that length change remove the stress from the elastic range of the fastener material.
So, you might ask why the long tubes in the bolt assembly for the QSM11 exhaust manifolds and why the bulletin to get rid of the short tubes and use the long ones for all the fasteners? Well, you can now see that these are there to compensate the thermal expansion of the bolt material by increasing the elastic range of the material.
So, to your concern on "over torqueing" the bolts. The bolts have 10.9 stamped on the head which denote a high strength fastener and brings the concern of sensitivity with over torqueing and yielding the fastener. Usually, in high strength materials the yield range is so narrow that the bolt will fracture and snap right off or eventually fail due to a condition called stress corrosion cracking which is a time and environment based condition. As you neither have exhaust leaks nor broken bolts it appears you may still be in the elastic range, albeit the upper end of the range, and may be OK. However, if you start finding broken off bolts under the engine due to stress corrosion cracking over time then it's time to replace them. I would call it good and monitor.

Now you know how to build a watch.....
Tom

This information was very insightful. I’m glad to have you in the group. Thanks for teaching me a lesson.
 
I talked to one of our structural engineers and got the bolting 101 class:
First "torqueing" a bolt is a very inaccurate means to tension a fastener due to variables in friction under the boat head, number of threads engaged, and variations in friction within the thread mating areas. However, due to the complexity and cost of measuring bolt stretch, rotational torqueing is the standard. Rotational Torqueing can vary up to 30% in actual tension (stretch) values. Most important is to chase and clean the threads and use the recommended lubricant.
Structures that use fasteners rely on the fastener clamping force for integrity. That clamping force is created by stretching the bolt within it's elastic material property range. As materials are put in tension they undergo four states: normal unstressed, elastic, plastic (yield), then fracture. In the elastic range the bolt length will return to it's normal unstressed state when loosened (consider it a spring). In the yield or "plastic" range the bolt will permanently deform its dimensional characteristics. Also, once a fastener is taken into it's yield range the tensile strength rapidly degrades. So, you can see that the fastener assembly needs to be in the elastic range to properly function and create that clamping force. Also notable is the higher strength the bolt is the more narrow the elastic range is. This goes to also say the longer the bolt grip (the unthreaded area between the head and threads) the greater the elastic range in length the fastener can go through.
The last part of bolting 101 is temperature - As a bolted assembly is heated each of the elements of that assembly expands and grows in size. The bolts will get longer consequently a reduction in clamping force can be realized should that length change remove the stress from the elastic range of the fastener material.
So, you might ask why the long tubes in the bolt assembly for the QSM11 exhaust manifolds and why the bulletin to get rid of the short tubes and use the long ones for all the fasteners? Well, you can now see that these are there to compensate the thermal expansion of the bolt material by increasing the elastic range of the material.
So, to your concern on "over torqueing" the bolts. The bolts have 10.9 stamped on the head which denote a high strength fastener and brings the concern of sensitivity with over torqueing and yielding the fastener. Usually, in high strength materials the yield range is so narrow that the bolt will fracture and snap right off or eventually fail due to a condition called stress corrosion cracking which is a time and environment based condition. As you neither have exhaust leaks nor broken bolts it appears you may still be in the elastic range, albeit the upper end of the range, and may be OK. However, if you start finding broken off bolts under the engine due to stress corrosion cracking over time then it's time to replace them. I would call it good and monitor.

Now you know how to build a watch.....
Tom
Tom, Great tutorial on bolt torque, I'm sure you won't mind my sharing it with my students in the AMT program when we teach materials and processes. One of the most difficult things to teach some folks is how to tighten bolts and screws properly. The most common mistakes we see is over tightening unless a torque spec is available and used. Thanks
Rusty
 
Tom:
Noticed you removed the Cooling Plate in this process as well. Did you have a leak or did you feel like you were in that deep and might as well remove/reseal/re-install? My mechanic suggested that cooling plate almost never needs to be removed except in my case where we developed a coolant leak from the plate.

Since I developed this starboard coolant leak it was an easy decision to replace the leaking Manifolds and service the Gear Cooler, Heat Exchanger while we were in there.
One bolt was leaking coolant; the leak was there even when I bought the boat. There would be a couple of table spoons of coolant under the engine every time we ran the boat. Couldn't get a wrench on the bolt or even see it unless everything was removed so when apart I replaced the gasket; the bolt was behind the oil cooler (see pic). You can see where someone put some dye in the coolant at some point to locate the leak. When I could access all of the bolts, I checked the tightness of the bolts and all were wrench tight so the reason for the leak remains a mystery. The removed gasket and mating surfaces were in great shape also. So to double down in the event that holes in the cover plate were "mis-drilled", I put a bead of Permatex Right Stuff gasket maker under the head of each bolt so the bolt to cover was also sealed. There are no longer any leaking coolant. We went ahead and completely stripped down that side of the engine, removed the paint and recoated with new paint to include the oil cooler assembly and all of the hardware; it looks like a new engine (second pic). The other engine was ok so I torqued each of those bolts but didn't take it apart but did prep and paint also.

BTW - if you haven't already, make sure you get something over the oil cooler interface flanges; that is the last place you need stuff to fall into.
IMG_4522.jpg

IMG_4570.jpg
 
Last edited:
One bolt was leaking coolant; the leak was there even when I bought the boat. There would be a couple of table spoons of coolant under the engine every time we ran the boat. Couldn't get a wrench on the bolt or even see it unless everything was removed so when apart I replaced the gasket; the bolt was behind the oil cooler (see pic). You can see where someone put some dye in the coolant at some point to locate the leak. When I could access all of the bolts, I checked the tightness of the bolts and all were wrench tight so the reason for the leak remains a mystery. The removed gasket and mating surfaces were in great shape also. So to double down in the event that holes in the cover plate were "mis-drilled", I put a bead of Permatex Right Stuff gasket maker under the head of each bolt so the bolt to cover was also sealed. There are no longer any leaking coolant. We went ahead and completely stripped down that side of the engine, removed the paint and recoated with new paint to include the oil cooler assembly and all of the hardware; it looks like a new engine. The other engine was ok so I torqued each of those bolts but didn't take it apart but did prep and paint also.

BTW - if you haven't already, make sure you get something over the oil cooler interface flanges; that is the last place you need stuff to fall into.
View attachment 85552


Interesting... we had a broken bolt that held the rear of the plate down. Also the plate was a bit bowed so we will replace it. I was loosing quite a bit more coolant Than you over a long run...
 
Currently looking at a 2012 540 Sundancer with QSM11 and pods. Sea Trial showed the boat is over propped of course. I have not seen anyone tackle the prop issue on a pod boat with Zeus Pod double props. Any suggestions?
 

Forum statistics

Threads
113,163
Messages
1,427,599
Members
61,072
Latest member
BoatUtah12
Back
Top