hynespa
Well-Known Member
- Jun 7, 2010
- 314
- Boat Info
- 2005 420 Sundancer
- Engines
- T-VD-8.1 S HO MerCruiser (T-420 hp)
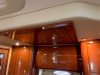
I finally got around to upgrading the TV in the master stateroom on my 2005 420 Sundancer. The original 2005 TV is not HD and does not work with digital HD signals any more:
1) - OLD TV/DVD REMOVAL - I was able to remove the black back panel of the TV cubby (to which the TV is attached) by removing the 4 black Phillips screws surrounding the TV. The TV and panel both come off, then I was able to remove the VESA screws holding the old TV to the panel. Once the TV was out, I was able to then remove the two screws holding the shelf on which the old DVD player sits. The bottom of the DVD player is glued w/ rubber glue to the shelf. I was able to pry off the old DVD player without damaging the shelf, and then I was able to scrape off the rubber glue.
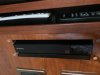
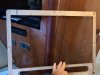
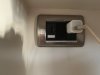
2) - This is the view with the old TV removed. There is a 110v outlet directly behind, and the old COAX as well.
3) - I purchased a 22" Samsung TV as the replacement (model UN22F5000). NOTE: It is very difficult to find name brand (e.g. Samsung, etc.) that are small these days. I really wanted a Samsung as the other new TV's I put on the boat were Samsung (all Smart TV's) - but they just don't make a 22" any more. I was able to buy this on eBay for $55 plus shipping. I liked this one because the power brick is external. I eventually want to convert this TV to run on 12V and the external power brick makes it easier to do that.
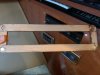
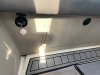
4) - I purchased a "Mount-It! MI-2829 TV Mount For Flat Screens" off of Amazon for $12.99. I liked this because I don't want the TV to swing out at all, and it looked like this one would hold it in close. I drilled two holes into the cubby backing, and through bolted the mount.
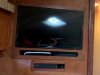
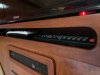
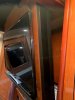
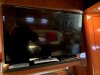
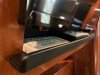
5) - Here is the new(er) TV mounted. This TV has 2 HDMI inputs. I will put one HDMI into the MacMini that you see below that replaced the old DVD. The other HDMI will connect to an HDMI splitter system I am running through the boat so that I can run either DVD media being played on the Fusion, BluRay on the PS4, Video out via Lightning to HDMI adapter from the iPhone/iPad, or HDMI out from the Raymarine MFD. I will post more about that later.
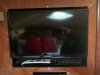
6) - Here is the TV on and running off the boat TV antenna.
7) - I didn't get to this part today, but I am going to convert the TV to run off of 12V instead of 110V by replacing the external power brick that came with the TV with this "uxcell Voltage Converter Regulator DC/DC DC 10-32V to DC 13.8V 3A 41W Step Down/Up Transformer Waterproof" which I purchased from Amazon for $16.99. I will post an update with pics once I finish this conversion.
1)
- OLD TV/DVD REMOVAL - I was able to remove the black back panel of the TV cubby (to which the TV is attached) by removing the 4 black Phillips screws surrounding the TV. The TV and panel both come off, then I was able to remove the VESA screws holding the old TV to the panel. Once the TV was out, I was able to then remove the two screws holding the shelf on which the old DVD player sits. The bottom of the DVD player is glued w/ rubber glue to the shelf. I was able to pry off the old DVD player without damaging the shelf, and then I was able to scrape off the rubber glue.2)
- This is the view with the old TV removed. There is a 110v outlet directly behind, and the old COAX as well.3)
- I purchased a 22" Samsung TV as the replacement (model UN22F5000). NOTE: It is very difficult to find name brand (e.g. Samsung, etc.) that are small these days. I really wanted a Samsung as the other new TV's I put on the boat were Samsung (all Smart TV's) - but they just don't make a 22" any more. I was able to buy this on eBay for $55 plus shipping. I liked this one because the power brick is external. I eventually want to convert this TV to run on 12V and the external power brick makes it easier to do that.4)
- I purchased a "Mount-It! MI-2829 TV Mount For Flat Screens" off of Amazon for $12.99. I liked this because I don't want the TV to swing out at all, and it looked like this one would hold it in close. I drilled two holes into the cubby backing, and through bolted the mount.5)
- Here is the new(er) TV mounted. This TV has 2 HDMI inputs. I will put one HDMI into the MacMini that you see below that replaced the old DVD. The other HDMI will connect to an HDMI splitter system I am running through the boat so that I can run either DVD media being played on the Fusion, BluRay on the PS4, Video out via Lightning to HDMI adapter from the iPhone/iPad, or HDMI out from the Raymarine MFD. I will post more about that later.6)
- Here is the TV on and running off the boat TV antenna.7)
- I didn't get to this part today, but I am going to convert the TV to run off of 12V instead of 110V by replacing the external power brick that came with the TV with this "uxcell Voltage Converter Regulator DC/DC DC 10-32V to DC 13.8V 3A 41W Step Down/Up Transformer Waterproof" which I purchased from Amazon for $16.99. I will post an update with pics once I finish this conversion.
")