Official 380 Thread

The high water alarm goes off on my boat when I manually activate the forward bilge switch. The rear bilge is activated when I throw the switch on the dash.

I get some weak back after they both run.
 
I assume these are the whale non-leak back or check valves. Has anyone tried to replace them? Where would you buy them?


WIMG_1127-1.jpg
 
In dc380's photo, the pump on the top of the photo (which is the aft part of the engine room) is the "aft" bildge pump that is automatic and may also be manually activated by the "aft switch" at the helm and the float for that pump is located on the low part of the bildge.(not visable in the photo obscured by raw water lines)

The other pump in the photo is the " high water" aft pump which is automatic and not controlled by any switch at the helm and the float is located on the raised portion of the engine room floor. (omited on the Searay Diagram but shown with your blue arrow)

Although it should be tested regularly, if the high water aft pump is activated you will get an alarm on the system monitor, reading aft pump and you've got BIG problems. meaning ALOT of water in the engine room.

In the forward part of the engine room there is the "forward" bildge pump that is automatic and may also be manually activated by the "forward switch" at the helm and the float for that pump is located on the low part of the forward bildge.

I learned the hard way that the bildge pump in the salon bildge (behind the shower, condensate pump (enclosed in a box - forget about that one for now) is the " high water" forward bildge pump which is automatic and not controlled by any switch at the helm and if the "high water forward pump" is activated you will get an alarm on the system monitor reading forward pump.

Poorly described as I thought is was the forward pump in the bildge but that's a whole other story.

There are 3 seperate discharge lines, that have seperate thru hull fittings well above the water line, each of which has a check valve.

I spend a good amount of time twice a year with a hose in the engine room making sure that everything is working as it is supposed to. Rarely is this the case.

Not trying to go on too long with this post, but... The pump maufacturer does not want a check valve on the line because if holds back a column of water that the pump must overcome. When I talked to the Searay guys at Merritt Island they said that is the way Searay does it because the water in each discharge line, when the pump shuts down, would end up back in the bilge and also that the check valve would stop any sea water from coming in, in the worst case scenario. (at that point I'd be ready to abandon ship).

After spraying away of the gunk from the standing water from rain etc., I take off the nozzle and run the hose full blast for a few minutes. and the pumps will cycle on and off making sure the check valves aren't frozen and the pumps and floats are free of debris.

Just one of many exciting boat lessons I've learned from boat problems.
 
If that is the case, then I believe someone replaced the floats and has incorrectly wired them. For it me it made no since for the what the manual calls the aft pump to come on using the engine room floor float switch

If you look at my diagram, what they call the "Emergency High Water Bilge Pump" in my boat is activated by (I am using the diagram here for reference only) the "Aft Pump Float Switch." :huh:

And what they call the "Aft Bilge Pump" is activated by a float switch mounted on the engine room floor :huh:

I am going to double check all this weekend

Thanks
:thumbsup:
 
Last edited:
Don't worry about the Searay diagram

If the float on the raised "engine room floor", when turned by hand, sets off the alarm, you are good to go. It would be quite the effort to rewire incorrectly.
 
Here is a picture from my survey. It shows the 2 bilge pumps. Neither pump gets all the water out. So I vacuum it out, and it stays dry for awhile.


IMG_1126.jpg

Thanks a bunch

That is just how mine is also, I have to wonder why they call the rear pump the emergency high water pump and the forward (aft) pump the rear bilge pump. The float on this with it's location would make it seem more appropriate as the emergency high water pump


I went over the pumps and floats quite thoroughly this weekend and the pump in the rear (closet to transom) is the pump which comes on from the aft helm switc, and the float for it is located between the two pumps as in the picture above (hidden behind the raw water intake hoses). Both floats are mounted as in the picture above. So except for the float location in the manual the only other thing I see is that the two pumps are actually mislabeled in the manual.

I know this is a minor point, bu twhne one turns on the "aft Bilge" switch at the helm, and it does not come on per the manual, but the other pump does. To me it is just nice to know what is what, I do not like to take things for granted, especially with boating.

:thumbsup:
 
I have cleaned my bilge and dried these areas where the pumps are. It will stay this way until I take the boat out. No leaks that I can find. Dry that is, then upon returning I have about 1/2 inch of water again, and the bilge pumps are not activating. Could this water be coming from condensation off of the strainers during boat operation?

It is in both the forward bilge pump area and the aft area.

 
Hey "Wingless" a question if you do not mind?

Your signature ends with "many mods..." Would you be willing to post any comments or send a PM about what mods you have made?

Thanks

:thumbsup:
 
Last year I experienced that same issue, this year the only thing I changed was a leaky water pump housing on the generator, and now my bilge stays dry.

The other thing to check our you dripless stuffing box, they do leak occasionally.

The 380 aside of me water heater drain valve was not totally closed by the yard, and it to leaked into the bilge. So there are lots of places where water can come.

Finding the source can be difficult, unless the source leaves a stain.

Do you have a picture or can explain to me where this valve is located?

Another question Sea Ray has a warning label which says to insure hot water heater is full before turning on the power breaker. I know where the hot water heater is located, but just how exactly does one tell if it is full.

I have not used the hot water heater since I bought the boat. The Sea Ray manual is not much good, and unfortunately I do not have any other manual, which Sea Ray states to consult

Thanks

:thumbsup:

As an aside it would appear that I am the only one that has ever has any 380 questions. Oh well, as long as those who do have 380's continue to answer. I will continue to ask. Who knows maybe another new 380 member will cruise in to CSR.:huh:
 
There is a access door under the rear couch. With the couch in the up position, open the door, and with a flash light look for a turn off/on valve. It looks likes the same as the valve on your home water heater. Make sure it's closed.

To check that the water heater is full, open the hot water fauset in the kitchen. When water comes out, the hotwater tank is full.

Filling your water tank and running the water pump will also fill the hotwater tank, the pump wouldn't shutoff until it's full and pressurized.

When I first got my 380 I had a alot of questions, which I asked on this forum and other forums. I've saves thousands by getting advice from this website.

Your not alone.

Dave
 
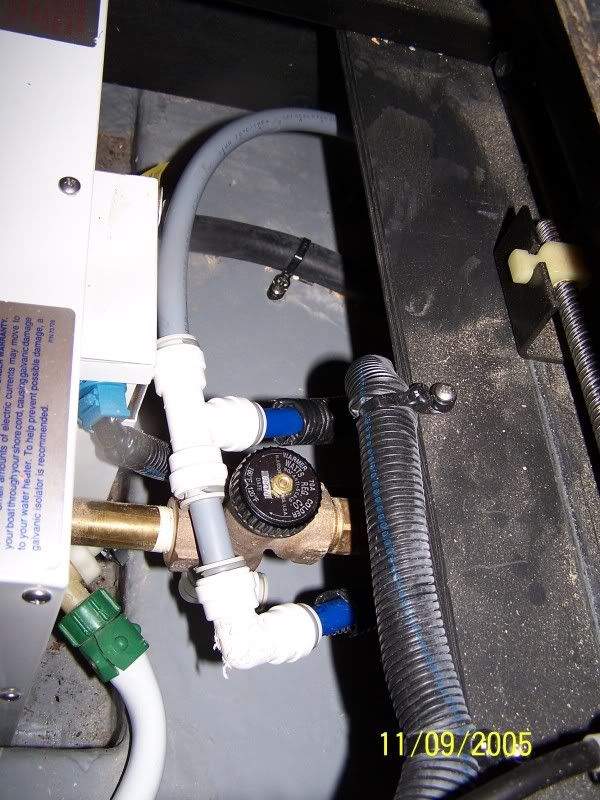
The HWH on the 380DA, at least on my 2002 380DA, has a mixing valve. I was going to post this in another thread, but I forget where that other thread is right now. Anyway, for winterizing, you can't just use a store bought bypass kit. I made a three way bypass from 15mm tubing, two elbows and a tee.

Here's a pic of that bypass installed. The two blue lines are the two cold water lines. One is to feed the HWH itself and the other goes to the mixing valve to add cold to hot ciruit. The upper 'bend' in the gray line goes to the red hot water line (not in the pic) to complete the bypass...


100_3460.jpg


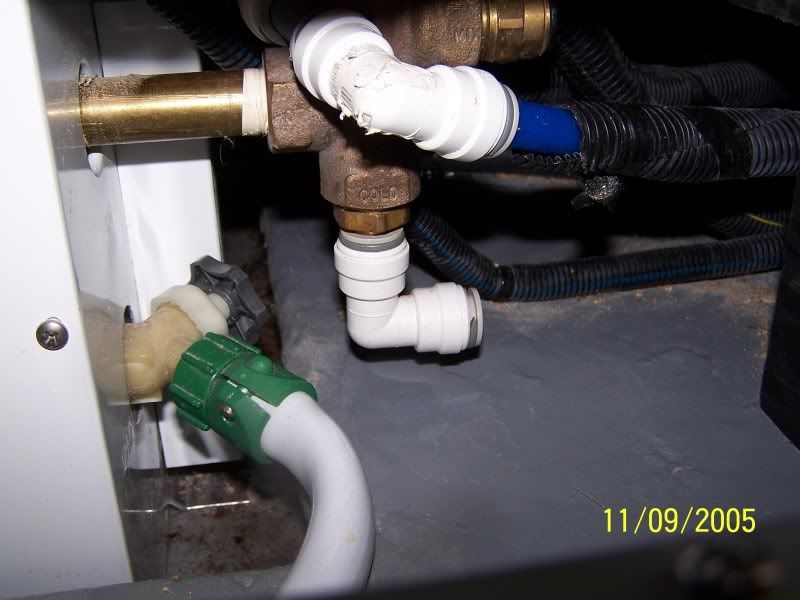
Here is a closer look at the drain valve for the HWH. It's permanently connected to a hose that drains into the forward part of the main bilge...

100_3464.jpg
 
Hi Dom

How did you get access to the HWH from the top? The picture of the mixing valve is from the top and not through the access door.

Does the couch come out? I've often wondered how you would get the hot water heater out if it needed to be replaced.

Dave
 
From memory know...that was three years ago...

There were four screws...regular SS sheet philip head metal type....holding the couch seat/bottom plywood base to the frame. It was a major pain to get to those screws, but once they were out, I left them out and just laid the seat bottom on the couch frame...winter and summer. To get them out, you have to play with the position of the electric couch....a different position to get each screw.

However, once the seat is free.....access to the HWH is all yours....
 
I am trying to change out the TV that is above the frig on a 2002 380 DA. Do I need to take the frig out to be able to unscrew the TV from the base, or is there another combination?

Michael
 
Hi Michael,

Dominic's thread was extremely helpful when I did my TV's, however, I did have to pull the fridge out a little to get to a couple of screws- It was not hard though- I removed the screw caps around the flange of the fridge, loosened those screws and had a friend help me slowly pull the fridge out a few feet so I could accress the screws. Here is a pic of the finished product.
 

Attachments

  • Picture 167 (Large).jpg
    Picture 167 (Large).jpg
    77.1 KB · Views: 1,030
Last edited:
Hi Michael,

Dominic's thread was extremely helpful when I did my TV's, however, I did have to pull the fridge out a little to get to a couple of screws- .......
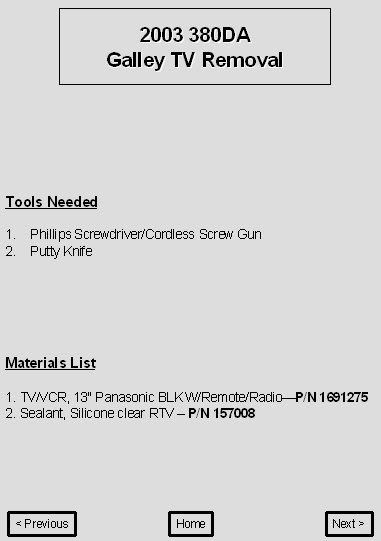
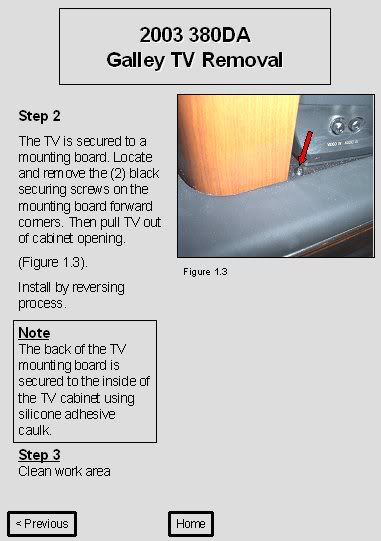
I'm surprised that you had to remove the fridge.

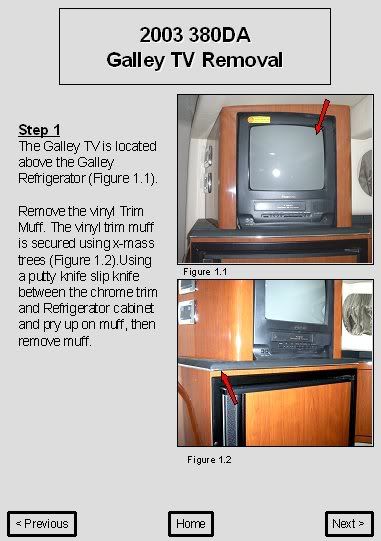
Below is the instruction sheets that I received directly from the Sea Ray Factory. I hope this helps...

tvrmovepg1.jpg


tvrmovepg2.jpg


tvrmovepg3.jpg
 

Forum statistics

Threads
113,143
Messages
1,427,150
Members
61,056
Latest member
Rafael Saraiva
Back
Top