Knott Today
New Member
- Aug 13, 2019
- 20
- Boat Info
- 260 Sundancer 2005
350 Mag Br 3
Raymarine C70
- Engines
- 350 Mag w Bravo 3
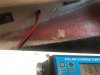
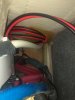
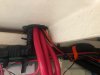
View attachment 74267 View attachment 74271
I have.
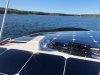
I’m using 2 x 100 watt flexible solar panels and a basic charge controller.
This setup will maintain my batteries all season.
Do you have any photos of how you ran through the cockpit and into the engine room...
")