Trim Senders Digital and Analog

pyro

Active Member
Dec 4, 2018
287
CT, Long Island Sound
Boat Info
2008 Sundancer 290
Engines
Twin 5.0L MPI Bravo III
Kohler 5ecd
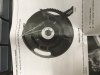
I'm trying to figure out these trim sender parts numbers. I have Smartcraft gauges with DTS. Currently I have a 2 wire puck on starboard and a 3 wire puck on port on each outdrive. On my old boat they used a analog sender and a trim limit. Sounds like these are a digital and an analog sender. And there is no trim limit to stop you from trimming up too much when moving?

Parts list for my drive shows three different types:
Trim Sender Analog 863187A1
Trim Sender Analog/Digital 8M0107462
Trim Sender Digital 8M0095310

The digital is labeled for newer S/Ns than mine. I think I only need a new digital gauge, and the analog gauge is wired into the boat harness but then never used since there are no analog (non smartcraft) gauges.

Will the 8M0095310 work for me? The digital only is half the cost of the digital & analog. They also look like these use different wire material. The lamp cord wires of the old design don't work for long.
 
If you want to get it right, call Mercruiser. I believe only the starboard puck is used on the DTS system...

(920) 929-5040

Bennett
 
I don't think DTS technically has anything to do with it. Instead its the use of the Smartcraft gauges that require the digital sender. I suppose you can technically have DTS with analog gauges. Also digital is on port side.

I took your recommendation and called today. The guy wanted engine S/N instead of outdrive and said the digital/analog sensors (8M0107462) is the correct part for my engine. He said the Digital version is the same as the digital version in the 8M0107462 digital/analog combination except it has a full seal (since it relies on only one set of wires) and will not seal with the analog sender and I'll sink the boat. I explained I wanted to remove the analog sender and he said it should work, although I didn't get an overwhelming amount of confidence in the conversation.

I think the Digital version comes with a block off dummy sender for the starboard side. I'll do a careful inspection of the seal to confirm it is the same. I'll also connect it before installing to make sure it works.

This is to only save a little money. Its stupid to buy a digital & analog sender for 2x the price and then never use the analog for any real purpose. If it was a one time purchase I would be ok, but these things are notoriously unreliable and will probably need to be changed in a few years again.
 
I’m in the same situation, so let us know if the digital only works. Also, how are you changing them out? I was able to do my old boat without removing the drive, assuming I can with this boat 08 310sa both had bravo 3 drives.

Also let us know where you’re getting the sensors
 
I am also changing the current exhaust boot to bellows exhaust. So I have the boot already off. Planning to take the back of the u-joint bellows off, hinge pins and then twist the bell housing 90 degrees to make access. YouTube perfprotech shows that method. But then I saw another website that says it could damage shift cable, so not really sure. I'll see how much access is there, but I hear you have to custom bend a open end wrench to get in there.
 
Received the new digital sender P/N 8M0095310. I temporarily hooked up the digital sender in the engine compartment for a test before actually removing the old sensors. I disconnected existing 3 wire digital sensor and plugged in new digital sensor. I also disconnected analog sensor. Turned engine switch on and once I rotated the center rotor of the sensor to be within range both the digital gauge and analog needle gauge worked as expected. I got between 0-25 on digital and was able to go full down and up on the analog needle gauge.

The part came with a few additional accessories that are not all consistent in online pictures. It comes with the connector pins already crimped on, but the connector housing is not attached but included in a bag. This is so the wires can be inserted through the transom assembly. It also comes with a blanking plate for the starboard side. These new sensors come with a different insulation material than the old stuff. Hoping it will finally last.

It came with very good instructions which I have not seen online. It even states in some finer print that if you have an analog sensor it must be removed. It also gives instructions to show that the outdrive just needs to be tilted fully down and steering turned hard to starboard. In this way you can just get to the bolt holding the grommet for the wires. It doesn't look easy and I know some people make a special tool to do it, but the good news is I'm not touching the hinge pins, u-joint bellows or bell housing! I am removing drives partially to check u-joint , gimbal bearing and engine alignment.

The instructions also say compatible with DTS & Axiom boats. They also say compatible with S/N greater than some number, which I am older than. I still don't completely understand why it has to do with DTS and not smartcraft digital gauges. My guess is all DTS had smartcraft gauges, lost support for analog gauges and is easier to track. I have both DTS & smartcraft gauges so I can't test this.

Hope this helps.
 
45A4BEC6-4E05-45E3-B701-A3BBC1B60143.jpeg
37B44EF4-2DF8-47A1-9A3C-FFD45694E65D.jpeg
CB451E5B-7CAE-497E-8B71-8D32E94FCA4D.jpeg
Do you have the smart craft operation manual?
If not, here’s the info on calibrating the trim gauge.
 
Pyro:
If you don’t mind, where did you get the digital trim?
Also, from the other thread, are you saying the mercathode wiring goes through the same hole as the trim wires?
 
Getting to the bolt:

What worked for me on another boat,
I have a long flathead screwdriver that fits into the end of a 1/4” socket just right to turn the bolt. place the socket on the bolt however you can get to it then insert screwdriver between gimbal ring and bell housing. you have to get drive trimmed and turned just right. I had to grind my screwdriver shaft just a bit to get enough clearance.

Worked perfect. By the way, dealer wanted $1500 to replace sensors on both drives.
 
Yes, I have the smartcraft manual. But thanks for posting the relevant calibration section. I'll scan in these instructions that came with the digital sensor.

I got the trim sender from NuWave marine in NJ.

Mercathode does not go through the same hole as trim senders. If I remember correctly, the mercathode wire actually comes through the top of the mercathode unit itself and seals into the bottom of the transom assembly, but in no way related to trim senders.

Screwdriver is a good tip if 1/4" u-joint doesn't work. And thanks for reminding me why I'm doing this myself! $1500 sounds like they were going to remove bell housing.
 
Quick update, I replaced both drive's with the digital only version. Analog pins are left disconnected at back of engine. Installed the blank that was included on the starboard side. Everything installed well. Getting that bolt back in took a lot of patience. It took about an hour to get each one in. I did a test connection before installing it to make sure the smartcraft system recognized it. Then installed it properly and turned key back on and got a trim sensor error on the smartcraft again! I had to re-read the directions and noticed you had to turn the rotor and align it to the mark. I figured since the smartcraft calibrates the position they were continuous. After repositioning the rotor, everything worked as expected. I'm getting trim number on the smartcraft guages which includes the digital LCD showing 0-25 and the smartcraft 4 in 1 needle gauge. I haven't yet calibrated, but seems easy to do.
 
Pyro,

I’m getting ready to do mine this week. Did you use a universal socket adapter to get to the bolt?
Any tips?
 
I'm updating my old thread since there's a lack of information on these digital trim senders. I see lots of threads about people attempting to calibrate them and then giving up and bringing it to a dealer.

There is a major trick that no one seems to mention! Unfortunately I can't find the instructions that came with the digital trim sender which is critical. If anyone orders one, please scan and post the instructions!

I had to replace the sender again after one year since it gave a few intermittent readings towards end of last season. I replaced entire transom assemblies, so it was not a big deal this time.

But the trick to calibrating these is they do not read in 360 degrees as many people on various forums would lead you to believe. You must line a nearly invisible mark on the rotor up to the inner ring when the drive is in the down position. The mark on the rotor is so small that I didn't see it the first few times. I thought it was a piece of dirt or something, but eventually realized its a mark. Its on the flat part right near one of the gear tips. I can't stress how impossibly small they made it! So that mark must be lined up with the mark on the inner ring. On one of my senders the inner ring mark is lined up with the "1" on the outside housing. On another sender the mark is lined up with the arrow on the outside housing. This part is not adjustable and I have no idea why they are different from MerCruiser.

sender.jpg

You will not be able to see the mark on the white rotor in this picture.

From there we did the calibration through Smartcraft guages. Start with down, then go to full up with is measured at the ram extending 21-3/4". Then trailer position. From there, it was still off a tiny bit at the down position. I would get to 0 but the drive was still able to go down for another second or two on the trim. So we manually tweaked the gauge and seemed to get it spot on. Went down all the way and just rotated the gauge until it was just under 1. Had to do this on both drives. If anything maybe we moved the trailer position a tiny bit lower, but that is fine with me.

Hope this helps.
 
You would think they come already lined up but maybe not. The drive should be in the down position, line up the marks on the sensor, then mount. If you zoom in you can see the groove in the white piece
 

Attachments

  • D5C2DF33-5BB8-4A6A-A463-1FFAEE2C3876.jpeg
    D5C2DF33-5BB8-4A6A-A463-1FFAEE2C3876.jpeg
    136.7 KB · Views: 320
When you were dealing with the analog/digital senders, is the analog puck just the trim limit or was it the full sensor? I am trying to convert my boat from analog to digital in stages and am wondering if I can install the analog/digital pucks when we have the drive off and use just the analog signal for a while.
 
Analog puck means analog sensor. The limit is a separate puck. So if you install the analog and digital that mine originally came with there is no trim limit switch. Theres nothing stopping you from trimming all the way up at 30 mph :eek:
 
Thanks pyro, that’s what I wanted to know!
 

Forum statistics

Threads
113,100
Messages
1,425,913
Members
61,018
Latest member
IslandGirls1020
Back
Top