370 AC - wire path from bilge to helm

romanservices

Member
Aug 24, 2016
182
Chesapeak Bay
Boat Info
1999 Sea Ray 370 AC, Raymarine es98 - AlbaCombi NMEA2K converter -
Engines
Twin 454 Horizon MAG MPI - replaced 2016
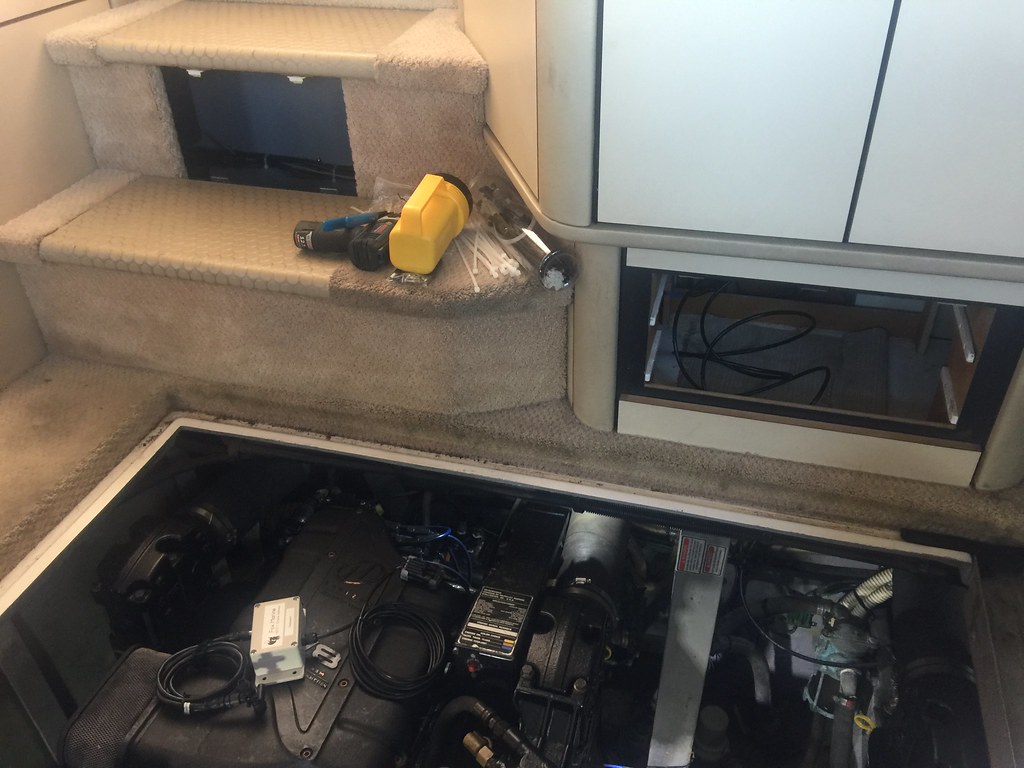
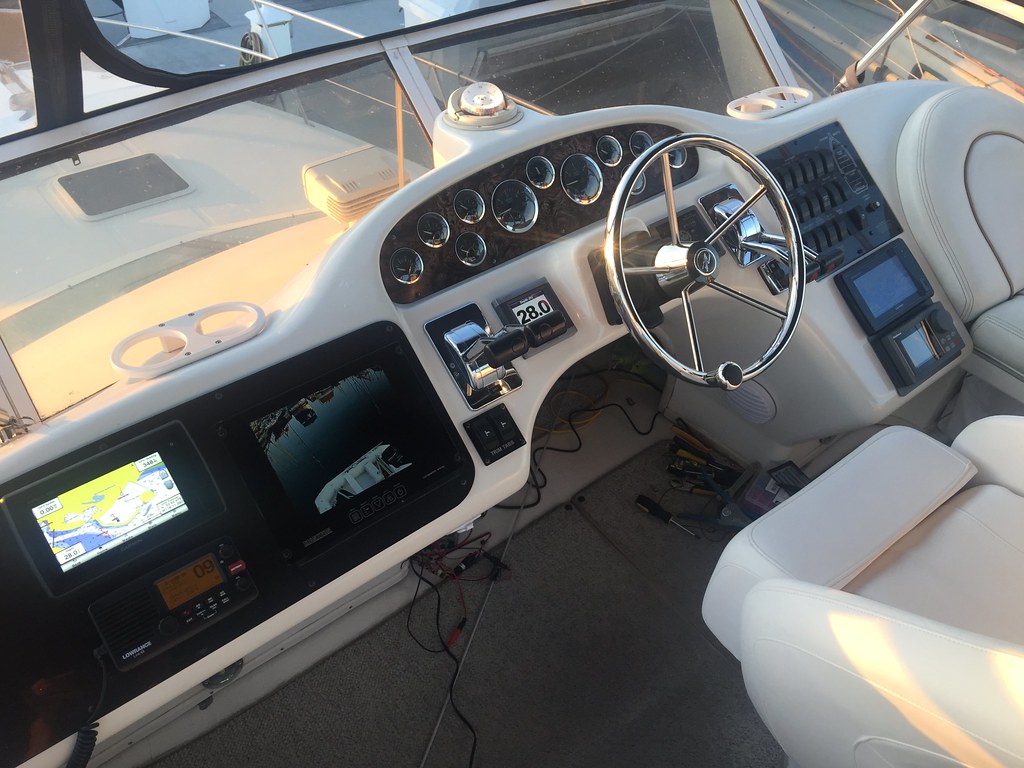
When I had the motors replaced I also had a new Raymarine down vision transducer installed. I'm ready to install my MFD and need some advice on how to run the transducer line up to the bridge. the new transducer is just forward of the stock one, right under the galley steps


Thanks
 
I ran my NMEA cables from the engines to under the TV cabinet. There should already be a hole there for the cable tv runs. You can make another hole if needed as behind it should be clear. Pull out the drawer and you can see where the cables go up. Once the drawer is out you can look to your left and see an existing wire run going under the salon steps. Follow those cables to the starboard side and they will get you by the main panel. I removed the two inside cabinet panels and routed around the Cruisair. So...

Once you are at the main panel it gets a little more involved but follow me. Remove the Vimar four switch plate by the sliding salon door. You can now run wire up from the bottom panel to the four switch location. What I did was use a long 1" wood chisel bit on a drill and drilled a hole straight across through the switch plate opening. To check the hole location BEFORE I made the hole I removed the access plate just outside the salon door. There should already be wires there from your TV and some larger harness cables inside there. If you put your arm inside you can go forward and feel where the hole is going to be drilled and check for clearance. Also, while you are in there run a screw driver through the lower drain hole as it tends to get clogged up.

Ok, so once you drill your hole behind the switch plate you can now run to the bridge. I used a fiberglass stick and tied the wires to it. I then had the wife push it forward as I was laying down under the roman seat with the speaker removed to grab the pole. Once it was to the speaker hole I then pushed it all the way forward to where the bridge curves and grabbed it through the open access hole there. Getting to the starboard access hole requires you to lay down and wedge yourself between the autopilot pump and forward bulkhead. It is a tight fit but it can be done.

Now that I have the hole drilled behind the switch plate I can run additional wires if needed. If I were you I would go and buy a NMEA cable and run the wires together so you have a NMEA connection to the engine area. I also ran a HDMI from the radio to the TV for ARC along the same route. I have a Fusion 750 under the panel so that was my original NMEA termination point but with the Fox Marine gateways I just added a NMEA cable to under the TV cabinet. I also added a Fusion remote on the bridge and since it is NMEA no additional cable runs were needed. I will eventually add a drawer fridge under the roman seat and will run the 10 gauge up the same route!

I would stay away from the port side as the original Nav equipment, the salon AC and some other wires makes the run a little more challenging.

31157987805_397ef530ff_b.jpg

30420668626_27b227bd19_b.jpg
 
Last edited:
We have a 380 AC no idea if cable runs are the same but in the engine room are 1" or so plastic conduits 4 in total I think that run to the upper deck. From there I ran through the void along the side of the upper helm in the wall. I ran a bunch of new wires through them for radio, radio antenna and VFH antenna wire. Uses an electric fish tape.
 
I finally got my transducer wired up with no extra holes! (well other than the one for the actual transducer) never had to touch the drill. My path started from right under the galley stairs directly port towards the washer/dryer room. I was able to fish it along with the other electrical lines running under a panel. once I was behind the removable wall to the left of the washer/dryer I could fish it along the port side behind the sofa and into the cabinet where the salon AC unit lives. While under the helm I found a grey conduit with a pull string in it. It took a while however I found it terminated right behind the port motor and it runs behind that cabinet where the salon air lives. Assuming that the 17 year old pull string probably wont hold up I did the old fluffy ball & shop vac trick and sucked a new string through in about 20 seconds. wedging my self into the access panels of the cabinet I put a T connector and ran my transducer line to the helm, I also took the opportunity to run a nmea backbone line from the helm to the engine bay. Because this conduit runs from the engine bay to the helm I sealed the T connector so no fumes would get into the cavity.

y4mlZMIPSxlSAEaJ0LD5qNjOeVct19ugqDt9y8zk3rG18DBn6HHF-0gxvcCuLM-iqoqz1A8ZRqYhWnsOKUjYEeTKjpHWwCQl3PrG6FpXlv_3px4AT_akNLoNCXREOEbrekoPY_GkceWKEGikt6bbzmKSWXVDQw8IrFJMeMjtqrn-tH8QUw084wfnD2iTGl1-5ky81AQ-3jphvJQsV8fCd9WPg


y4msLzNamHqCGbUDD4E8oeCT_5O5qGprk6yLPgiMfZP1dN6d58wdfQ0_68I0EnjDmwRiDIuASs1mdQnrE3-70GfZSyT44L7j6p9PD5YZ3_BeJQixxpUv5qCpl14MNM4efu1gu9BA4fYpOFviayfASZPCXE0AyfJ-KBkqo6Zq3PZ08EMokiqgk_Q16Ps3ck1Bx2Pe3vTjuYJKK5xo0uBsYuiKw
 
Good to see the transducer is ready. I like your approach. I ran an 8-pin 30' extension cable down the starboard side since I had to remove the upholstery panels due to a window leak. It then goes behind the microwave and the fridge to the transducer location. Your route probably would have been my original option. As an alternate choice, when installing the bilge heater, I cut a hole behind the stairs into the engine compartment. I plugged the AC bilge heater in next to the vacuum cleaner. I sealed that hole with some extra Garmin grommets but I could have run the cable out that new hole between the generator and the battery charger and then up from there.

I now have the cable waiting to the right of the original starboard transducer waiting for hall out. I bought a Garmin Xdcr and will swap it out for the original one when the boat is out for paint next month. Is your transducer already mounted in the original location?

33463702640_44131dd23b.jpg
 
Good to see the transducer is ready. I like your approach. I ran an 8-pin 30' extension cable down the starboard side since I had to remove the upholstery panels due to a window leak. It then goes behind the microwave and the fridge to the transducer location. Your route probably would have been my original option. As an alternate choice, when installing the bilge heater, I cut a hole behind the stairs into the engine compartment. I plugged the AC bilge heater in next to the vacuum cleaner. I sealed that hole with some extra Garmin grommets but I could have run the cable out that new hole between the generator and the battery charger and then up from there.

I now have the cable waiting to the right of the original starboard transducer waiting for hall out. I bought a Garmin Xdcr and will swap it out for the original one when the boat is out for paint next month. Is your transducer already mounted in the original location?

No, if I remember right the existing holes are too large due to the fact that they have a housing and can be removed while in water. Mine is installed just forward of the existing unit.

wish I would have taken pictures of it out of the water but this is the transducer
CPT-110
y4mCTIVVBRUVpNX8YsthKNtmKlPyIgSBqk0N0EoBM0jEKt_KTkLxlrxg41mXDCephMNalU6I0SZH0pCv61Rw9FnEc0YNId-qTvYXxfZDIE2hv8CywKneeRwSekhTp91s6v_UscaF34rWWDSJ-TEhCwZy0qaaUdLNXCjCKn224RexHk4ql3mpg0gnJiJtno3zOccEvM_Ab74wRpsD67Boadkpg
 
No, if I remember right the existing holes are too large due to the fact that they have a housing and can be removed while in water. Mine is installed just forward of the existing unit.

wish I would have taken pictures of it out of the water but this is the transducer
CPT-110

Uh oh. I measured the existing transducer and bought a Garmin one with the same measurements. I hope I do not have to have them cut another hole...

61nKWTRujGL._SX522_.jpg
 
Uh oh. I measured the existing transducer and bought a Garmin one with the same measurements. I hope I do not have to have them cut another hole...

Hey I just saw your youtube video... what's this monthly bottom cleaning you speak of? you brush the bottom? or scuba?
 
Hey I just saw your youtube video... what's this monthly bottom cleaning you speak of? you brush the bottom? or scuba?

Due to growth and worms here in Southern California we need to have a company come out once a month and clean the bottom of the boat. The diver will also check/replace anodes if needed. It is $68 a month and keeps the bottom clean and helps prolong the paint.

33012908444_2cdbeeefa3_c.jpg
 
Hey Gang!

I was able to use this same grey approx 3" flexible conduit to route a few cables from the engine bay to the port side under the helm. Not sure if it is a factory loom or not. Mine had the bowthruster cable run through it, but tons of room for more cables and the fish went through it EASY so there must not be many twists and turns in this run.

LB

My final installation is here: http://clubsearay.com/showthread.ph...lor-Radar-Sonar-Autopilot?p=934882#post934882

I finally got my transducer wired up with no extra holes! (well other than the one for the actual transducer) never had to touch the drill. My path started from right under the galley stairs directly port towards the washer/dryer room. I was able to fish it along with the other electrical lines running under a panel. once I was behind the removable wall to the left of the washer/dryer I could fish it along the port side behind the sofa and into the cabinet where the salon AC unit lives. While under the helm I found a grey conduit with a pull string in it. It took a while however I found it terminated right behind the port motor and it runs behind that cabinet where the salon air lives. Assuming that the 17 year old pull string probably wont hold up I did the old fluffy ball & shop vac trick and sucked a new string through in about 20 seconds. wedging my self into the access panels of the cabinet I put a T connector and ran my transducer line to the helm, I also took the opportunity to run a nmea backbone line from the helm to the engine bay. Because this conduit runs from the engine bay to the helm I sealed the T connector so no fumes would get into the cavity.
 

Forum statistics

Threads
113,270
Messages
1,429,731
Members
61,147
Latest member
bmel
Back
Top