DIY Prop Puller, less than $100

Gallf1

Well-Known Member
Sep 26, 2018
316
Palm Coast, FL
Boat Info
2000 Searay 380
Engines
Mercruiser 454 MAG MPI 7.4L
Custom Forward Hardtop
Whaly 270 Hard Dinghy, 4hp Honda

Bahamas Veteran
As part of my (possible) removal of Hurth V-Drive to replace the rattling Drive Plate while in the water, I decided to build a Heavy Duty prop puller to keep on the boat.

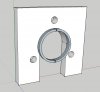
I just completed my DIY Hookah system so I jumped in the water to check dimensions for a prop puller. There is ample room for a 3/4" plate between the prop hub and cutlass bearing and the slot milled in the plate fits perfectly on 1/1/2" shaft. I then marked that plate while I was underwater for bolt locations (between the 4 prop blades) and measured the prop hub length at 4-1/4" (not including the outboard end of shaft with locking nut).
Materials:
(2) 6" x 6" x 3/4" mild steel plate cut-offs....Ebay $20.00
Machine shop mill a 1-5/8" "slot" for rear plate to fit behind prop....$50.00
(4) 1/2" x 8" Grade 8 Fine Thread bolts, washers, nuts $24.99
Drill 17/32" holes in both plates....1/2" drill and a few fermented beverages

I will assemble in the water one last time and then mark it to have a small relief milled in the outboard plate so that the shaft tip can recess in to it.
I will most likely paint at some point or just keep oiled and in a bag. I think its a great tool to have at home OR on the boat if you are far from home and may need to put on your spare props by yourself.
IMG_1426[1874].jpg
IMG_1450[1873].jpg
 
Quick question? How do you plan on removing the VDrive while in the water? Doesn't the shaft go through the drive and attach to a flange in the front?
 
Quick question? How do you plan on removing the VDrive while in the water? Doesn't the shaft go through the drive and attach to a flange in the front?
Glad you asked...!
  1. First thing is remove the prop (while in the water)
  2. Then remove flange at V-Drive...there is enough room between the end of the shaft and the bulkhead to get a flange puller in there. https://www.deepblueyachtsupply.com...MIi-qspp726wIVS77ACh1AmgXOEAQYASABEgLAkPD_BwE
  3. Push/pull the shaft back thru the V-drive (approximately 11-12") until it has cleared the V-drive.
  4. Make a temporary lifting truss with come alongs, Unbolt V-drive, support engine, remove starter etc etc to get V-drive up and out of the way to remove/install damper plate.
  5. Reassemble.
For safety I am going to add stop collars on the shaft to prevent the shaft accidentally "slipping" too far, along with some safety wire as well.
 
Nice tool, the prop puller attachment for the strutpro I just ordered looks exactly the same so yours should work well.

I have to ask, is it just that cost prohibitive to pull the boat to get the tranny out? Or maybe you don't want to lose the time in the water? I know different parts of the country have vastly different haul and block fees so that's why I'm asking
 
Last edited:
Nice tool, the prop puller attachment for the strutpro I just ordered looks exactly the same so yours should work well.

I have to ask, is it just that cost prohibitive to pull the boat to get the tranny out? Or maybe you don't want to loose the time in the water? I know different parts of the country have vastly different haul and block fees so that's why I'm asking
I hear ya...
Locally cost to haul is about $450 (in and out), about 40 miles away and each day on the hard is about $65.....I figure at least 3 days to allow for any unforseen issues. Given that I have recent bottom paint etc, I really dont need to haul out just yet. The boat lives on a dock behind my house so working on it at home is easier and access to tools etc etc is easier.

Since I am hearing from the vast majority of fellow SR owners that absent other indicators that the damper plate rattle is normal....I may just wait until I haul out.

I now have the tools I need and I already purchased the damper plate.

understandable, nice having it behind your house!
 
Glad you asked...!
  1. First thing is remove the prop (while in the water)
  2. Then remove flange at V-Drive...there is enough room between the end of the shaft and the bulkhead to get a flange puller in there. https://www.deepblueyachtsupply.com...MIi-qspp726wIVS77ACh1AmgXOEAQYASABEgLAkPD_BwE
  3. Push/pull the shaft back thru the V-drive (approximately 11-12") until it has cleared the V-drive.
  4. Make a temporary lifting truss with come alongs, Unbolt V-drive, support engine, remove starter etc etc to get V-drive up and out of the way to remove/install damper plate.
  5. Reassemble.
For safety I am going to add stop collars on the shaft to prevent the shaft accidentally "slipping" too far, along with some safety wire as well.

Good Luck with everything..
 
...I decided to build a Heavy Duty prop puller to keep on the boat. <..> There is ample room for a 3/4" plate between the prop hub and cutlass bearing and the slot milled in the plate fits perfectly on 1/1/2" shaft.

I picked up some 1/2 plate steel in an attempt to copy what you've done.. I prototyped the first piece (with the slot) that fits behind the prop out of plywood - just to make sure my measurements where good to go. I ran into a slight problem -- the blades (3-blade) on my prop actually extend beyond the prop hub. Meaning -- the steel plate actually hits the trailing edge of the blades before it contacts the hub of the prop. I'm thinking I'll need to add a spacer - 1.5" ID tube, cut in half, 1/4" length (similar to the strut-pro setup). Any other ideas/thoughts?
 

Attachments

  • plate_wSpacer.JPG
    plate_wSpacer.JPG
    50.8 KB · Views: 145
Hey...
Interesting problem....my props are 4 blade and I didn’t have that problem. Not sure what size you plates are, (mine are 6” x 6” square).

would slightly reducing the size or shape of the plate do away with the need for a spacer?
 
Anytime they remove my props they need to heat the hub of the prop....how are you getting away without doing that.... and you can’t be holding your breath... what are you using for air?
 
I made/have an electric hookah with 100’ of air hose, so no issue with air.

I would never let anyone use heat on any part of my prop,shaft or running gear as it changes its characteristics and could lead to failure (former commercial diver).
Once you have cranked down on the prop puller bolts, a few taps on the puller plates with a hammer will induce enough of a harmonic shock to break the prop loose of the tapered end and keyway.
 
I would never let anyone use heat on any part of my prop,shaft or running gear as it changes its characteristics and could lead to failure
The heat on the prop only is not enough to change the metallurgical properties by a long shot...plus it’s always been a prop that’s been hit
 
Finally - Success!

I'm using a 4"x4"x1/2" plate. If I started removing material from that plate (to avoid the prop blades), it almost ends up as a triangle, with the tips cut off. I opted to us flat washers (1.5ID x 2.25OD x 14ga) with the side cut out - as spacers. After a few hours with a cutoff tool and the drill press -- we were set. Definitely jealous of your $50 well spent on the CNC work - I couldn't find anyone locally.

IMG_2581.jpg IMG_2585.jpg IMG_2586.jpg IMG_2587.jpg IMG_2588.jpg

Next up - taking a piece of 2" OD pipe, slicing it lengthwise, and see if I cant augment this into a cutlass bearing removal tool.
 
Finally - Success!

I'm using a 4"x4"x1/2" plate. If I started removing material from that plate (to avoid the prop blades), it almost ends up as a triangle, with the tips cut off. I opted to us flat washers (1.5ID x 2.25OD x 14ga) with the side cut out - as spacers. After a few hours with a cutoff tool and the drill press -- we were set. Definitely jealous of your $50 well spent on the CNC work - I couldn't find anyone locally.

View attachment 95002 View attachment 95003 View attachment 95004 View attachment 95005 View attachment 95006

Next up - taking a piece of 2" OD pipe, slicing it lengthwise, and see if I cant augment this into a cutlass bearing removal tool.

That thing looks like it hasn't been off in a coons age, good on ya for persevering. Be sure to thoroughly clean and lap the mating surfaces' upon reinstallation.
 
Last edited:
I’ve have been thinking of having the same thing made up for years now. The cost to buy them seem outrageous. Nice job!
 

Forum statistics

Threads
113,218
Messages
1,428,821
Members
61,115
Latest member
Gardnersf
Back
Top