Correct. There are those little covers they just pop off and reveal the screws. They are a pain to get back on. Or I should say to stay on. It will give you more access either way.Good tip @Kbratko, I will check for that first. When you say you removed the molding, I assume you meant from inside? How did you do that? There are what appear to be a couple of small screw covers in the vinyl ring in the ceiling around the windows, is that actually what they are? Do they pry off to reveal screws, or is there something else involved?
Navigation
Install the app
How to install the app on iOS
Follow along with the video below to see how to install our site as a web app on your home screen.

Note: This feature currently requires accessing the site using the built-in Safari browser.
More options
You are using an out of date browser. It may not display this or other websites correctly.
You should upgrade or use an alternative browser.
You should upgrade or use an alternative browser.
Official 320 Dancer Thread
- Thread starter boltman
- Start date

Countdemonet
New Member
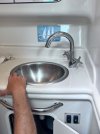
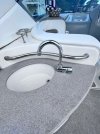
I got the cockpit tap in 2021 from https://www.iboats.com/shop/cabin-and-galley/fresh-water-boat-systems/scandvik-basin-tap.htmlHas anyone replaced the cockpit sink faucet, bathroom faucet ?? If so do you have a link for the one you purchased ? TIA
Harmon
Member
- Jun 28, 2011
- 363
- Boat Info
- Current: 2006 320DA as of 6/7/19
Previous 1997 Sundancer 250
1989 Basstracker 40HP
- Engines
- Twin 350 Horizon with Vdrives
Single 7.4 Ltr carbed
Bravo 3 outdrive
Thanks Hammer, just saw this. I was at the boat yesterday to check leaks and its still there. We've had a lot of rain in NJ this month!. Anyway so far I've re-bed the bow rail, nav light on star side. Caulked the deck hatch including screws , ran a small bead around forward sunpad rail bases.My 05' 320 I resolved this exact situation and 100 percent Its the deck hatch...re bed your deck hatch. the water gets in the deck hatch and slowy dribbles in the ceiling and drips and pools to that corner and stains the speaker and bed area.
I did find that the hatch seal has about a 2.5 inch crack in it facing up. There was acually water in bulb part that I could squeeze out. It looks like the water runs around the seal and to the underside of deck and makes its way down the side of hull. There is a dirty water stain that runs down I can see . Went to HD and got some flat weather stripping and added it to the locker lid to make contact with trim seal for now.
Anyone eplace that trim seal? Its part number 816322 3/8 w 5/8 bulb in manual.
Is it one piece? Mcmaster Carr has a big selection by the foot.
Thank you
MJD
New Member
- Apr 13, 2022
- 11
- Boat Info
- 2004 Sundancer 320DA
- Engines
- Mercruiser 350 Horizons, V-Drive
I dug it out (small flat tool & utility knife), cleaned with acetone and then a few days later resealed it.Thanks for the feedback @MJD, too bad about the fridge - that sucks. Can I ask how in-depth did you get with resealing those round windows? Did you totally remove them, or did you just dig out the sealant that was there (from above) and reseal it with the 3M 4200? I assume there is probably around 1/2" or so of sealant up top?
leeron
New Member
- Oct 4, 2023
- 25
- Boat Info
- 2004 320 Sundancer
2007 Sea Ark 2472MV
- Engines
- Twin 5.7L MPIs
115 ETEC
Spring has sprung here in SE Virginia! We took our maiden overnight voyage over St. Patrick's Day Weekend. It was about a 24 mi run, roughly 2 hours.
Attachments


KG & JJ
New Member
- Oct 16, 2023
- 20
- Boat Info
- 2006 SeaRay Sundancer 320
Zodiac Yachtline 360 DL
- Engines
- Mercruiser
I hated both original faucets on our 2006 dancer and replaced them when we first bought the boat last fall. We do not use our boat for showering. We use the shower house at the marina, so we chose not to put a hand sprayer back in the head. I don't have links, but I have pics. I remember searching on line for "small chrome faucet for boat" and quite a few options popped up. The nice thing about the cockpit faucet is that it can fold down and out of the way so you can use that area for a cooler or a platter of food, etc. Even though it was a small upgrade, I thought it gave the boat an updated look. Post pics of what you end up getting.Has anyone replaced the cockpit sink faucet, bathroom faucet ?? If so do you have a link for the one you purchased ? TIA
Attachments
White Shadow
Active Member
- Feb 17, 2023
- 127
- Boat Info
- 320 Sundancer 2005
AB Dinghy w/9.9 Merc
Axiom 9 MFD
Kohler Model 5E Generator
- Engines
- Twin Mercury 350 MPI Horizons w/Bravo III Drives
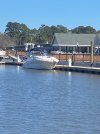
We moved our 320DA from North Vancouver down to Point Roberts WA yesterday due to our marina closing down. We are quite happy with the new marina. It was a decent day, a little cool but still ok. Gives me an excuse to post this picture! 

Harmon
Member
- Jun 28, 2011
- 363
- Boat Info
- Current: 2006 320DA as of 6/7/19
Previous 1997 Sundancer 250
1989 Basstracker 40HP
- Engines
- Twin 350 Horizon with Vdrives
Single 7.4 Ltr carbed
Bravo 3 outdrive
So i got a new length of gasket from SR for the anchor locker hatch. Installed that and sadly after some rain there was water in the same area, starboard forward right near where the speaker was installed in Vberth. So frustrating. I Peeked around in hte locker as best I could and did feel a wet spot, drip source coming from the eye for the anchor lanyard. You would think that b/c that is dead center it would just drip off the thru bolts and drip on the rope. My new theory is it is running along the under side of deck and making its way to the aft corner of locker and running down inside the hull to the vberth area behind the speaker. I removed that eye and rebed it, the sealant was 18 years old and dried out. I havnt been back to check yet, fingers crossedThanks Hammer, just saw this. I was at the boat yesterday to check leaks and its still there. We've had a lot of rain in NJ this month!. Anyway so far I've re-bed the bow rail, nav light on star side. Caulked the deck hatch including screws , ran a small bead around forward sunpad rail bases.
I did find that the hatch seal has about a 2.5 inch crack in it facing up. There was acually water in bulb part that I could squeeze out. It looks like the water runs around the seal and to the underside of deck and makes its way down the side of hull. There is a dirty water stain that runs down I can see . Went to HD and got some flat weather stripping and added it to the locker lid to make contact with trim seal for now.
Anyone eplace that trim seal? Its part number 816322 3/8 w 5/8 bulb in manual.
Is it one piece? Mcmaster Carr has a big selection by the foot.
Thank you
West Coast
Active Member
I hear a lot of people are moving back down to Point Robert’s… sorry to hear about Mosquito Creek but it will open up the San Juan islands and Sucia is a quick trip for you. Hopefully Point Robert’s gets back to its glory day. I moved back up to Vancouver from Semiahmoo Marina during COVID.Have a great Summer and enjoy the cheap gas and boozeWe moved our 320DA from North Vancouver down to Point Roberts WA yesterday due to our marina closing down. We are quite happy with the new marina. It was a decent day, a little cool but still ok. Gives me an excuse to post this picture!
View attachment 161413
Harmon
Member
- Jun 28, 2011
- 363
- Boat Info
- Current: 2006 320DA as of 6/7/19
Previous 1997 Sundancer 250
1989 Basstracker 40HP
- Engines
- Twin 350 Horizon with Vdrives
Single 7.4 Ltr carbed
Bravo 3 outdrive
So that didnt work either. Im running out of things to re-bed up at the front. Im thinking windlass next and then anchor davit and anchor cleat.So i got a new length of gasket from SR for the anchor locker hatch. Installed that and sadly after some rain there was water in the same area, starboard forward right near where the speaker was installed in Vberth. So frustrating. I Peeked around in hte locker as best I could and did feel a wet spot, drip source coming from the eye for the anchor lanyard. You would think that b/c that is dead center it would just drip off the thru bolts and drip on the rope. My new theory is it is running along the under side of deck and making its way to the aft corner of locker and running down inside the hull to the vberth area behind the speaker. I removed that eye and rebed it, the sealant was 18 years old and dried out. I havnt been back to check yet, fingers crossed
Harmon
Member
- Jun 28, 2011
- 363
- Boat Info
- Current: 2006 320DA as of 6/7/19
Previous 1997 Sundancer 250
1989 Basstracker 40HP
- Engines
- Twin 350 Horizon with Vdrives
Single 7.4 Ltr carbed
Bravo 3 outdrive
My next attempt will be the hinge of the anchor locker. I was at the boat yesterday and observer that at least 1-2 screws were sloppy loose. To the point that the hole might be worn out. My theory is that the more I worked the hatch/ put new fatter seal on, over the last 4 months exacerbated an already small leak. Sat project.So that didnt work either. Im running out of things to re-bed up at the front. Im thinking windlass next and then anchor davit and anchor cleat.
White Shadow
Active Member
- Feb 17, 2023
- 127
- Boat Info
- 320 Sundancer 2005
AB Dinghy w/9.9 Merc
Axiom 9 MFD
Kohler Model 5E Generator
- Engines
- Twin Mercury 350 MPI Horizons w/Bravo III Drives
Well I finally got around to pulling the molding around the starboard ceiling round window as suggested by @Kbratko so I could have a better look around to see where the drips were coming from. Unfortunately I discovered that this must have been leaking for years as I found a lot of mold and rotted plywood. I have a number of pictures but am only attaching this one to give a general idea (and I didn't want to gross anyone out with some of the others). This is actually taken after I had scraped out all the mold and sprayed it down with a mold killer. The strange thing is we only ever saw maybe 2 drips, and never found water on the floor or anything. It must have just been pooling up there for ages.I dug it out (small flat tool & utility knife), cleaned with acetone and then a few days later resealed it.
So now I'm looking at removing and replacing the plywood in the ceiling (along with the vinyl headliner and anything else even remotely close by that may have mold on it (we don't like mold). I had a repair guy by yesterday looking at this with me and he is putting together an estimate. He has advised that it will be a range since a lot of it will depend on what we find when we get the headliner off. He said it's not horrible overall, but that depending on how Sea Ray had put this all together this will effect how much we have to take out, and what needs replaced (for example, is the headliner all one piece, or was it joined. Also how the plywood panels were installed, etc.). He is going to contact Sea Ray to see if they have diagrams outlining how this was all assembled. He is also going to ask about the source for the vinyl.
Have any of you ever had the pleasure of pulling the headliner and/or having to replace any of the plywood in the ceiling? I'd be very grateful for any advice on what is involved in this and what order to remove things in. Also if anyone has replaced the vinyl where did you get it from?
On a side note, I did also reseal the window from above. A bit late though...
Grosen
Member
Anyone with a bow thruster know the prop size? Looking to switch out to a 5 blade prop for the thruster
White Shadow
Active Member
- Feb 17, 2023
- 127
- Boat Info
- 320 Sundancer 2005
AB Dinghy w/9.9 Merc
Axiom 9 MFD
Kohler Model 5E Generator
- Engines
- Twin Mercury 350 MPI Horizons w/Bravo III Drives
I figured out how to tighten the stairs going down to the cabin and figured I'd share with you all.
The 3 bolt heads are underneath the SS threshold strip. Take the 4 screws out of the threshold strip and I also suggest you take the screw out of the plastic trim piece going up the side as this makes moving the threshold easy. Once the bolt heads are exposed, you might be lucky and simply be able to tighten them from here.


Unfortunately for me, 2 of them were just spinning so I ended up having to drill about a 1" hole underneath and behind the stairs. From there I could get a socket on an extension in to hold the bolt while I had someone else up above tightening the bolt. For the record the nut is a 12mm (or possibly a 15/32"). I can pop a cover over this hole easily enough. My stairs are now much better.

I'm heading to Myrtle Beach on Saturday for a week of golf with a bunch of buddies. When I get back I will be dealing with my rotten plywood ceiling dilemma. Something to look forward to...
The 3 bolt heads are underneath the SS threshold strip. Take the 4 screws out of the threshold strip and I also suggest you take the screw out of the plastic trim piece going up the side as this makes moving the threshold easy. Once the bolt heads are exposed, you might be lucky and simply be able to tighten them from here.
Unfortunately for me, 2 of them were just spinning so I ended up having to drill about a 1" hole underneath and behind the stairs. From there I could get a socket on an extension in to hold the bolt while I had someone else up above tightening the bolt. For the record the nut is a 12mm (or possibly a 15/32"). I can pop a cover over this hole easily enough. My stairs are now much better.
I'm heading to Myrtle Beach on Saturday for a week of golf with a bunch of buddies. When I get back I will be dealing with my rotten plywood ceiling dilemma. Something to look forward to...
Harmon
Member
- Jun 28, 2011
- 363
- Boat Info
- Current: 2006 320DA as of 6/7/19
Previous 1997 Sundancer 250
1989 Basstracker 40HP
- Engines
- Twin 350 Horizon with Vdrives
Single 7.4 Ltr carbed
Bravo 3 outdrive
Hey White shadow. Did this water incursion show itself anywhere else down the line. If you've read my posts I have water coming in to the vberth right by the speaker. I am wondering if you have seen any sighn there? or was it just the drip from around the trim ring of the skylight?Well I finally got around to pulling the molding around the starboard ceiling round window as suggested by @Kbratko so I could have a better look around to see where the drips were coming from. Unfortunately I discovered that this must have been leaking for years as I found a lot of mold and rotted plywood. I have a number of pictures but am only attaching this one to give a general idea (and I didn't want to gross anyone out with some of the others). This is actually taken after I had scraped out all the mold and sprayed it down with a mold killer. The strange thing is we only ever saw maybe 2 drips, and never found water on the floor or anything. It must have just been pooling up there for ages.
So now I'm looking at removing and replacing the plywood in the ceiling (along with the vinyl headliner and anything else even remotely close by that may have mold on it (we don't like mold). I had a repair guy by yesterday looking at this with me and he is putting together an estimate. He has advised that it will be a range since a lot of it will depend on what we find when we get the headliner off. He said it's not horrible overall, but that depending on how Sea Ray had put this all together this will effect how much we have to take out, and what needs replaced (for example, is the headliner all one piece, or was it joined. Also how the plywood panels were installed, etc.). He is going to contact Sea Ray to see if they have diagrams outlining how this was all assembled. He is also going to ask about the source for the vinyl.
Have any of you ever had the pleasure of pulling the headliner and/or having to replace any of the plywood in the ceiling? I'd be very grateful for any advice on what is involved in this and what order to remove things in. Also if anyone has replaced the vinyl where did you get it from?
On a side note, I did also reseal the window from above. A bit late though...
View attachment 162034
White Shadow
Active Member
- Feb 17, 2023
- 127
- Boat Info
- 320 Sundancer 2005
AB Dinghy w/9.9 Merc
Axiom 9 MFD
Kohler Model 5E Generator
- Engines
- Twin Mercury 350 MPI Horizons w/Bravo III Drives
Hi @Harmon - At this point it has just been around the window (knock on wood). I’ve read your posts and others like it, I’m surprised you haven’t tracked it down yet. Good luck!
WV 320 Dancer
Well-Known Member
- Oct 28, 2018
- 971
- Boat Info
- 2003 Sea Ray Sundancer 320
- Engines
- Twin 350 MAG - V Drive
During our re-commissioning this week we discovered an issue with our spotlight. It will rotate side to side and it will rotate down, but it will not rotate up. I am hoping it is the switch on the control panel and not the light itself. Does anyone have a wiring diagram for the switch or can anyone offer guidance who has experienced this before? I would like to do some troubleshooting before I spend the money on a new switch.
leeron
New Member
- Oct 4, 2023
- 25
- Boat Info
- 2004 320 Sundancer
2007 Sea Ark 2472MV
- Engines
- Twin 5.7L MPIs
115 ETEC
I don't have direct experience troubleshooting the spotlight but you can look up the wiring diagrams in the owners manual from SR website. Here: Sea Ray OwnersDuring our re-commissioning this week we discovered an issue with our spotlight. It will rotate side to side and it will rotate down, but it will not rotate up. I am hoping it is the switch on the control panel and not the light itself. Does anyone have a wiring diagram for the switch or can anyone offer guidance who has experienced this before? I would like to do some troubleshooting before I spend the money on a new switch.
I took a look and I think it's shown here. So either the "spotlight control" (switch assembly), cable, or the spotlight itself. Maybe try to stand near the light while someone else try's to move it up. That way you may see if it is "trying" to move.
KG & JJ
New Member
- Oct 16, 2023
- 20
- Boat Info
- 2006 SeaRay Sundancer 320
Zodiac Yachtline 360 DL
- Engines
- Mercruiser
We bought our 2006 320 dancer last Fall and we are trying to make some upgrades to the boat to give her a facelift. The anchor is bent. Original owners had her in a shallow lake much too small for her. Probably caught the anchor under a tree or something. It still works but it just adds to making the boat look a little rough... Has anyone swapped out the original anchor for a stainless steel anchor? If so, was it easy to do and where did you find the new ss anchor?
Shenanigans77
Well-Known Member
I did do this but found nothing other than the original kodiak anchor fits the roller real well. Bought a 316 stainless plow anchor and changed the bow roller to a stainless ultra marine rollerWe bought our 2006 320 dancer last Fall and we are trying to make some upgrades to the boat to give her a facelift. The anchor is bent. Original owners had her in a shallow lake much too small for her. Probably caught the anchor under a tree or something. It still works but it just adds to making the boat look a little rough... Has anyone swapped out the original anchor for a stainless steel anchor? If so, was it easy to do and where did you find the new ss anchor?
