Transmission Coolers (acid dip)

missnmountains

Active Member
Dec 12, 2007
560
Florida
Boat Info
2008 58 Sedan Bridge
Engines
900 Man
Coming back from our "Plan B" trip, we left Hawks Cay across the Florida Bay and along the west coast of Florida home to Cape Coral.

About 10 miles north of the Keys, our port engine heated up to around 188 (typically 174-175). Paging through the Smartcraft, I noted the port transmission gear temp was 176 degrees (typically 150 to 155).

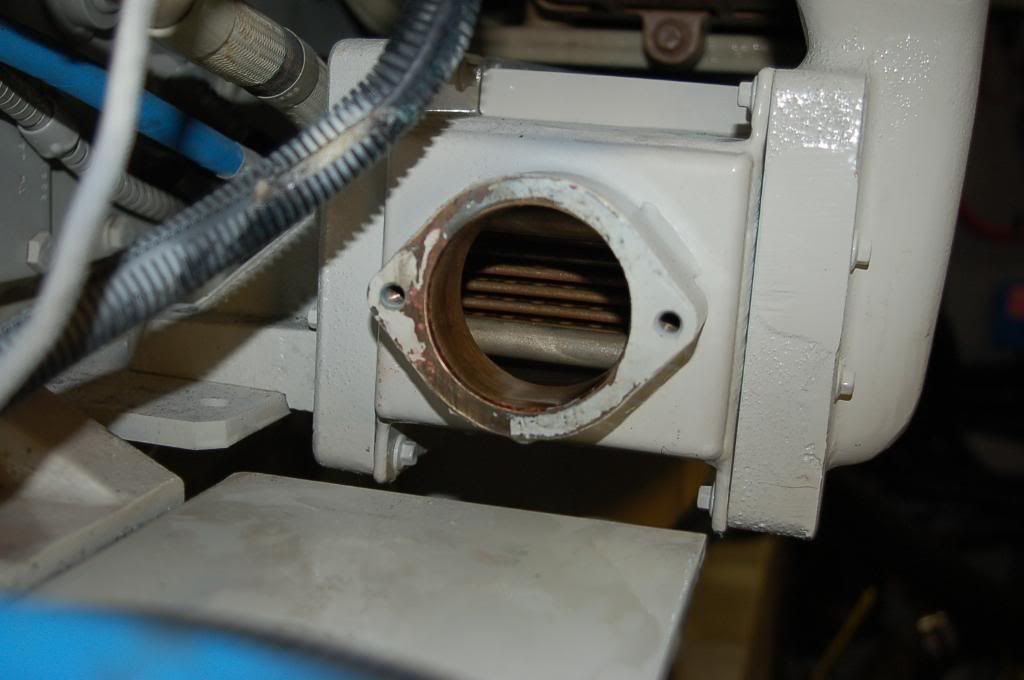
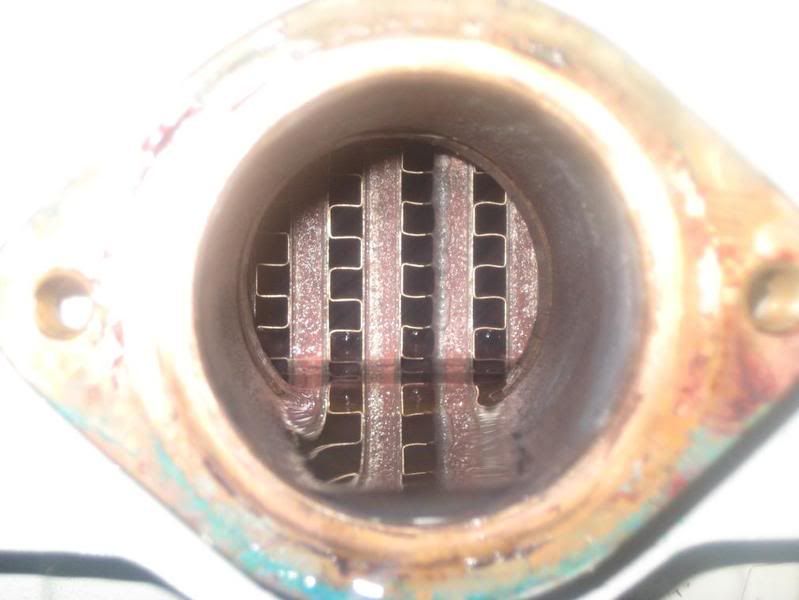
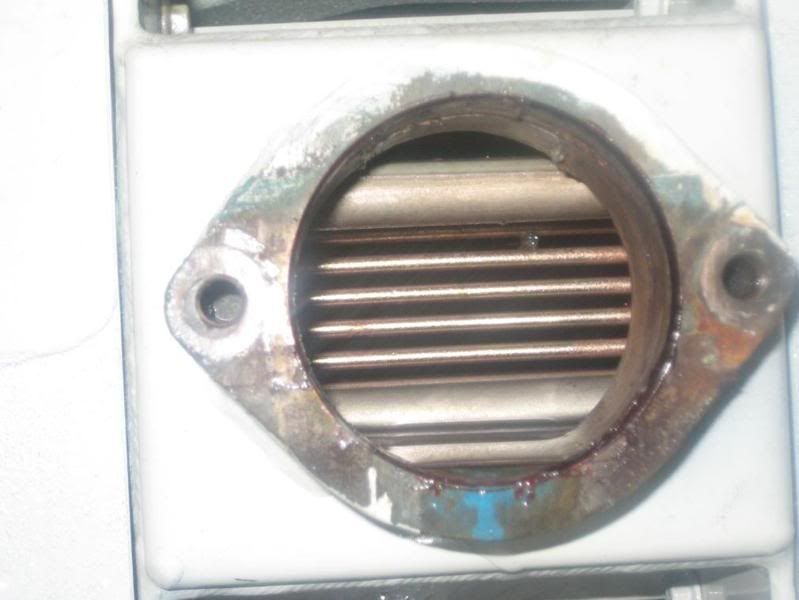
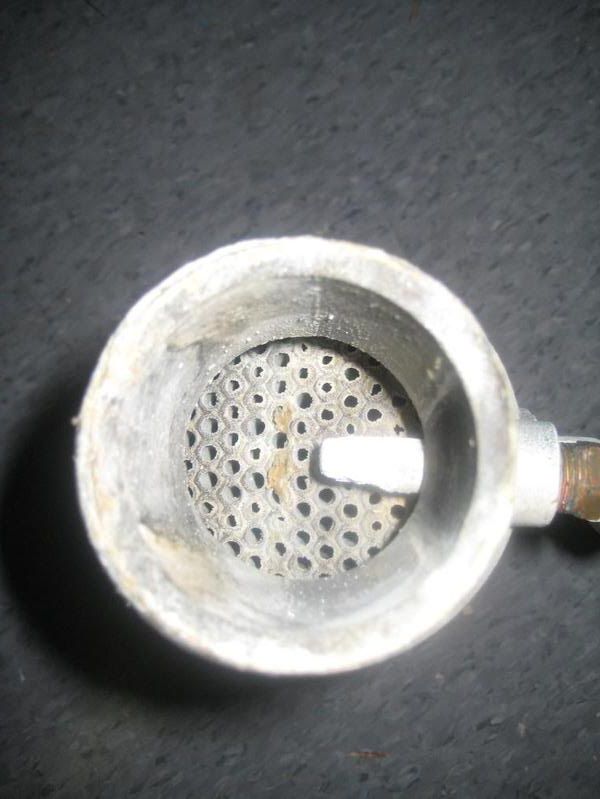
We got home ok, but last week, I had our mechanic look at it. He pulled the cooler and noted it was clogged up. An acid dip cleared it out and it is fine now.

My question: is this a normal maintenance procedure? We now have 325 hours on the engines/tranys.

Any help is always greatly appreciated.

Ken
 
Hi Ken:

The entire raw water cooling system requires periodic cleaning. Some do it annually or every 300 hours using a recirculation approach. Typical duty cycle is to remove all these HE & After Cooler and have them cleaned by ultrasound, then each pressure checked. and repaired as necessary.

HOW to DIY on interim tear down cycles:

Set up a large bucket, small bilge pump, a feed hose and return hose (hoses can be scrap garden hose). Make simple PVC rigs to adapt into the raw water hose off the sea water pump (Input side) back to the bilge pump in the bucket, and then a PVC pipe and fitting to reduce from the raw water hose going into the exhaust riser and runs back into the bucket.

Close the raw water seacock, remove the raw water hose from the output flange on the cooling water pump and insert your PVC converter and clamp. Attach the other end of the hose to the bilge pump in the bucket.

Remove the hose from the exhaust riser and insert the PVC reducer & clamp and run the return hose to the bilge. Fill the bucket with fresh water and connect the pump and purge the system of sea water, note how much water it takes to get the first strong stream from the out put hose. You'll need to know this later.

After purging the sea water cooling system you're going to make up an acid solution in the bucket that will be recircuated to remove scale, shell and other mineral debris.

I use a product “BUSTER Concentrate” which is 80% Phosphoric Acid.

http://trac-online.com/barnaclebuster.htm

This acid cleans slower but will not attack metals or the solder in the Heat Exchangers. Muriatic Pool Acid or H2SO4 work faster but can kill your system.

Make up your acidizing solution in the bucket according to instructions. BUSTER is tinted blue so it makes the next step easy.

Now having noted the volume of the raw water side you'll need at least this much solution plus about a gallon.

Begin pumping in the acid solution and run the clear purge water into the bilge. When you begin to get tinted acid solution put the return line into the bucket and let the acid clean your entire raw water system. It will take 3-4 hours if performed annually 8-10 (overnight) hours if every 300 hours.

The solution will get cruddy looking but it's still working. If your bucket is going to run dry before the return line is returning acid solution, add more mixed solution to the bucket.

After the cleaning process is completed, you are going to run the acid solution into a new bucket(s) for reuse. You'll purge out the acid with clear water. When clear water is running from the output side, put the return line back into the pump bucket which now is full of clear water. Add 4# of Baking Soda to the clear water, (I use the Baking Soda from my onboard fridge & Freezer) stir a bit and then begin circulating this solution for 20-30 minutes to neutralize the acid in the cooling system. When your done, remove the hose adapters and reclamp (See below on sea strainers).

Repeat the process on the second engine, Then

The Generator, Then

The AC system raw water side.

Then soak the strainers, then

Scrub the thru hulls and any rusting stuff fin the ER


TIPS:

The first time you do this it might take several hours to get it all set up with the fittings, hoses and clamps. After you'll set it up and get it running in 20 minutes or less. Actual DIY time might be 30-40 minutes per engine.

On my AC system I have a cross over hose rig which lets me clean both units at once.

One gallon of Buster Concentrate will clean two 6CTA's, One 8KW Genny and two AC systems and still have kick to: de-rust all your tools, soak your sea filters; scrub down the green crap on the through hull fittings and other metal that has rusted or corroded. Anything left, dump it into the drink as its biodegradable and generally sea safe.

Wash those things exposed to acid with the Baking soad solution as well!

Yes you save the solution after each engine and just reuse it, ad some acid if you think its needed. If your engines are really fouled you might need to add a pint or two more acid during the cleaning process.

I test my solution strength in a very simple way. When I first set up the solution and start the pumping I stop for a moment and drop a small pinch of Baking Soda into the bucket and note the fizzle strength. If the solution is loosing its punch test again and of the fizzle is less pronounced and just ad some straight BUSTER to the slurry.

All done? Clean down the ER with the baking soda solution (inc the battery box and surrounding area) and the hose down the ER into the bilge and wet vac dry the swanky clean ER :smt038

This is a very thrift money saver process:

Hire it done:

Diesel Mechanic time and materials 2 days $1,600 plus materials $150.00 bucks Estimated cost $1,750.

Marine AC Tech, 5 hours for $500.00 plus materials $75.00 Estimated $575.00

CheckBook Maintenance $2,325.00 Plus tax

DIY Cost.

1 Rainy Summer week end you woun't have to go to the mall.

One Time costs: Pump $45. Hoses and PVC $40, 1 gal. of Buster $75.00, safety goggles $5.00

Estimated 1st time cost $165.00 There after $75.00

You save $2,165.00 Per year in Boat Dollars.

Put a TV in the ER and watch the game while its all going on!

The 600 hour tear down should cost less because you're not going to need a week of radiator shop time to clean & pressure test.


IMPORTANT UPDATE: You must remoe the Zincs from the Heat Exhangers and replace the bronze plugs. Zinc will consume your acid until they are gone and really slow down the cleaning effectiveness of the acid.
 
Last edited:
Chad,

Wow you know your stuff. I have printed your post and will add it to my maintenance book.

Thanks

Ken
 
To add to what Chad said, I've found that one needs to use a LARGE container for the pump kit for this job. If you have a lot foaming action from the scale reacting with the acid, the foam will overflow the bucket and make a mess. I actually use an 8 gallon container now for my pump kit as the 5 gallon bucket would get 3 gallons of foam in it and start overflowing.

My 2 cents.

Good write up.... It's basically what I do every couple of years... and my heat exchangers look great.

I don't have a picture of my flush kit I made but I know Dominic has a picture of his... I couldn't find it so maybe he'll repost it.
 
Last edited:
Gary, I've not experienced the foaming, I suspect you're getting alot organic shell (Calcium) in your system that reacts with a foaming action. You've already fixed the issue for your need. But If I encounter it I'll put just two three drops of something like cooking oil on top of the slurry as that will kill the foam and reamain biodegradable. Might work.
 
OH, the bilge pump i bought for this purpose is a Rule 500 GAl Per Hr with internal float switch. I added small battery clamps to the attach to the house bats in the ER.

The pressure side of the RULE fits a 5/8 garden hose and I just push the hose on and don't bother clamping that connection.
 
I just take mine to the local radiator shop and let them do the job. They clean them just as mentioned above. For me - not worth spilling any acid or clean up for the novice.
 
I just take mine to the local radiator shop and let them do the job. They clean them just as mentioned above. For me - not worth spilling any acid or clean up for the novice.

I'm going to get on my soapbox and rant about this because I don't agree with the "not worth spilling..." part.

Doing what you suggest for my QSM-11's would involved breaking down each engine and removing 2 fuel coolers, 2 aftercoolers, 2 coolant heat exchangers, and 2 transmission coolers. That would involve 8 heat exchangers and would involve having to remove the salon floor in my boat to get the coolant heat exchangers off. On top of that, it would not get done every year or two but would be a 5+ year job and basically waiting until they get all crapped up to make it worthwhile. The cost to break down the raw water circuit would be many man hours and ridiculous expense with regards to new gaskets, replacing the coolant, and potential leak issues.

Doing an acid flush (like Rydlyme, Barnacle Buster, etc.) as "preventative" maintenance keeps the raw water circuit clean and trouble free. This is picture of the inside of the raw water side of the engine coolant heat exchanger (transmission cooler is removed).

effbe6e9.jpg


You can see that even after 6 years of use, the heat exchanger is clean and working at 100%.

It kills me that people are so eager to change their oil with the latest "deep purple super heavy duty slick willy goop" every 6 months but let their raw water cooling system go to crap before they take it to a radiator shop.

Being able to properly flush the raw water system is even covered in the Cummins QSM-11 manual. Flushing out these circuits (AC, genny, mains, etc) and keeping the impellers in top shape is part of good maintenance IMO. I think the manual says every 2 years on the flush....
 
Last edited:
Here... more pics... Aftercooler after an acid flush:

IMG_2483.jpg


Coolant heat exchanger after an acid flush:

IMG_2484.jpg


Entrance to fuel cooler BEFORE acid flush (5 year old fuel cooler on 5 year old boat)

IMG_2505.jpg


Exit to same fuel cooler BEFORE acid flush:

IMG_2507.jpg


The flush keeps things nice... and is easy....
 
Tip O' The Hat! Anything for my SR pals.
Chad,
Have you ever noticed acid washing having an adverse affect on your impellers? It is time for me to either take off the coolers and have them done or acid wash as you recomended. The way my Cats are set up sea water goes into the fuel coolers and then to the pumps before going through the heat exchangers.
Also as was said GREAT post.
Jack
 
Jack, I acid wash from the output side of the impeller so the raw water pump is not in the circuit. I remove the output hose on my sherwood pump and insert a PVC make up reducer to the pressure side of the flush kit pump. Hence the impeller and pump works never sees acid.

While all this is going on I drain the sea filter and pour in the acid solution until full and let stand. I'm thinking of a loop rig where I go in the strainer and then output to the pressure side of the raw water pump, cutting out the raw water pump but adding the strainer to clear any shell and corrosion in the basket etc.

This recirculating system is so slick, I'm also working through the idea of a system for the aftercooler on the airside. I'd have to Remove it and lay it horzontal and pump up from the bottom, but this few hours of essentailly R&R would really save big bucks on fuel effiiciency thru improved boost at the intake manifold. I'd use a low foaming degreaser safe for aluminium and bronze. I'll consult with TRAC on this one first tho.

Ever seen something like this done?
 
Last edited:
Chad and Gary--- great post! This should be a sticky . Ric


I'm due to reflush the mains in August and I'll take photos then.

Gary, would a special maintenance thread be handy to post the in depth How Too DIY things make sense here? Where everything is sticky and saved in context of the proceedure. IE this thread is in transmission coolers vs a more aptly headed thread of "cleaning and care of raw water systems? We have a wealth of DIY stuff her ethat has to be teased out though searches, slow cumbersom searches at that.
 
Chad,
I love where you have went with this. You also Gary.
I thought my sea water went through my aftercoolers thus I figured I would kill several birds with one stone. I will have to do more research on this.
Your idea is sound you just have to find out what the aftercoolers are made of.
Also I reread Gary's post and It seems like his acid wash gets his aftercoolers also. Gary you want to chime in? Do you wash your aftercoolers seperatly?
One last question. What does the acid do to the zincs?
Jack
 
Last edited:
I'm not a "spurt" on Cats, but the concept of the after cooler is a heat exchanger has to be similar. Where post turbo compressed air is extremely hot as it passes through a sea water cooled radiator like fins and the air further compressed by cooling to a tighter density, hence packing more air (O2) into the cylinders.

The cooler is little more than a box or chamber for sea water to collect and the be rammed upwards through tubes that are inside the radiator fins. The sea water removes heat from the air and proceeds onto other heat exchangers in the system.

With that back light, the flushing we've been discussing only cleans the sea water side of the after cooler. Not the air side.

The airside is separated from the raw water by a radiator or condenser coil like core ... with very narrow fins. Like you’d see on a home ac condenser unit, will clog up with dirt that passes through the air filters. And yes a lot dirt gets past the air filters. Plus the oil vapors from the crack case vent get though as well. The condensed oil will burn off from high temp of the turbo compressed air, but the sticky soot/ash collects on the fins along with the dirt. Over time air has a hard time getting through the cooler and boost is lost as the coils get so clogged you can't get light through.

The typical Rx for this is to make sure the “Walker Airsep” filters are always cleaned at least every 150 hours (in car talk 10K or 10K miles). The “as specified” for a Cummings 6CTA, every 600 hours you remove the after cooler, extract the inside cooler and have it cleaned by ultra sound, the tubes re-soldered as required and then reassembled and sealed. The shop should do a 48 hour pressure test before delivery, to make sure you aren't going to feed sea water to your pistons.

What I'm considering adding to the flush cycle is to flush the air side at say every 200 hours to clean the radiator like vanes that the air passes through. Clean means efficient and high boost. High boost means better combustion and more speed for the same gal of fuel.

I'm motivated to reduce wasted fuel by fuel cost, and to put off by the high cost of the teardown and being out of service for a week to ten days this gear is in the shop.

If I can flush the airside and dry it without removing the core it will save 300 bucks a side in shop charges and I can perform this cleaning more frequently to maintain high efficiency over the 600 hour teardown cycle. And perhaps lengthen the tear down cycle altogether.

As you saw in Gary's photos with the raw water side this flushing keeps the water side spanky clean, and presents no reason to tear it down for cleaning and as long as its pressure tight. The duty cycle is now dictated by the needs for boost pressure. So that’s the idea any way.

On mine I'd have to remove the After cooler and take it to a vice or otherwise brace it, install a plumbers rubber reducer to take the 2" air outlet down to a 1 inch hose led to the flush pump, then a similar rubber reducer on the turo inlet side similarly reduced to the return line and the flush bucket. By pumping the cleaner up from the clean side of the cooler core to the dirty side, I'd lift the dirt and crud out and into the bucket, with the chunks collecting in the bottom. Run a 5 gal bucket of cleaner through there at 500Gal per hour for two hours and I'm thinking I'd get a decent cleaning of the cooler coils while still installed in the housing. If so. after a good neutralizing rinse, and air drip dry over night, and a pressure test to design boost pressure plus 20% and if I'm holding air, I'm reinstalled.

Its not a huge savings on the shop charges, but by more regular cleaning I 'm betting I'm going to get whole lot better fuel burn.

Doing this every 200 hours on the checkbook plan would be prohibitive and the labor would kill the fuel savings. But on the rainy weekend DIY self plan ... I'm liking it!

More to follow once I get the cleaning solution spec'ed.


Forum statistics

Threads
113,171
Messages
1,427,826
Members
61,083
Latest member
wavespestcontrol
Back
Top