

kvduff
Well-Known Member
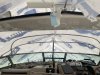
After gaining some experience sewing the upholstery in my 1998 450 I made the bold statement to some boating friends that I think I could sew my own winter cover. After many beers, and having talked about it so much, I had to put my words to action. The marina I winter store with has a ridiculous mark up and only allows their authorized people to shrink wrap boats. After researching materials I settled on a fabric called harbor time edge made by a company called trivantage.
To get started I made a template based on the shrink wrap installed last season. While it was still intact I patterned the curves of the bow and hull with tyvek house wrap. Using the midline of the shrink wrap support line to hold my tyvek in place and tucking behind the bow rails I was able to pattern the top half of the boat. From there I patterned the outside from the bow rail to the rubrail on the outside of the wrap. And then the same from the rub rail down to the boot stripe. A lot of alignment markings were made on the different pieces.
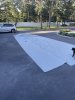
Took it all home and let it sit over the summer as I planned my attack. Bow parts had to be done first. So I started there. It was then that I realized folding and rolling fabric were going to be 90 percent of the work.
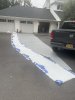
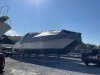
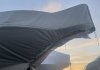
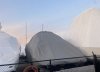
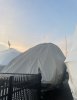
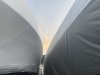
Originally planned for one continuos piece from bow to the arch but realized quickly that it was too bulky/heavy. Ended up dividing the cover in half from bow to the arch, portside/starboard, installed grommets and covered with a Velcro flap. From the arch back to the stern I did the same, grommets laced the front halves together with the stern half, all covered with a Velcro flap sewed to the front halves.
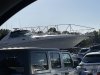
More than happy with results. A few adjustment ate to be made atthe bow and along the arch. But it s easy enough to lower off the boat and sew. To secure along the keel, I sewed 1.5 inch webbing and fixed with clips. Take a look at the pics.
To get started I made a template based on the shrink wrap installed last season. While it was still intact I patterned the curves of the bow and hull with tyvek house wrap. Using the midline of the shrink wrap support line to hold my tyvek in place and tucking behind the bow rails I was able to pattern the top half of the boat. From there I patterned the outside from the bow rail to the rubrail on the outside of the wrap. And then the same from the rub rail down to the boot stripe. A lot of alignment markings were made on the different pieces.
Took it all home and let it sit over the summer as I planned my attack. Bow parts had to be done first. So I started there. It was then that I realized folding and rolling fabric were going to be 90 percent of the work.
Originally planned for one continuos piece from bow to the arch but realized quickly that it was too bulky/heavy. Ended up dividing the cover in half from bow to the arch, portside/starboard, installed grommets and covered with a Velcro flap. From the arch back to the stern I did the same, grommets laced the front halves together with the stern half, all covered with a Velcro flap sewed to the front halves.
More than happy with results. A few adjustment ate to be made atthe bow and along the arch. But it s easy enough to lower off the boat and sew. To secure along the keel, I sewed 1.5 inch webbing and fixed with clips. Take a look at the pics.
Attachments
-
 22D280FF-681E-4654-9D74-4B777C576942.jpeg182.6 KB · Views: 192
 -
 C9B4EC1E-20FE-459B-9276-2207F9517774.jpeg125.1 KB · Views: 190
 -
 83E129ED-ED99-47BF-9492-5DE4F4A58595.jpeg156.5 KB · Views: 188
 -
 0780CF14-E545-439E-BA23-AC7533D27A6A.jpeg164.1 KB · Views: 186
 -
 FB805331-A825-440F-9022-E65685386F4D.jpeg152.6 KB · Views: 184
 -
 8D4B5C23-DBE8-45AD-ACD1-088EB073646A.jpeg69.6 KB · Views: 181
 -
 140A4494-2252-4060-ADC5-6567FDBA218E.jpeg111.5 KB · Views: 185
 -
 29F4926B-9C4E-476B-97EB-7C3A2D1B48D7.jpeg65 KB · Views: 183
 -
 DB2D8FAA-84FD-475D-8F05-0E3B2CAABF7A.jpeg78.8 KB · Views: 195
 -
 F9DA50E8-EE1B-4A81-B527-BC1DA77C1D9B.jpeg135.4 KB · Views: 194

") .
.
