AKBASSKING
Active Member
- Apr 13, 2008
- 4,649
- Boat Info
- 1988 Yacht Fisher
- Engines
- Twin 375hp Cat 3208 T/A
Well,
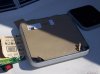
I had to replace the "big" hatch on the bow. I could not find parts for the old hatch which was the original Taylor made 20 X 20 hatch. I was able to use the handles to rebuild the 12 X 12 hatches with new risers.
I removed the old hatch and cleaned the surface. The new hatch is a 20.25 X 20.25 Bomar. I used a rough rasp file to enlarge the hole to fit the new hatch.
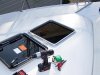
I removed about 1/4 inch of the wood filler and replaced it with an epoxy wood filler to seal the fiberglass and prevent water intrusion. I then laid the hatch in the hole and pre-drilled the new screw holes, and then ran a screw into each hole. I took an air hose and blew the area to clean all the dust. Yes I was wearing a respirator and safety glasses. Wiped the area down with a damp cloth.
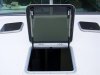
Next I disconnected the hatch base from the hatch cover to ease in the installation. I then laid down a heavy bead of silicon on hatch base, and then carefully laid the hatch down on the surface. Then I installed the screws in a Chris-cross pattern.
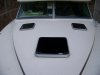
After the silicon set and dried I installed the hatch cover. Project done and a great looking hatch. Tested the area with water and no leaks.
I had to replace the "big" hatch on the bow. I could not find parts for the old hatch which was the original Taylor made 20 X 20 hatch. I was able to use the handles to rebuild the 12 X 12 hatches with new risers.
I removed the old hatch and cleaned the surface. The new hatch is a 20.25 X 20.25 Bomar. I used a rough rasp file to enlarge the hole to fit the new hatch.
I removed about 1/4 inch of the wood filler and replaced it with an epoxy wood filler to seal the fiberglass and prevent water intrusion. I then laid the hatch in the hole and pre-drilled the new screw holes, and then ran a screw into each hole. I took an air hose and blew the area to clean all the dust. Yes I was wearing a respirator and safety glasses. Wiped the area down with a damp cloth.
Next I disconnected the hatch base from the hatch cover to ease in the installation. I then laid down a heavy bead of silicon on hatch base, and then carefully laid the hatch down on the surface. Then I installed the screws in a Chris-cross pattern.
After the silicon set and dried I installed the hatch cover. Project done and a great looking hatch. Tested the area with water and no leaks.