Unique wiring problem, I think...

dev6315

Member
Jul 11, 2009
371
Myerstown, PA
Boat Info
2005 SeaRay Sundeck 240
Engines
5.7mag Mercruiser with bravo 3
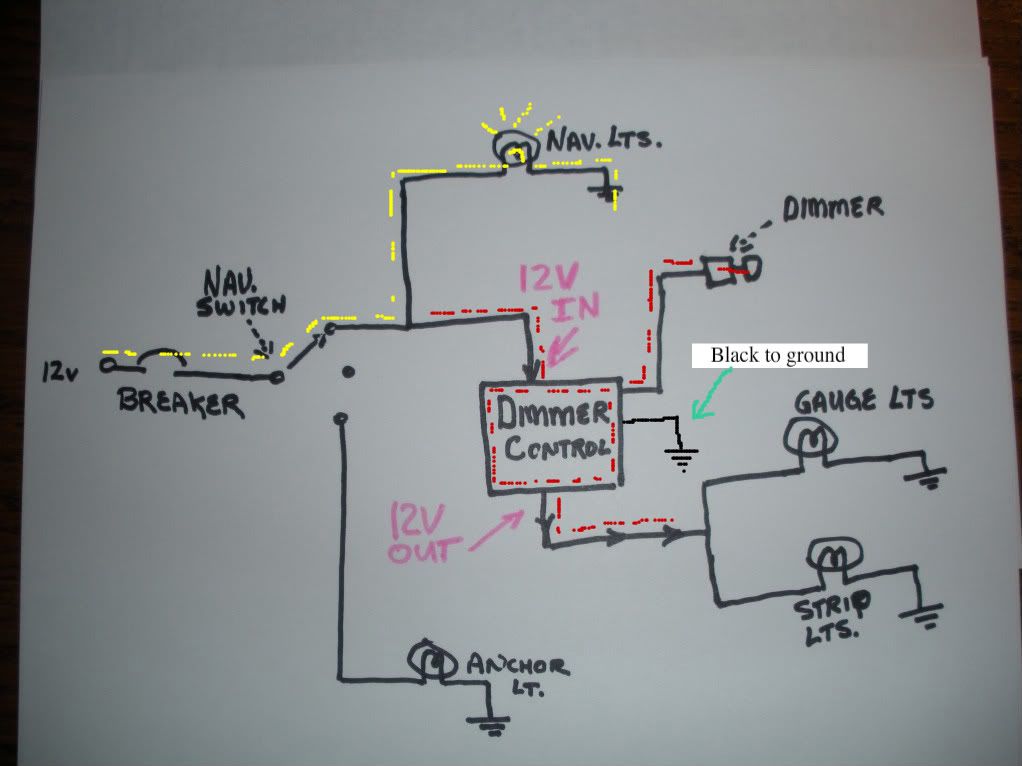
I just got done wiring in all new gauges. Lights DID NOT work before. I traced all the power and ground wires to a black box, approx 2"x3" with a auto spade type fuse in it. I bypassed the dimmer knob...connected the black to the ground bus under the dash and connected the yellow and green together.

Lights would flicker when I turned on the NAV lights. I noticed the connectors holding the spade fuse was loose. I found one was broken. I bypassed the fuse just to see if that was the problem...after about 10 minutes...all of a sudden I had lights. Turned everything off, waited a min, turned on, NOTHING. :smt021. I have a Blue-Green-Yellow-Black wired going in. Then a thicker gauge red that was connected to the fuse. They are set in an epoxy type bed, I cant access. I am thinking this box is the culprit, I THINK. Does anyone know how this box is wired so I can bypass, tie in the correct wires and add my own fuse. Everything else on the panel works perfect without the box connected, switches and gauges, just no lights. ANY ANY ideas or suggestions are appreciated.
No part numbers or anything on it.
 
The “black box” that you are talking about is probably the dimmer control module. If you bypass it and try to control your dash lights directly thru the dimmer control, you will burn up the dimmer control switch and you could possibly start an electrical fire if the dimmer control should holdup under the higher amperage going thru it.

http://www.imtra.com/includes/pop_imagePreview.cfm?path=products/products&image=ILDIM-ROT10.jpg

Other than that, it is hard to say what you have already done. Not a good idea to fool around with the electrical system if you don't know what you are doing.
 
Last edited:
IMG-20120220-00031.jpg This is the box that had the broken fuse terminals. I only bypassed the dimmer switch because I knew that was broken back from when I bought the boat. I am more than competent to do the work and have electrical knowledge, I am at a loss however as to why there needs to be the control box? Why is everything else working perfectly? Esp the NAV lights. Why did the lights work for a few minutes, now absolutely nothing? That is why I am lead to believe the control box went. Other than bypassing the dimmer switch, I did nothing else from when the boat left the factory.
 
lol I actually had the same lighting problem , I had nav lights but no dash lights since i bought my boat , every time id bump the dimmer knob lights would flicker , so I thought it was the dimmer, as Ive never dimmed lights before i figured I could just cut the dimmer switch out and installed a toggle switch in case i ever did want to turn dash lights off for anyreason ? when i bypassed it I had to leave one wire disconnected , cant remember which ,(just did this on Saturday) this Saturday ill look , anyway after all this i still had lights that would sometimes work , after digging I too found that little black box , found when I wiggle the wires going in to the epoxy lights would come on , I then used new epexy and set the wires over the existing epoxy and made it so they would not move and walla !! fixxed ! , chit thing though i cut the wires on the dimmer too short , cant reuse it , so now I am stuck with the on/off toggle switch
 
Does this do anything for you?

Gauge2001-1.jpg
 
ok when i thought my issue was the dimmer knob ,I cut the 3 wires to it yellow,black and green I believe , I then hooked the grn and yellow to the new toggle switch , left black unhooked , the reostat dimmer knob must need a ground to work , I did not rework any of the wires on the black box except for epoxying the wires tight to the existing epoxy to make a secure connection , I wish i would have dug deeper instead of assumeing it was the dimmer knob , its now on a off/on switch , the cheapest ive found for a dimmer switch is $50. , least of my worries , atleast my lights work now.

In Dev6315s case , looks like he needs a new black box , looks pretty bad condition , must be a common issue on the Sea Rays
 
View attachment 24182 ................ I am at a loss however as to why there needs to be the control box?.................

The dimmer control box contains an electronic circuit that basically puts an electronic bias on the 12V source to reduce it. Turning your dimmer control knob changes that bias in the black box which in turn controls the output voltage to your gage/strip lights.
 
OK I understand. I thought that was the purpose of the switch, like in a Residential light switch application, there is no separate control module. When I get to the boat today, I will work on your schematic and see what I cant get to fire up. I will also try to hook in a temp toggle switch.
Big question is...If im not at all concerned about dimming my lights, can I then bypass the black box without harm to the electrical system, for a full on and off?
In advance, Fasttoys and JerryS, thank you for taking the time to work through this with me!
 
......Big question is...If im not at all concerned about dimming my lights, can I then bypass the black box without harm to the electrical system, for a full on and off?
.....

Yes, you can by-pass the black box with just a switch and a circuit breaker.
I have been looking at the picture of the box that you put up trying to figure it out.
You stated and the picture shows a blue, a green, a yellow and a black wire.
Blue is for instrumentation and general lighting. (If you look at the back of your gages, you will see a blue wire for the lights)
Yellow - according to the standard wiring code is for Bilge blowers and also alternator DC output.
Green - according to the standard wiring code is for bonding.
Black - grounds.
White - general alarm usage. I know on mine that it is used for strip lighting power input ( it T's off of the blue for the gages)

Your boat is the same year as mine, but, the black box used in mine is not like the one that you picture. Mine is like the one that I referred to with a link. I am guessing that SR changed the setup sometime during the production cycle. I know that my boat was built near the end of the production year (June 1990). I am curious, do you happen to know when your boat was manufactured?

Bottom line - since your set up is different from mine, I am not sure what you have there.
 
Well... this scenario just got a bit more interesting. I was able to narrow down my problem. It is definitely the control box. When I was at the boat tonight, I was working with an old style clamp on light with an incandescent bulb. I set the light down close to the control box, after a minute, all of a sudden I had lights and it was working perfectly. I unhooked it and hit it with a heat gun. Plugged back in, perfect. I unplugged it, left it outside for a bit, hooked it up cold, nothing, heated it up slightly, lights. This is using a toggle to bypass the dimmer. I am guessing that heat is the reason they insulated with epoxy in the first place.
I know household dimmer switches run warm, so Im guessing this may have something to do with it. Maybe the epoxy inside the box gets warm and expands and makes the needed contact. Cold=Nothing. Warm=Perfect.
JerryS. I checked my HID and it says my boat was manufactured in April of 90. That would make it a pretty early run.

At this point, I want for sure to bypass the box. I never ever foresee myself dimming the lights or needing too. Jerry, if I could trouble you for a rough schematic as to how I can wire up a bypass. Again, I have 5 wires coming in. When the lights were working, I only had power coming out on the blue and of course the red 12V power, that was always my constant, even when not working, in and out. I have the blue, yellow, black, red 12v and green. I triple checked, everything else behind the switch panel is good and tight, no loose connectors or wires. Thank you very much in advance. This is a new one to me.
 
It is easy enough to bypass the dimmer and dimmer control module. All that you need is a switch, some connectors, etc. The hard part is getting in there and finding the wires that you need to connect together.

The main thing is to find the blue wire going to the gauges and the white wire going to the transformer for the strip lighting. You get 12v to those two sets of wire and you will have gauge lighting and switch backlighting. Put a switch in there from the output for the nav lights and you are in business. The switch can go in the hole vacated by the dimmer.

Other008.jpg
 
Last edited:
Jerry, again, thank you very much. I am going to work on this tonight.
 
Jerry, schematic worked like a charm. everything works perfectly on the toggle. Installed, In place of the dimmer and looks factory. Many thanks to you!!!
 

Forum statistics

Threads
113,283
Messages
1,430,015
Members
61,151
Latest member
KMadden
Back
Top