AEO
Active Member
- Feb 6, 2019
- 446
- Boat Info
- 2008 44DB
GHS Swim Platform
2018 AB w 15hp Merc
- Engines
- Cummins QSC500’s
Does anyone know if our hull material below the water line is solid or cored? TIA
Follow along with the video below to see how to install our site as a web app on your home screen.

Note: This feature currently requires accessing the site using the built-in Safari browser.

I took a quick look but can't locate the pictures. I will resurrect my old phone and see if they are on it somewhere...Thanks!
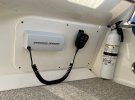
The pictures will help a lot. I can get the wire up and behind the couch from behind the cockpit fridge. It would be better through the engine room if possible.
There is a 110V outlet on the side of the storage under the bed near the floor. That would be a great place for the 12V outlet.
Cheers!
Solid.Does anyone know if our hull material below the water line is solid or cored? TIA
I don't disagree!!I’ve ordered two new vacuum pumps and a new discharge pump.
Call it a pre-emptive strike but all these stories are enough to make me have nightmares. The one thing I don’t want to do when out on the water is to spend my time up to my armpits it you know what … It’s a 16 years old boat now so time to invest so money in the toilet systems.
Thanks. Planning on installing Hull Shield.Solid.
@Bruce SEA 993 now that i may have to replace my front center panel I'm considering the panely with wiper option. Do you have additional photos of the setup from the inside. Found this company below that sells them. https://ajrmarinewindows.com/View attachment 141493 Thanks!
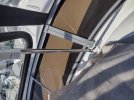
We do not have an opening at the forward part of the flybridge...we have a glass insert with a wiper mounted in it. The curved corners are fixed. I just added a picture...you can really see the wrinkles. The glass insert shows up and the lack of front ventilation. So far, we haven't needed it.
A vent like the 380 Sundancer had would be nice but not needed up here in the Northwest all that often. The sides can be open and maybe the back and no flapping.
Thats great info. Thank you! My only concern is not being able to open for airflow. But i think i could have a vent added to the top of the isenglass panel. Also looks like the control wire and power is run through one of the supports?I have the canvas insert that is on their website. It has the wiper built in with the washer. Right now the washer does not work but I don't miss it. I need to replace the little pump...no biggie.
Still would like a vent at the front for some air movement. Sometimes when it is hot here and we are running with the wind, it gets warm up top. The corner isenglass has been replaced with polycarbonate...much better material and it holds its shape and is very clear.View attachment 160916
I has the same support arms shown on their picture. It is a very simple setup and really works well to keep a clear view in all of our rainy days...or spray over the bow. When I replace the pump I will refill the washer tank with Rain-X washer fluid. The Rain-X does work well on the cars. I used the windshield treatment for years but I find the washer fluid does a good job to touch up as it is harder to apply the polish by hanging out the front of the corner canvas.
I thought the Rain-X fluid was a brand marketing gimmick but it does work.
Anyhow, if you need specific pictures let me know. I will be running down to the boat this afternoon.
Cheers!
I just ask sea ray that question about our 2006 44 sedan bridge. They said no coring in hull.Does anyone know if our hull material below the water line is solid or cored? TIA
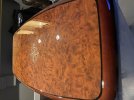
Looks better than new. I want to try this but afraid to make it worse. I have cracks in the clear coat. What was your process to restore?Stripped down my cracked salon table, and was able to bring it back to life.
I sanded by hand with a fine grit sand block until I got past the resin coats. I had a wet rag I used to manage the progress. Keep in mind, the table is not real wood, and I suspect it is a veneer top. Be careful of the black strip, it is thin and you can sand through it. I used a high grade contact paper used for faux wood trim in cars. I cut a template inside of the black border, traced it on the contact paper, cut and then adhered to table top. I also bought a chrome vinyl compass rose that I stuck centered on the table. Last step was a flooding of resin. I was told I could not refinish the table, which to me, meant challenge accepted. I thought, worst case scenario, I’d have to buy a real table. Hope this makes sense.Looks better than new. I want to try this but afraid to make it worse. I have cracks in the clear coat. What was your process to restore?
I’m not clear on why you did the contact paper. Can you explain further? Was it to mask off an area?I sanded by hand with a fine grit sand block until I got past the resin coats. I had a wet rag I used to manage the progress. Keep in mind, the table is not real wood, and I suspect it is a veneer top. Be careful of the black strip, it is thin and you can sand through it. I used a high grade contact paper used for faux wood trim in cars. I cut a template inside of the black border, traced it on the contact paper, cut and then adhered to table top. I also bought a chrome vinyl compass rose that I stuck centered on the table. Last step was a flooding of resin. I was told I could not refinish the table, which to me, meant challenge accepted. I thought, worst case scenario, I’d have to buy a real table. Hope this makes sense.