

paulswagelock
Well-Known Member
Injector replacement Mercruiser 8.1 496 mag
I purchased a new set versus just cleaning. I found an online Mercruiser parts dealer selling OEM set for $349 for the set of 8. That is not much more than having them serviced.
I rate this project as a 4 knucklebuster out of 5. For perspective, I rate changing the plugs and wires on the 496 as a 1.5 knucklebuster. All left and right perspective is looking from the front of the engine to the rear. Keep in mind you will loosen and move the ECM so not for the faint of heart. Also, lube the injector o rings and pintle cap before installing. Also, put a rag over the schrader valve on the left side of the fuel rail and press the needle to release the pressure before starting. Shut off the batteries since you will be messing with the ECM.
Tools needed are minimal. A metric socket set with 1/4 and 3/8 drives and 4" extensions, Metric box wrench set, 4" small flat screwdriver with narrow head and a hex wrench set.
To get started, take the engine cover off using the hex wrenches. There are 3 screws to remove. That allows access to the top of the engine. Careful with the screws as they are not locked in the cover.
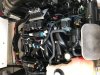
Next up is the mess covering the injector fuel rail. I included the picture below so can see all of the things in the way. In order, here are the things to remove:
4 nuts on the fuel rail studs that hold the wiring bracket and top of the ECM. This starts the process of moving things for access.
2 nuts holding the rest of the ECM bracket. They are lower near the exhaust manifold on the right side.
2 nuts holding the shift bracket rear right and lower near exhaust manifold, and loosen the far rear left one so the assembly pivots out of the way.
2 nuts on top left of coolant reservoir and loosen the front one (need to shift the reservoir for access to lift the fuel rail).
Remove the coolant over flow hose for access.
Now you can remove the 4 studs securing the fuel rail in place.
Carefully lift and move the ECM assembly and all the wires on top of the engine off to the right side. There is enough slack in all of this to not need to unplug and remove anything.
There is now enough access and room to carefully pry the entire fuel rail up to pop all eight injectors out of the manifold but connected to the fuel rail.
I started at the front left as it had the easiest access. Use the small flat blade screwdriver to slide the injector clip off. Careful as they will fly away easily. Then pry the injector down and out of the rail. Keep a rag handy as gas will leak out and to keep the hole in the intake manifold covered. Spin the injector for access. Squeeze the green safety clip holding the electrical plug and pull it out half way. Then use the small flat blade to press on the locking tab and remove the green clip completely. Press the tab and the electrical plug will come off. Injector is now free. Take the new injector and connect the plug. Then press the green safety clip back in. Pay attention when you remove the green clip as it only fits one way. Once the plug is secure, press the injector back up into the rail. It takes a bit of pressure. Then take the injector clip and press it back onto the rail locking the injector to the rail. Pay attention as it only fits one way as well. Continue the process for all eight.
Once done, press the fuel rail and injectors back into the intake manifold and put the fuel rail studs back into the intake manifold to lock the rail in place. Then reassemble all of the components removed in the opposite order.
Overall it took me about 2 hours. Access is tough and you need to be extra careful with nuts and bolts, clips etc as once they fly away you will not find them.
I purchased a new set versus just cleaning. I found an online Mercruiser parts dealer selling OEM set for $349 for the set of 8. That is not much more than having them serviced.
I rate this project as a 4 knucklebuster out of 5. For perspective, I rate changing the plugs and wires on the 496 as a 1.5 knucklebuster. All left and right perspective is looking from the front of the engine to the rear. Keep in mind you will loosen and move the ECM so not for the faint of heart. Also, lube the injector o rings and pintle cap before installing. Also, put a rag over the schrader valve on the left side of the fuel rail and press the needle to release the pressure before starting. Shut off the batteries since you will be messing with the ECM.
Tools needed are minimal. A metric socket set with 1/4 and 3/8 drives and 4" extensions, Metric box wrench set, 4" small flat screwdriver with narrow head and a hex wrench set.
To get started, take the engine cover off using the hex wrenches. There are 3 screws to remove. That allows access to the top of the engine. Careful with the screws as they are not locked in the cover.
Next up is the mess covering the injector fuel rail. I included the picture below so can see all of the things in the way. In order, here are the things to remove:
4 nuts on the fuel rail studs that hold the wiring bracket and top of the ECM. This starts the process of moving things for access.
2 nuts holding the rest of the ECM bracket. They are lower near the exhaust manifold on the right side.
2 nuts holding the shift bracket rear right and lower near exhaust manifold, and loosen the far rear left one so the assembly pivots out of the way.
2 nuts on top left of coolant reservoir and loosen the front one (need to shift the reservoir for access to lift the fuel rail).
Remove the coolant over flow hose for access.
Now you can remove the 4 studs securing the fuel rail in place.
Carefully lift and move the ECM assembly and all the wires on top of the engine off to the right side. There is enough slack in all of this to not need to unplug and remove anything.
There is now enough access and room to carefully pry the entire fuel rail up to pop all eight injectors out of the manifold but connected to the fuel rail.
I started at the front left as it had the easiest access. Use the small flat blade screwdriver to slide the injector clip off. Careful as they will fly away easily. Then pry the injector down and out of the rail. Keep a rag handy as gas will leak out and to keep the hole in the intake manifold covered. Spin the injector for access. Squeeze the green safety clip holding the electrical plug and pull it out half way. Then use the small flat blade to press on the locking tab and remove the green clip completely. Press the tab and the electrical plug will come off. Injector is now free. Take the new injector and connect the plug. Then press the green safety clip back in. Pay attention when you remove the green clip as it only fits one way. Once the plug is secure, press the injector back up into the rail. It takes a bit of pressure. Then take the injector clip and press it back onto the rail locking the injector to the rail. Pay attention as it only fits one way as well. Continue the process for all eight.
Once done, press the fuel rail and injectors back into the intake manifold and put the fuel rail studs back into the intake manifold to lock the rail in place. Then reassemble all of the components removed in the opposite order.
Overall it took me about 2 hours. Access is tough and you need to be extra careful with nuts and bolts, clips etc as once they fly away you will not find them.
Attachments
Last edited: