Mid-90's 270 Sundancer Thread

Starting batteries provide a lot of cranking amps for the heavy draw from a motor, but once the motor is running, that demand drops out. Using a refrigerator while under way isnt a problem at all. I wouldnt recommend relying on a starter battery for usage while anchored and expecting it to keep you running for 24 hours long, but its more than enough for a few hours. Your best bet is to keep your battery switch to your starter battery while starting and underway, and feel free to use any of your DC devices while you're running, but once you stop, switch over to your house batteries and use them for all your DC

Thanks Sicktght311, that’s how I will run it from now on!!
 
Thanks Sicktght311, that’s how I will run it from now on!!
NP. This is all of course under the assumption you're connected to shore power when you're done with your day, allowing both batteries to stay fully charged. If your dock space doesnt have shore power, and you're relying on the motor to charge your batteries, then you will want it in the "Both" position while the motor is running. 1 to start it, Both for running, 2 for house battery when anchored
 
Just recently replaced the thermostat in my 97 7.4L carbureted merc with standard cooling. According to my serial number and the online parts catalogs plus the boat repair shop I went to when I broke the plastic retaining spacer it takes a 160* thermostat. The one that came in the engine when I bought the boat 2 years ago must have been a 140* as that is what the gauge always read( 140ish or 12 o'clock on the gauge face).

I've searched the forum and have seen people say because it's standard cooling it should have a 140 but none of the info I find through searches agrees.

So my question is what thermostats are you guys running if you have the same engine configuration? I'm sure a season at 160 isn't going to affect anything just want to know for my own knowledge.
 
Just recently replaced the thermostat in my 97 7.4L carbureted merc with standard cooling. According to my serial number and the online parts catalogs plus the boat repair shop I went to when I broke the plastic retaining spacer it takes a 160* thermostat. The one that came in the engine when I bought the boat 2 years ago must have been a 140* as that is what the gauge always read( 140ish or 12 o'clock on the gauge face).

I've searched the forum and have seen people say because its standard cooling it should have a 140 but none of the info I find through .

So my question is what thermostats are you guys running if you have the same engine configuration? I'm sure a season at 160 isn't going to affect anything just want to know for my own knowledge.

If you have raw water cooling, 160 degrees is the OEM thermostat. The 140 is for closed cooling
 
If you have raw water cooling, 160 degrees is the OEM thermostat. The 140 is for closed cooling
Actually scratch that. I didnt see you have carburated not MPI. If i remember correctly based on previous posts, the 160 thermostat is for EFI/MPI, and the 140 is used on the carbureted 454s.
 
This is from an online parts catalog I found. For my serial number (which seems to only apply to one model year of engine 96-97) it shows the thermostat as 160*.

Maybe I should email Merc and see if they have an opinion.
 

Attachments

  • upload_2023-6-12_10-21-13.png
    upload_2023-6-12_10-21-13.png
    312.5 KB · Views: 49
Stick to what the serial number recommends. The next years moved up to MPI. We have a 99 MPI and its 160 as well
 
Stick to what the serial number recommends. The next years moved up to MPI. We have a 99 MPI and its 160 as well

I went through the three options in the merc parts catalog looking at thermostat temps and found this info

7.4L Bravo '88-91 used a 140* in both new and old thermostat housings

7.4L Bravo Gen V '92-96 came in two options. 140* or 160* depending if there was a heat exchanger or not.
upload_2023-6-12_11-43-7.png

upload_2023-6-12_11-43-49.png


7.4L Bravo Gen VI '96-97 uses a 160*

Looks like everything after uses a 160*

I tired emailing and calling Merc directly but both options don't work. The telephone support is just an endless loop of no one is home and the email "contact us" gave me an error each time.
 

Attachments

  • upload_2023-6-12_11-43-24.png
    upload_2023-6-12_11-43-24.png
    314.4 KB · Views: 46
Boo! Somebody needed to say something in here. It’s winter time in TN with snow on the ground and I have cabin fever. Cheers!
 
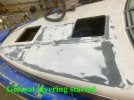
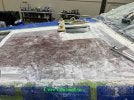
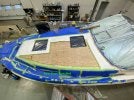
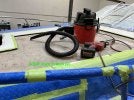
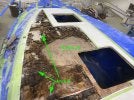
So, ive been a way for a while and thought I'd come back to share some recent work ive had done on the 270. I had noted in a few other threads (or maybe above) I was going to use inject-a-deck to do a fiberglass core repair. After purchasing great gobs of the stuff along with the applicators, wringing my hands alot, a coming into a bit of spare cash, I decided to have the core repair done professionally. When I bought the bought back in 2019 I new there was core rot around the front bow hatch and a self repair was always in my future plans. But, unfortunately at the time, I didnt check around the entire foredeck to see the situation around the back foredeck hatch. That was by far worse (area B first photo). I was lazy about where I measured with my moisture meter at the time of my survey and only later at home did I notice the weakness around that back foredeck hatch. See first photo -Note area A is where I had used a 3/8" 2 foot long drill bit (with vacuum) to gow-out the rotten core between the upper and lower gel surfaces. After considering the quality of the self repair with Inject-a-deck and the larger size than what I had originally thought vs professional repair, I bit the 15K bullet and had the professionals repair. Again, the first photo shows after the top coat removal and how extensive the rot was. The next series of photos are throughout the repair process by the professionals. A completion, its much stronger now that OEM with the marine grade 3/8 plywood installed in the core. When I say stronger, the OEM style included 3/8 thivk 3"x3" squares laid in and fiberglassed around vs my current repair which includes scored 3/8 plywood installed to match the foredeck surface. I got a custom skid pad surface as well on the finished surface that I havent got photos of yet but will post a few when I have a chance.

BTW -The rotten core was a result of prior owner not paying attention to hatch seals. Had they paid attention, they could have avoided this 15K bill by simply rebedding the hatches in 3M 4200. I recommend to everyone you rebed your bow hatches regardless of whether you think they need it or not at least every 5-10 year. Inspect every year.

Now that the foredeck repair is complete, I am moving on with a high performance refit of the BBC. Hope to get 430HP out of the refit and should have done in 2 months. Will post update of that when Its complete. WIll likely have to reprop the BIII due to increased HP and will likely go with Hill Marine 4x3's as well.
 

Attachments

  • Forum Post 5.jpg
    Forum Post 5.jpg
    110.9 KB · Views: 23
  • Core Glassed in.jpg
    Core Glassed in.jpg
    659.1 KB · Views: 22
  • Forum Post 3.jpg
    Forum Post 3.jpg
    364.1 KB · Views: 24
  • Forum Post 2.jpg
    Forum Post 2.jpg
    437.9 KB · Views: 21
  • FOrum Post 1.jpg
    FOrum Post 1.jpg
    625 KB · Views: 23
So, ive been a way for a while and thought I'd come back to share some recent work ive had done on the 270.
What a beautiful job, and I am jealous

I have a soft deck just in front of my Bow window on my 2001, 290. I cannot bring myself to spend the 15k to fix it. I bought the boat at a discount knowing it had the soft deck and I will likely sell the boat at a discount as it doesn't seem logical, as I would never get any value out of the 15k. Does the soft deck bother me to high hell.... yes, do I need to jump around on the deck in front of the window. Hell no lol
 
Thanks for the comment Jonl21. When you say Bow window, which one, forward most or rear like mine? There is a possibility to fix cheaply if its not a large area like mine was. Might be worth getting a decent moisture meter (i use a Protimeter Aquant Non-Destructive Moisture Meter - BLD5765) and measuring the size of the rot. If its not a large area and encompassed within 24" or so of the hatch, you could easily repair with Injectadeck. Look at my first photo. Note I was able to gow out a good amount while keeping both the top and bottom gel surfaces intact by using a 3/8" drill bit on a 24" extension. Then, you go to home depot get a bunch of cheap 3/8in or 1/2 in poly tube and inject the foam through the 24 inch poly tube filling from the back to the front with no need to drill holes in the top deck. This will only work if its a smaller area and the only way to know that is to measure with a GOOD moisture meter. I know a guy (me) who has a bunch of injectadeck with the applicators (https://injectadeck.com/product/large-boat-kit/) you can get cheap. The stuff is rated at 12#/sq.ft which is pretty strong. Just saying......
 
"Now that the foredeck repair is complete, I am moving on with a high performance refit of the BBC. Hope to get 430HP out of the refit and should have done in 2 months. Will post update of that when Its complete. WIll likely have to reprop the BIII due to increased HP and will likely go with Hill Marine 4x3's as well."

89P270. You definitely sound like you know what you are doing. But make sure that new motor is cammed appropriately for the exhaust. Tons of HP motors have been destroyed in short order by even very slight reversion problems.
 
Right, great comment. the motor builder is installing a mild cam. What will make the horsepower are the flow of the heads and the bore increase. Sticking with Carb'd. I think we are shooting for around 8 to 9:1 compression or there abouts. I assume when you mention reversion you mean blocking the exhaust flow and increasing pressure in the block? Keeping a mild cam and compression should support managing this situation.
 
Right, great comment. the motor builder is installing a mild cam. What will make the horsepower are the flow of the heads and the bore increase. Sticking with Carb'd. I think we are shooting for around 8 to 9:1 compression or there abouts. I assume when you mention reversion you mean blocking the exhaust flow and increasing pressure in the block? Keeping a mild cam and compression should support managing this situation.
I think we are talking about the same thing. But for clarity, in a wet exhaust system there is a very high risk of 'sucking' wet exhaust back into the cylinders due to valve-timing on certain cams. This is not at all uncommon on modified motors, and will destroy a new engine in short order. Even factory motors from Marc have had this problem. Make sure your engine builder knows exactly what he is doing with that cam and marine wet exhaust.
 
Thanks for the comment Jonl21. When you say Bow window, which one, forward most or rear like mine? There is a possibility to fix cheaply if its not a large area like mine was. Might be worth getting a decent moisture meter (i use a Protimeter Aquant Non-Destructive Moisture Meter - BLD5765) and measuring the size of the rot. If its not a large area and encompassed within 24" or so of the hatch, you could easily repair with Injectadeck. Look at my first photo. Note I was able to gow out a good amount while keeping both the top and bottom gel surfaces intact by using a 3/8" drill bit on a 24" extension. Then, you go to home depot get a bunch of cheap 3/8in or 1/2 in poly tube and inject the foam through the 24 inch poly tube filling from the back to the front with no need to drill holes in the top deck. This will only work if its a smaller area and the only way to know that is to measure with a GOOD moisture meter. I know a guy (me) who has a bunch of injectadeck with the applicators (https://injectadeck.com/product/large-boat-kit/) you can get cheap. The stuff is rated at 12#/sq.ft which is pretty strong. Just saying......
Thank you, I have been thinking of doing the injectadeck, below is a photo of the soft spongey area, it seems very localized to there. I need to pull the hatch to re-seal it and I will see the accessibility of of getting all the old junk out. I will reach out for the injectadeck if I get to it this season.

BOW.jpg
 
Yea, so if it is limited to that small of an area the inject a deck would work great. Go back up and look at my pre-repair photo. You will see that the OEM design includes a marine grade plywood perimeter around each of the window that is about 3 inch x3/8 thick. Its harder and more like plywood than the main squares cut for the curved surface sandwich wood. I suspect they added that plywood as an increased material strength just around the windows. That doesnt tend to rot like the main material sqaures. the repair guys told me the main wood outside that hatch perimeter was balsa but I dont think it is. Its much stronger than balsa but not as strong as the marine grade plywood around the hatch surround. Reason I mention all this is it may be hard to get beyond the surrond plywood if not as compromised. But, I can tell you, that area would be easy to gow out with tha 3/8 inch diameter 24 inch long wood bit I used. Then simply inject the foam from the hatch surrond with a small poly tube extension. The tubes themsleves come with about a 6 inch long tube to begin with.

Measure with a moisture meter first to guage how big and area it really is. then make a decision.
 

Forum statistics

Threads
113,253
Messages
1,429,347
Members
61,130
Latest member
VaBreeze
Back
Top