paramac844
New Member
- Aug 26, 2023
- 12
- Boat Info
- 1996 330 Sundancer
- Engines
- 7.4L V Drive
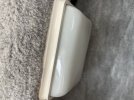
I have a 1996 330DA, I am looking for the Sea Ray Part #596072, light single dome white flush mount without switch, or a suitable replacement. I have been looking everywhere with no luck, does anybody have any suggestions?