windlass wiring?

Gotta say...ordered the windlass from Defender Marine Friday morning just before lunch and tracking says it will be here tomorrow. I did the regular cheap shipping. I'm in western PA and think they are in CT. Pretty impressed with their speediness...lol. I had ordered from them before but it was something small so didn't pay attention to how long it took to get here. Total for tax and shipping for the V700 was ~$747.
 
I know this is a stretch but anyone know if it is possible to buy the 8 gauge ring terminals and power posts locally, like Lowes or HD?

Also, Lowes has Loc-Tite PL marine sealant. Is it any good?

Trying to have a plan A, B, and C here. Likely I will have to order the rest of the stuff and wait until the following week to finish the install but if I can find it locally I can finish it up this weekend.
 
Windlass arrived today:)
 
Take a Naproxen about 2 hrs before you start the install. They last about 12 hrs.
lol. Yeah won't be fun. Getting in there to get the wiring done will be the hardest part. And by getting in there I mean hands and working blindly. Thinking with that camera I ordered and with the mounting holes drilled I think if we pull bow in it shouldn't be too bad.

And someone mentioned about re-attaching the motor? Not sure why I would have to do that? I was a little confused when they first mentioned it but after opening the box and reading the directions I see no reason to have to separate the motor from the windlass? The whole motor will slide right down into the mounting hole.

But I will get pics along the way
I watched an install video on Youtube about the V700. You are right that it does not separate like the Lofrans I have. Buy you cut a much bigger hole in the deck for the install. I think your install will be MUCH less painful than my re-install was. Good luck with it. I hope the wiring is simple to sort out since that seems to be the most challenging part.

One thing I noticed on the video was a recommendation to seal the inside of the cut opening. I STRONGLY recommend you do that, and if its balsa cored on your crownline, make sure you cut/grind it back a bit into the balsa and use epoxy paste to fill it back out to make sure is strong and no water gets in. Also seal inside the drilled holes for the bolts using the method of slight oversizing the holes, then filling with non-fast cure epoxy, then redrill to size. You don't want rot to start in the deck. A windlass vibrates and slightly flexes the deck when it operates or is used so you need to assume water is going to get under that gasket that Lewmar uses to seal the base of the windlass.

I had to have the deck repaired around the windlass on my 330 because Sea Ray didn't seal the windlass cut outs very well. Its an issue that is easy to avoid if you seal the holes properly.
 
Last edited:
Yeah planning on sealing the cut edges for sure. Going to fill the old bolt holes with Marine-Tek too. There is a cleat and a latch to hold the chain for the anchor that are right in the center. The cleat holes will be cut out when I drill the big mounting holes but I think the latch holes will be exposed so plan to fill them with Marine-Tek then 'countersink slightly nd fill back up with Spectrum gel paste to match it so hopefully they aren't noticeable. I could fill the holes completely with the paste but not sure if it is recommended for filling holes?
 
Yeah planning on sealing the cut edges for sure. Going to fill the old bolt holes with Marine-Tek too. There is a cleat and a latch to hold the chain for the anchor that are right in the center. The cleat holes will be cut out when I drill the big mounting holes but I think the latch holes will be exposed so plan to fill them with Marine-Tek then 'countersink slightly nd fill back up with Spectrum gel paste to match it so hopefully they aren't noticeable. I could fill the holes completely with the paste but not sure if it is recommended for filling holes?
I wouldn't use the gel coat paste for a complete fill. Its cosmetic, not structural and may crack around the edge of the hole and let water in. Just get a tube of marine epoxy as the majority of the fill. I would suggest using that instead of Marine-Tex too. Marine-Tex in the jar is too thick and doesn't soak into the wood as well. You could use this and mix and fill the holes. Drill holes on a deck are easy because you can put some masking tape or duct tape on the bottom to keep it from leaking out while it cures. I generally try to use slow cure regular epoxy for hole filling though because it gets more time to be absorbed into the wood before it kicks off.
81bMGbxPXcL._AC_SX569_.jpg
 
Yeah for the fresh cut edges I wanted to use something more liquidy to soak into the pores. My step-son has some 3M Marine Premium Filler (3M Unique Vinyl Ester Formulation). Was going to use that to fill the holes and use the epoxy you posted for the fresh cut edges?
3F2444C7-4808-4CEC-9516-7BF14B46E762.jpeg
 
Last edited:
Polyester or epoxy resin would both work equally well. Poly is quite a bit cheaper - especially for a one-time use. Holes can be completely filled with either, as well. If the holes are larger, and you will not be coming back to re-drill, then add some reinforcement like cheap fiberglass strand. Just cut it up and mix it in with the pour. Gelcoat can be applied over top of either. You want LIQUID poly or epoxy to soak into the coring. It will make a better bond, in the end. The stuff Creek pictured would be plenty adequate for the job, as well - if that will be enough for your job.
 
Polyester or epoxy resin would both work equally well. Poly is quite a bit cheaper - especially for a one-time use. Holes can be completely filled with either, as well. If the holes are larger, and you will not be coming back to re-drill, then add some reinforcement like cheap fiberglass strand. Just cut it up and mix it in with the pour. Gelcoat can be applied over top of either. You want LIQUID poly or epoxy to soak into the coring. It will make a better bond, in the end. The stuff Creek pictured would be plenty adequate for the job, as well - if that will be enough for your job.
Thanks. Yeah should be plenty. I used that stuff before on our old 250DA when I mounted a new depth finder. Drilled them oversized then filled with that Loc-Tite epoxy then drilled the correct size into the epoxy
 
Bought some of that Loc-Tite epoxy today and found an old tube of 4200. Hope it's still good cause I don't know anyone that sells it around here. Gonna try to get started on it tomorrow. Will get pics
 
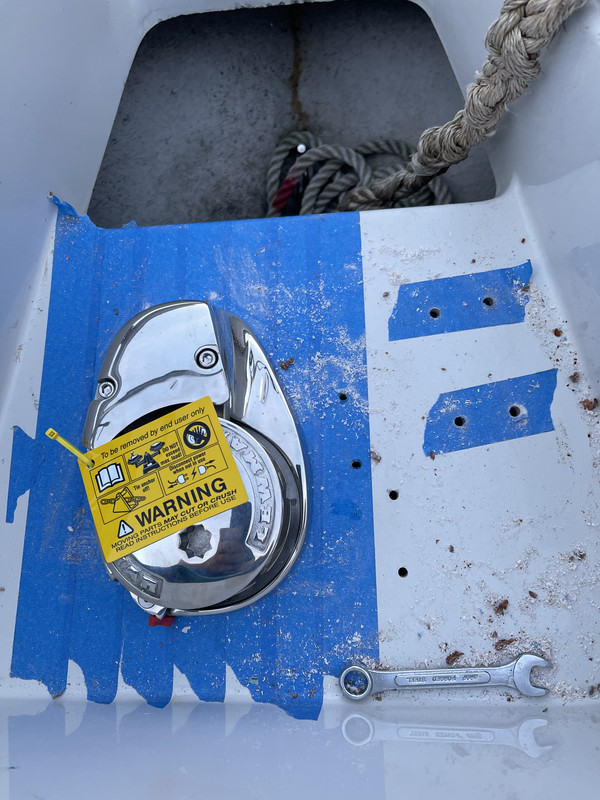
Well started the install today. Got the holes all cut and dry fit the windlass and all was good. Still can't find the wires. A guy at our marina that is a Kicker stereo dealer and a mechanic actually fit his head in there and the wires I thought may be them are orange with a white tracer and yellow. Those are the same colors as my horn wires. Guy said he is pretty sure they are 10GA wires but we are both confused why a horn would need 10 GA wire??? I pulled the recessed panel out where my battery switch and Lewmar breaker are and the both the inlet and outlet wires head back towards the engine bay which now leads us to believe the wiring may run up the port side??? And in the locker the big conduit comes in on the port side so tomorrow I am going to look in the engine bay to try to find that wire and try to see where it goes. I also checked the windlass switch at the helm and there are 3 wires connected to it so the assumption is there is a contactor mounted somewhere. I reset the breaker and hit the switch on the helm and did not hear any clicking other than the switch itself clicking. But if the breaker wire runs to the back then where would the contactor be mounted???

Here are some pics from today. I also coated the fresh cut edges with epoxy to seal them.


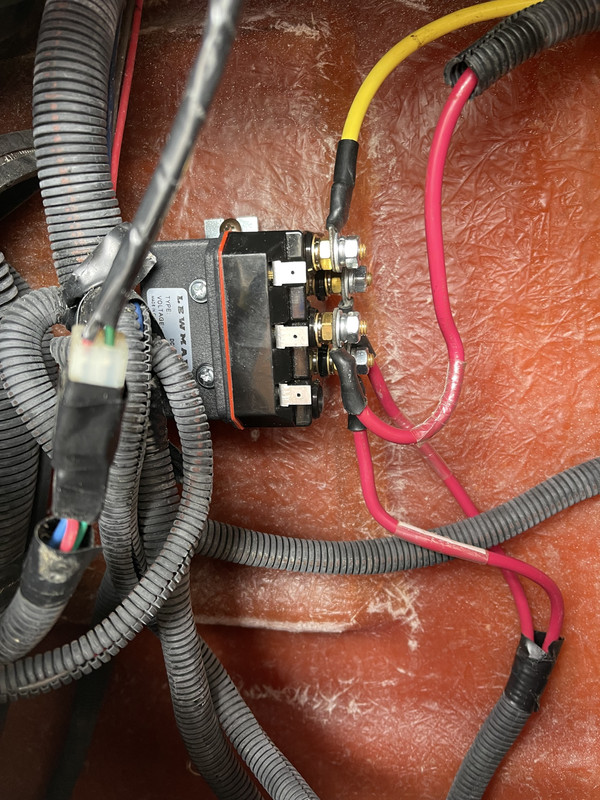
I am very frustrated after today. Yellow wire running from the engine bay and stopping right behind the cupholder beside the helm. The red wire runs from the factory installed Lewmar breaker and also stopping beside the helm. Right next to those wires are 2 more red 8GA wires and all 4 have ring terminals attached but the wires are just hanging there. The switch on the helm has wires connected to it and there is a bundle of 3 wires hanging near the 8GA wires. Today I installed the contactor (relay solenoid) with all of these wires attached under the assumption these were the correct wires (have not powered the breaker on yet until I verify these). I did verify that the red and yellow are the wires coming from the 35A breaker and the engine bay ground. I pulled the cabin trim piece out far enough to see that there were 2 conduit runs running behind it, one larger and one smaller. The larger one also has 2 red 8GA wires inside it so that is why I assumed the wires behind the cupholder were them. There wires run all the way to the front bulkhead behind the 4" trim piece. Here is where the problem lies. These wires do not come out into the anchor locker. The smaller conduit does and has smaller gauge wires. The larger one seems to disappear into that bulkhead. I pulled my speakers and there are 3 layers of about 3/4" plywood with about a 3/4" gap between 2 of them. I used my mini camera to get down inside there and there is a larger conduit running over towards the port side however I cannot find the end. It does not exit into the locker. I pulled every wire out of every piece of conduit in that locker and those 2 red wires are not there. So one of two things happened...1) it runs across towards the port side and stops somewhere in there or 2) that conduit in that gap has nothing to do with those wires and the wires actually are terminated and bundled up right at the bulkhead. I can't see for sure if they go through the bulkhead cause the vinyl material is stapled to the wood behind that trim board and the conduit seemed to go through the bulkhead so I didn't tear into it any further.
I'm wondering if I can grab them and pull them out from that gap? I have no idea what else they could possibly be running? The only issue with that is that if they are connected to something I may rip the wires out but more likely is that I just won't be able to pull them? Part of me says to just order new wire and start from scratch. Not sure what else to do here?
I'll try to load some pics.
Seems I was lazy with pics today. Grabbed a bunch of video trying to figure out what went where but this was the only pic I took.
 
Last edited:
There's clear heat shrink on those three wires with what looks to be identifiers contained inside. Can you get a mirror or something behind there to read those? That might give a clue as to where the other ends go.
 
So talking to my wife just now and think I might go back down in the morning and try grabbing those wires behind the trim and give them a pretty good tug and see what happens. I can't figure out anything else those 8GA wires would be for other than windlass so doubt they are connected to anything? If that fails then maybe order new wire and start from scratch?
 
There's clear heat shrink on those three wires with what looks to be identifiers contained inside. Can you get a mirror or something behind there to read those? That might give a clue as to where the other ends go.
I looked at that and its just white paper with purpelish smudging so any writing that was on there is not legible. But I'm 99.9% sure those are the right wires as they match the ones running up towards the anchor locker in the cabin. Also, I'm on the Crownline forum but there isn't much activity on there so as more 'generalized' questions here. There is a member there that has the exact same boat that has a factory installed windlass and his wiring matched mine exactly except his actually exits through the bulkhead...lol. He posted pics and it looks identical and the wires come through right on the other side of the bulkhead where mine stops. Given all that I'm almost certain it's the right wire. If I could find the ends I could test them for continuity to be sure but that's where I'm hitting a roadblock...lol
 
Got it. Will add details and pics later but just got home and I'm starving and exhausted. But the wires were there and were sandwiched in that gap between the bulkhead boards
 
So the Crownline (at least our 2006 250CR) has 3 layers of plywood at the front bulkhead. There is about a 1/2" gap between 2 of them. My wires ran up the starboard side behind the trim piece but never exited through the bulkhead to the locker. I could see conduit in that gap but couldn't reach it. In the one pic you can see a screw hole on the edge of the speaker hole. I removed that screw and then could wiggle the inner-most sheet of plywood. That gave me enough room to grab that conduit and pull it out. BINGO!!! There they were. And there was another smaller conduit with 3 wires that are for the foot switches. Next issue was there was a screwed wire tie attaching those runs to the plywood in between and I couldn't reach it to cut it so just used a spade bit to drill a hole just below the speaker hole on the outermost sheet (the locker wall). Went and got more epoxy and sealed those edges.
Plan to go down Thursday evening and run those wires through that new hole so then they will be in the locker. The contactor is all wired up and clicks when I push the switch at the helm. Not sure if those are backwards or not yet so left that panel off in case I need to switch those wires. I also need to re-attach my bundles to the bulkhead after I cut them all loose looking for those wires.

Ordered the power posts tonight so will install those Thursday and should be able to finish everything up. It has been an adventure but in the end I only spent about 16 hours or so on it and about 6 of those was just trying to find then ends of those wires.


Forum statistics

Threads
113,180
Messages
1,428,032
Members
61,088
Latest member
SGT LAT
Back
Top