300 Sundancer questions.

Does anyone else get water accumulating in water tank area? Seems there is no drain and water finds its way in there and just sits with no where to drain. Stinks and gets moldy!

I opened up port side hatch next to water tank and found little bit of very moldy water also. Shop vac'ed it out and going to open other hatches this weekend. Does stink and is pretty nasty!
 

I opened up port side hatch next to water tank and found little bit of very moldy water also. Shop vac'ed it out and going to open other hatches this weekend. Does stink and is pretty nasty!

"port side hatch" = under the aft cabin seating? I havent had any issues that I'm aware of, as indicated by funky smells, but I've also never opened up anything under that seating area to see the water tank.
 
The starboard side is pretty simple. 5 Screws and tilt the old sender toward you while pulling it out.The new unit goes in the same way, just looks tight.

The port side requires the removal of the battery switch panel (4 screws) to gain access above the existing sender. The wires are long enough to just set aside the panel w/ switches while working on this sender. I only had to cut the foam as a 4" hole was already in place (maybe from O E installation?)
This side requires a little dexterity when removing and reinstalling the screws but if patient it isn't too bad. I didn't ask for a quote from anyone but have read the price for installation varied from $100 to $200. Self installation for me was a no-brainer. BTW there is no flex on the Royce tube, it's SS.
Well, couldn't take the terrible fuel level readings so my Royce 20" senders arrived today. No instructions of any kind came. But its just 5 screw holes and two wires (same as on the currently installed sender). Although there is a red tie wrap on the top (will be above the tank) and a clip on the very bottom (which will be in the tank). Not sure if I am supposed to leave those on or take them off to allow for sliding in and out new innards if needed. Guess I'll call Royce. I am going to do the starboard tank first since its so easy to replace and run it for a while before I do the port side.

Update: Found installation instructions online
 
Last edited:
Under aft cabin cushion. Unscrew plywood cover and there she be.
 
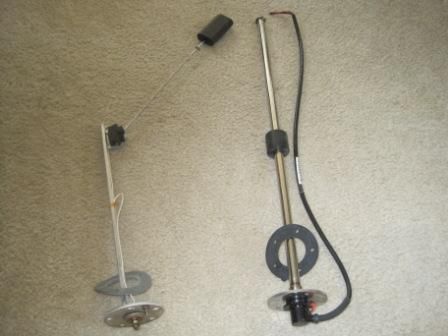
I replaced the starboard fuel sender. As you can see from the picture below the old sender had contact posts. The wiring from the boat has ring connectors that go over those posts and are secure with hex nuts. The new sender has two open end wires. I didn't want to mess with the boat wiring so rather than cut the ring connectors off and butt-connect the new sender, I crimped on a matching ring connector to the new sender wire ends. Then I bolted them together with 1/2" stainless steel bolts/washers/nuts. I used tie wraps to secure the long wire run from the new connector and to make sure the two bolts don't come in contact. Not sure if I am happy with this as a permanent connection, but it works.

Also, I am thinking there is a chance I can get the old port sender out from in the engine room by angling it out. And the same for putting the new one in. I am going to try that before I remove the breaker panel and cut the foam panel above it.

Fuel reading was immediately more accurate. Old sender read about 26 gallons remaining when it should have read somewhere between 35-38 gallons as the fuel used read 48 gallons used on the 85 gallon tank. New sender read 36 gallons remaining. I may use the other uninstalled sender and try the smartcraft tank calibration process to get a more accurate programming of the sender range. I can do that with the sender out of the tank and move the float to the right position by hand.

Here's the pic. Old primitive aluminum sender with the floating arm is on the left. New, stainless steel sender with something inside of it to read the float position is on the right:

fuelsenders.jpg
 
Last edited:
I replaced the starboard fuel sender. As you can see from the picture below the old sender had contact posts. The wiring from the boat has ring connectors that go over those posts and are secure with hex nuts. The new sender has two open end wires. I didn't want to mess with the boat wiring so rather than cut the ring connectors off and butt-connect the new sender, I crimped on a matching ring connector to the new sender wire ends. Then I bolted them together with 1/2" stainless steel bolts/washers/nuts. I used tie wraps to secure the long wire run from the new connector and to make sure the two bolts don't come in contact. Not sure if I am happy with this as a permanent connection, but it works.

Bill,

This is on my list to do.... what brand of fuel sender did you use? Also, please update if/when you do port sender. Port is not working at all on my boat (vs. starboard which is kinda working) and was looking at removing the foam and access panel. Hoping you can do without removing these.

Good luck.
I bought the 20" Royce Flexi-sender. Its $83 direct from Royce. I know I can get out the old port sender. Its thin aluminum that I can just bend as I need to to pull it out. Not sure about the new stainless steel shaft. I am going to make some measurements of the hole size needed at the insertion angle available and hope that the actual hole size is large enough.
 
Bill, I think Brian (Bridog) replaced both of his...if I remember, there was enough room to angle it in without cutting a new hole from above.
 
Bill, I think Brian (Bridog) replaced both of his...if I remember, there was enough room to angle it in without cutting a new hole from above.
That's good to hear. I am giving it a try tomorrow.

I think I figured out why the old sensor gives sketchy readings. If you look at the picture of it in my above post, the clip that holds the float to the end of the float arm works it way down (or up, actually) the arm. You can see its about an inch away from the float in the picture. This allows the float to travel up the arm when the tank is low, causing the arm to be more vertical than it should be. Thus, low level readings occur when the tank actually has more fuel in it. I think if I just pushed that clip back down to lock the float to the end of the arm, then the readings would get more accurate again (until it moved again, of course).
 
Bill,

This is on my list to do.... what brand of fuel sender did you use? Also, please update if/when you do port sender. Port is not working at all on my boat (vs. starboard which is kinda working) and was looking at removing the foam and access panel. Hoping you can do without removing these.

Good luck.
Well, the old hinged sensor came out just fine on the port side, but the 20" rigid stainless steel shaft wouldn't fit at an angle with the available space. I could just barely get the tip of the rod in, but the retaining clip at the bottom was too big to clear. Even if I could clear the clip, when I got it in far enough to have to drop the flange below the cockpit floor I am pretty sure it would have stalled out there. So, its remove the DC panel and cut the foam panel. Probably am going to save that for the off season. I have one accurate sensor in and since both engines consume fuel at about the same rate, I am in good shape for now.
 
Last edited:
LED light retrofit... Posting this here since it's for our model, but writing it up based on some discussion in the 280 forum. All the bulbs were ordered from superbright LEDs. I was having trouble finding solid links to the appropriate pieces of their pages but you can find all these under the Boat/RV listing.

Directional / “reading lights” in the cabin.
G4-WHP18-TAC. (w=warm white, cw=cool white) This has 18 led’s on a tower that gives 360 degree coverage plus some directly out the front of the fixture. I tried the one with 15 LEDs and it wasn’t bright enough for me. I also tried the G4-CWHP18-TAC but the cool color was a bit harsh for my preference. One thing I have noticed though, is that if I’m out on a rough day in the bay, I did have two of them shake loose. The front of my fixtures capture the bulb, but I did have to slide them back in. Perhaps I need to just crimp the sockets a little so they hold on the 2 pins more tightly.

Arch lights – My arch fixtures are like this (google for image) Perko 1146DP112V model which has a festoon bulb in it. For these I went with the 4210-BHP6 bulb. This has 6 high powered LEDs on a flat wafer all facing the same direction. Originally I tried the 4210-BHP12, which has 12 smaller LEDs going around the circumfrence of the entire bulb which gives 360-degree coverage. My fixtures aren’t reflective inside, so I felt I was losing light from the LEDs facing upward toward the black back of the fixture. I aimed the flat wafer straight down.

Stern light – Same Perko fitting as the arch lights. Used 4210-CWHP6 for the cool white look that matches the LED anchor light that was installed when I had my radar and sea view mount installed. This bulb is very bright, and while I don’t do much night boating, I had a friend watch as we left a fireworks display and he could see my light until we rounded a bend in the river. Well over the 2mile requirement.

My 2 cockpit lights and the one lighting the floor area by my helm were Attwood fixtures with a bayonet style base. I couldn’t find a blue replacement bulb that would fit in the housing with this style base. I found red, green, and orange from various sources, but that’s because the same style bulb is used in some nav lights. For these three, I chose to replace the fixtures with the same Perko ones as in the arch and used the 4210-BHP6 blue bulb installed facing slightly angled toward the floor vice paralell to the wall. This reduced the glare a bit while sitting in the cockpit at night. I personally hate seeing a light as opposed to indirect lights, but I never found a slightly opaque lense or frosted lense that would take some of the "hot spots" out.

Of course Murphy’s law was in full effect this year. We had an unusually large mayfly/midge season this spring and they stayed around through the summer. If you know these flies, they don’t bite, they just swarm and land on anything light colored that is lit up at night. So aside from being annoying, they leave behind green dots of either eggs or waste (not sure which) that usually requires a re-waxing to get off. So after all that effort, I only got to use my arch/cockpit lights a few times. Overall I like how it came out. Someone did make a comment though (which I never thought about, and don’t know how much I believe) which was that bug-zappers use blue lights for attraction, so maybe they’re not such a good idea. I think zapper lights look more violet however.

Hope this helps. I wish I knew what bulbs were in the overhead fixtures in the head and galley. Some are 12v and some are 110v. Guess I’ll think about that for the next few months until the shrink wrap comes off again!


James

Trying to keep all of this information together, James has done a great job with providing info to date.

Overhead fixtures in the galley and above the sofa (Plan B). For the 120V lights and as I have seen mentioned here once before, an adapter is needed. Go to any good lighting supply house and tell them you need adapter to convert Candelabra to European bulb. They will provide a $2 part that looks like the base of a Candelabra bulb, it allows a Candelabra bulb to be screwed in to in and then the whole assembly is screwed in to the fixture. For some reason, Sea Ray used a European bulb for this fixture. From superbrightleds.com, I ordered E12-WW12, LED bulb in warm white. The original bulb was 25 watts (in a small enclosed fixture which accounts for why it gets SO HOT) and LED equivalent is only 10-15 watts. Is is dimmer but I either use the 12V light or use the overhead reading lights as well. I have not run it at full night yet, only dusk and seemed to be fine. The challenge is finding an LED Candelabra that outputs more than 10-15W but will also fit in the fixture. If someone finds a better one, please let us know.

As a side note on the 120V, when I originaly installed the 120V LED and adapter, it did not light. I suspected that the LED did not screw far enough into the adapter and took it back to the lighting store. They put it in a tester and it lit right up. Went back to the boat and WITH THE POWER OFF!, I took a screwdriver into the fixture and pulled out the tab at the bottom of the fixture that makes contact with the bulb and the light lit right up. Bottom line, the adapter was not making contact with the tab until I pulled it further out.

For the 12V bulb, any G4 bulb will replace this one. I took a G4 bulb from overhead reading light that PO had replaced and it fits in the fixture fine.

Nice to have a setup that generates less heat and uses less power, especially on the hook and at 12V.

EDIT - not any G4 bulb will work for overhead fixtures due to size. I have two disk types from PO in the reading lamps and these fit fine. I am going to order more overhead fixtures and reading lamps and plan to try below units

http://www.superbrightleds.com/moreinfo/led-bi-pin/10hp-led-disc-type-g4-base-white/489/1636/
 
Last edited:
Ok, next issue for me. First year with new to me boat and it has been one issue after another, feels a bit like peeling an onion. My friends say it is because I want everything right and maintenance is a high priority.... who knows.

When I bought her, I found water stains in the aft cabin, port side "secret compartment" and under mattress in same corner. It had been dry (check it often) until a few weekends ago when it POURED when we were out and it was damp in stern side of secret compartment. I suspect water leaking into the arch so a re-sealed aftermarket radar dome mount and VHF antenna mount.

I have also found water in the access compartments on the starboard side of the aft cabin. 4 screws and the panel lifts up to find two compartments where water hoses and head lines run between ER and the cabin. I orginally found stale water in both compartments with clear leak point in the left one. I shop vac'd water out and few weeks later found water in the right one. I suspect that either water is leaking from cockpit washdowns or from caulking that is shot between windshield and hull. Think it is too far foward to be leaking through the arch. Not sure if there is other ways for water to get to this area.

It poured again today and secret compartment was dry but starboard compartments had some water. Could have been fom rain or another time from other sources, not sure.

Anybody have any experience with leaks in this area?
 
See my post on page #95. I'm pretty sure this is where your water is coming from.
 
See my post on page #95. I'm pretty sure this is where your water is coming from.

Perhaps its a coffee shortage this AM that's preventing me from finding your post, but I went to post #95 on this thread and also page #95 but didnt see anything related to leaks... Just curious.

Thanks
Jim
 
Last edited:
Sorry, post # 945, or page 95. Anyway, below is a cut and paste. I can take a picture of the silicone fix I did if anyone is interested, once I get back into town. By the way - my 02 300 is up for sale if anyone is interested. Will get it posted up shortly.


I saw some folks with mystery water in the galley sump box area. Took me forever to figure it out but I would imagine every 300 is the same way. The water comes in through the bathroom window if you don't tighten the black latches with a screwdriver. The water runs behind the molded fiberglass bathroom piece (between the fiberglass piece and vinyl covered wall) and makes its way into a fiberglass compartment under the aft seat on the port side (use a screw gun to access the carpet covered hatch). Once that compartment fills up with water, it spills over a pipe routing hole (I think) and makes its way to the sump box area. Once that filled up some, the water would eventually make its way to the aft carpet where we would notice a wet floor. It took me years to figure this out because it was somewhat of an intermittent problem. I've tested it with a garden hose and proved my theory. Simple fix - bead of almond silicone just below bathroom window so the water coming in the window goes into the bathroom and not behind it. And, most importantly, leave a screw driver in the bathroom so I remember to tighten the window latches when I close it.

Stupe - Huge piece of data for me, thanks. I could also imagine that this could be causing the leak in my starboard "secret compartment" from water leaking in starboard windows. What do you think?

Also, if you could send a picture, I would greatly appreciate it. I think I understand what you are talking about but would like to be sure. As you say, problem is intermittent so tough to be sure it is fixed.

Thanks again for again proving the value of this forum. Sorry to hear you will be selling your 300, hopefully for the right reasons...

Best,
Jason
 
Here's a picture of the bead of silicone I put below the window. You wouldn't think a tiny leak in the window would amount to much but it eventually does. The silicone allows the water to flow into the bathroom (where it eventually makes its way to the sump) without going behind the fiberglass mold. Of course, if you just tighten the black plastic latches tightly you don't have to worry about water coming in.

Anyway, sad to see the 300 go but my wife had a bad skiing accident last year and we need a bigger boat to get her around inside. I love the boat but things are just too tight inside now. Need something with bigger door openings.
 

Attachments

  • Bathroom window.jpg
    Bathroom window.jpg
    21.7 KB · Views: 373
Here's a picture of the bead of silicone I put below the window. You wouldn't think a tiny leak in the window would amount to much but it eventually does. The silicone allows the water to flow into the bathroom (where it eventually makes its way to the sump) without going behind the fiberglass mold. Of course, if you just tighten the black plastic latches tightly you don't have to worry about water coming in.

Anyway, sad to see the 300 go but my wife had a bad skiing accident last year and we need a bigger boat to get her around inside. I love the boat but things are just too tight inside now. Need something with bigger door openings.

Stupe - stopped by the boat today and pushed on the fiberglass piece and it literally came off in my hands. Very wet behind it and I can see EXACTLY how water comes in behind it. Already bought the almond silicone and on the list of things to do this weekend. Appreciate the guidance and the picture. All 300 owners in our model year should check the aft cabin hatch for water collection. My guess is more have it then know it. Good place for mold and mildew to gather, not like we don't have enough of this already!

Sorry to hear about your wife, skiing is great especially in the area you live but does have it's downsides. Looking at glass as half full, opportunity for bigger boat. Good luck with everything. I was in Saratoga area for first time recently, great town!
 

Forum statistics

Threads
113,247
Messages
1,429,244
Members
61,127
Latest member
Ants84245srv
Back
Top