

James Lister
New Member
- Aug 12, 2021
- 23
- Boat Info
- 1989 Sea Ray 180 Outboard Bowrider
- Engines
- Johnson 150 VRO
Hello fellow Sea Ray members.
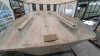
I've found myself in need of some advice and/or potential factory build plans.
http://www.clubsearay.com/index.php...180-bowrider-restoration.107849/#post-1290894
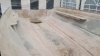
This is the link to where I've posted all the images. To summarise, I've ripped out everything, right down to the hull. The stringers have gone, and everything inside the hull needs re-building. I took dimensions beforehand, but some sort of factory information would be helpful. Is there such a thing available please?
Thanks,
James
I've found myself in need of some advice and/or potential factory build plans.
http://www.clubsearay.com/index.php...180-bowrider-restoration.107849/#post-1290894
This is the link to where I've posted all the images. To summarise, I've ripped out everything, right down to the hull. The stringers have gone, and everything inside the hull needs re-building. I took dimensions beforehand, but some sort of factory information would be helpful. Is there such a thing available please?
Thanks,
James


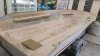

") .. Exterior ply is fine, will last a long time if maintained.
.. Exterior ply is fine, will last a long time if maintained.