Surface Prep for Vitricore replacement

dtfeld

Water Contrails
GOLD Sponsor
Jun 5, 2016
5,572
Milton, GA
Boat Info
410 Sundancer
2001
12" Axiom and 9" Axiom+ MFD
Engines
Cat 3126 V-Drives
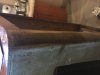
Getting ready to re-laminate my fridge cabinet with some new Vitricore from Restoration Marine. Working with John @PlayDate to get the material, and there are plenty of examples on how to install the new material on the website.

Two Issues - Surface Prep and what Contact Adhesive.

1. Surface Prep - What is the best way to clean up the cabinet surface after the old laminate material has been removed. It looks to have a thick coat of various adhesives and left over Vitricore. It has a gummy/sticky feel to it. I was thinking just sanding from course to fine, but looks like the gumminess would clog up a lot of sand paper. So...just sand paper? Scrape it off, then sand? Chemical remover?

20230113_123158.jpg


Anybody with real world experience in the removal of the residual contact cement would be helpful, for me to get the right materials in place to get the job done.

2. Contact Adhesive - Somewhere buried in the 50 threads on the subject, there was a recommendation for the "best" contact cement. Of course I didnt write it down. What the brand name and a source?

Dave
 
When we did the installation work, we used progressive sandpaper grits and power sanders to get the surface smooth. Any surface anomalies will show up in the new laminate if they are not addressed.

I would not use chemical adhesive removers on MDF or plywood. The likelihood of those chemicals permeating the surface and reducing contact adhesion is too great.

We recommend Weldwood clear contact cement. Weldwood is compatible with the adhesive that comes pre applied on the back of the laminate.

upload_2023-1-22_12-48-45.jpeg
 
Thank you!

Heading out to stock up on sand paper. This should be fun! Cabinet too big to get out of the cabin, so all the sanding will have to be done in place.
 
A 5” orbital with a vacuum port is your best friend (along with a mask) to keep the dust down. The dust gets everywhere.
 
If you’re looking for a reason to spend even more money on this project, the Festool RO150 has the best dust collection I’ve ever seen and would make quick work of this job between the forced rotation and then random orbital for the finish

what’s another ~$650 for the right tool?!
 
If you’re looking for a reason to spend even more money on this project, the Festool RO150 has the best dust collection I’ve ever seen and would make quick work of this job between the forced rotation and then random orbital for the finish

what’s another ~$650 for the right tool?!
$650 seems to be a reoccurring number for this project. I think I’ll pass.
 
@dtfeld - From my experience, attempting to sand off old contact adhesive will just clog and gum up the sandpaper. A frustrating waste of time and sandpaper. I've had reasonable success pulling sharp edged scrapers and very sharp chisels (in a scraping action) across to remove the bulk of old adhesive. Then with a Lacquer Thinner soaked rag wipe the surface well. the Weldwood solvent-based (don't use water based for this) contact cement that @PlayDate showed earlier is hands down the best. It will bring that thin remainder of adhesive that is left after scraping back into solution and dry together. Then apply a coat of the Weldwood on the new Vitricore and allow it to dry. Then place the new Vitricore on the cabinet surface and roll it and finally trim the edges.

As an edit - I would use a brush rather than roller to apply the contact cement and make sure the brush keeps a wet edge throughout the application.
 
@ttmott

I like this idea a whole lot better! I've been dreading trying to sand the cabinet inside the cabin. I'll do it if I have to, but I'm going to attempt this first. If, nothing else to de-bulk the residue. Either way I'll be ready with the tools/supplies to get this done right.

I spoke to John @PlayDate the other nite before ordering a sheet of material, and we spent more time discussing the re-application.

New fridge is making its way across the country already. Thought I had another several weeks, but it will be here next week.

I have a few projects that i thought I would have time to work on, but now it game time!
 
I started to removed the old glue. Its a B**CH! Attempted to just scrape it off, but scraping alone didn't even touch it.

51B40F15-496A-4BD5-B9C6-690F31508E74.jpeg


I had some Goof Off that I keep in the dock box, so I tried that. The Goof Off softened it up, but didn't necessarily remove it either.

However, once softened up with the Goof Off, I was able to scrape off the residue. Looks like there may be 2 coats, as it takes repeated softening/scrapings to get it off and down to bare wood..


F3FC7069-C479-46C0-AB7A-058224950939.jpeg


After a lot of elbow grease, I was able to get a pretty decent sized section down to bare wood, and the surface is extremely smooth. This was about 2 hours of work.

A69D813B-DF54-4594-8C7C-A29DDDC4F167.jpeg


Its probably going to take me a couple more hours to get this prepped, but no sandpaper used, and the mess is easily vacuumed up.
 

Attachments

  • 015917B5-ABCD-4478-90B8-341491E37754.jpeg
    015917B5-ABCD-4478-90B8-341491E37754.jpeg
    113.4 KB · Views: 170
@dtfeld - From my experience, attempting to sand off old contact adhesive will just clog and gum up the sandpaper. A frustrating waste of time and sandpaper. I've had reasonable success pulling sharp edged scrapers and very sharp chisels (in a scraping action) across to remove the bulk of old adhesive. Then with a Lacquer Thinner soaked rag wipe the surface well. the Weldwood solvent-based (don't use water based for this) contact cement that @PlayDate showed earlier is hands down the best. It will bring that thin remainder of adhesive that is left after scraping back into solution and dry together. Then apply a coat of the Weldwood on the new Vitricore and allow it to dry. Then place the new Vitricore on the cabinet surface and roll it and finally trim the edges.

As an edit - I would use a brush rather than roller to apply the contact cement and make sure the brush keeps a wet edge throughout the application.


Tom....the new laminate comes with a super aggressive adhesive backing.....no need to coat it. Nuvacor switched to that because a lot of the problems people experienced were glue related. In fact, the guys applying the glue in many cases at the SR factory were inconsistent with its application (spray gun).

10 seconds of history: Newmar was the original Vitricor supplier to SR. They licensed the patents to produce the material from Nuvacor (1995). Around 2004 SR switched laminate suppliers to Lignapal produced by a company in Norway. Newmar shut down and was sold to another manufacturer and no longer had rights to produce Vitricor.

We struck a deal with Nuvacor in 2006 to manage the boating market and preserve most of the SR custom finishes. Nuvacor had moved on to other global markets such as Healthcare and Retail providers so it worked for both of us. Today's Nuvacor product is on its 4th generation which means it has evolved to be scratch and UV resistant.

Lastly.....the two most popular Vitricor/Nuvacor SR finishes were Sovereign Cherry and Executive Cherry. It is unfortunate that several other custom SR finishes were lost in the process most notably Light Maple.
 
I started to removed the old glue. Its a B**CH! Attempted to just scrape it off, but scraping alone didn't even touch it.

View attachment 139362

I had some Goof Off that I keep in the dock box, so I tried that. The Goof Off softened it up, but didn't necessarily remove it either.

However, once softened up with the Goof Off, I was able to scrape off the residue. Looks like there may be 2 coats, as it takes repeated softening/scrapings to get it off and down to bare wood..


View attachment 139360


After a lot of elbow grease, I was able to get a pretty decent sized section down to bare wood, and the surface is extremely smooth. This was about 2 hours of work.

View attachment 139361

Its probably going to take me a couple more hours to get this prepped, but no sandpaper used, and the mess is easily vacuumed up.


That looks really good!

Nice work.

John
 
Tom....the new laminate comes with a super aggressive adhesive backing.....no need to coat it. Nuvacor switched to that because a lot of the problems people experienced were glue related. In fact, the guys applying the glue in many cases at the SR factory were inconsistent with its application (spray gun).

10 seconds of history: Newmar was the original Vitricor supplier to SR. They licensed the patents to produce the material from Nuvacor (1995). Around 2004 SR switched laminate suppliers to Lignapal produced by a company in Norway. Newmar shut down and was sold to another manufacturer and no longer had rights to produce Vitricor.

We struck a deal with Nuvacor in 2006 to manage the boating market and preserve most of the SR custom finishes. Nuvacor had moved on to other global markets such as Healthcare and Retail providers so it worked for both of us. Today's Nuvacor product is on its 4th generation which means it has evolved to be scratch and UV resistant.

Lastly.....the two most popular Vitricor/Nuvacor SR finishes were Sovereign Cherry and Executive Cherry. It is unfortunate that several other custom SR finishes were lost in the process most notably Light Maple.
Ah - I didn't know it came with the backing. Cleaner yet... Thanks.
My boat has the Lignapal - some of the product is laid over complex shapes and is getting a bit "foggy". Is there any way to replace that? It looks as if it was put in a press and heat formed over the substrate.
 
Around that 2004 period SR made a number of decisions that changed how they assembled the interior. With Vitricor it was my understanding that they had their own workers/contractors spraying adhesive and laminating the cabinets.

I'm pretty sure a decision was made to outsource that work and focus on boat building once they switched to Lignapal. Rusty probably has the real answer. In any event....they used cold forming presses on the Vitricor and probably (I'm speculating) the same technique on Lignapal.

The combined thickness of the Lignapal was approximately (.6mm) the same thickness of the Vitricor (.040") which made radius areas almost impossible to do without a cold form press. 98% of the replacement material we sell is .020" material which works great for tight radius turns.

In regards to how Lignapal is made.....it was an actual wood veneer covered by a sheet of polycarbonate material. SR had them make a series of custom finishes which is why no supply of the material remains. I checked their website today and it seems that they no longer offer the polycarbonate option and have gone back to lacquer.

https://www.leeuwenburgh.com/en/products/lignapal/

When new.....the material was really beautiful but like any other laminate..the marine world is unforgiving. What worked great in offices and kitchens is challenged by high humidity, UV rays and heat. This was the first time the material had been used on boats.

We get a lot of calls on Lignapal but the key to making it last is keeping the interior environment stabilized for temperature and humidity. Just so you know....this is what happens when the environment is not stabilized.

upload_2023-1-28_14-13-45.jpeg


upload_2023-1-28_14-14-26.jpeg


upload_2023-1-28_14-16-3.jpeg
 
John @PlayDate - These are the corners with the detail. The last pic shows a bit of fogginess I'd like to correct. I can match the finish using aniline dyes and satin polyurethane but corner piece would need to be removed and replaced with a suitable wood. The boat stays airconditioned at all times. Ideas?
IMG_7518.jpg
IMG_7517.jpg
IMG_7516.jpg
 
Tom,

Let me take a closer look at this tonight. I recall them using real wood corners to manage the cabinet edges. Lignapal could not bend to that radius so color matched end pieces were an easy solution.

I expect the cabinet was assembled with the end pieces finished …..the question is how are they attached?
 
Someone on here used a high end wrap to cover the corners….. it looked pretty good and matched really well
 
John @PlayDate - These are the corners with the detail. The last pic shows a bit of fogginess I'd like to correct. I can match the finish using aniline dyes and satin polyurethane but corner piece would need to be removed and replaced with a suitable wood. The boat stays airconditioned at all times. Ideas?
View attachment 139401 View attachment 139402 View attachment 139403
I have the exact fogging going on with some of those exact pieces on my boat. I need to deal with this soon myself as the fogging gets worse every year. Going to require a lot of disassembly and I am betting they glued this stuff together...just saying as they cut a lot of corners IMO. Which means sand and repair in place and deal with a big mess.
 
Received a full sheet of Vitricore from John @PlayDate this morning. It is a complete match on the grain. Color looks to be a little lighter compared to the old fridge panels, but I doubt it will be noticeable in the cabin.

now to get the cabinet prepped and this new material applied.

4BDFD4CC-AC4F-4572-A0ED-A00A3DE8B50D.jpeg
 

Forum statistics

Threads
113,171
Messages
1,427,826
Members
61,083
Latest member
wavespestcontrol
Back
Top